What’s the difference?
If you started your journey in digital photography using Photoshop, you like most others are likely familiar with the Curves Adjustment, and use it to adjust contrast, white point and black point in your images. Compared to Photoshop, Lightroom is a relative late-comer, arriving on the scene in 2007 (Photoshop has been around since 1990). So, it’s not surprising that when photographers move to Lightroom they tend to gravitate immediately to the familiar and use the Tone Curve for basic contrast and mid-tone adjustments.
That would be a mistake.
Starting way back with version 4, Lightroom introduced two features to the controls in the Basic Panel which make it the preferred tool with which to begin your editing: image-adaptive contrast control and highlight recovery.
Most people who do use the Basic panel slide right past the Contrast slider and dive straight into the Highlights, Shadows, Whites and Blacks below. Again, this would be a mistake. Lightroom adapts the tone-mapping controls in the Basic panel to optimize them for the contrast range of each image. Adjusting the Contrast control before moving to the other tone-mapping sliders is an important step to set you up to use the rest of them to optimum effect. It’s important to reduce the contrast setting for high-contrast images before moving to the other tone adjustment sliders. Similarly, it’s important to first increase the contrast with low contrast images, before making other tone adjustments.
Lightroom has an, at times, uncanny ability to recover highlights lost to overexposure: as long as the highlights are not blown in all three RGB colour channels; if there is detail in at least one channel (better yet: two channels) logic built into the Highlights slider can often reconstruct the missing data in the blown channel(s). This doesn’t mean we can get away with sloppy exposure, but it’s nice when, on occasion, we mess up. Let’s look at an example.
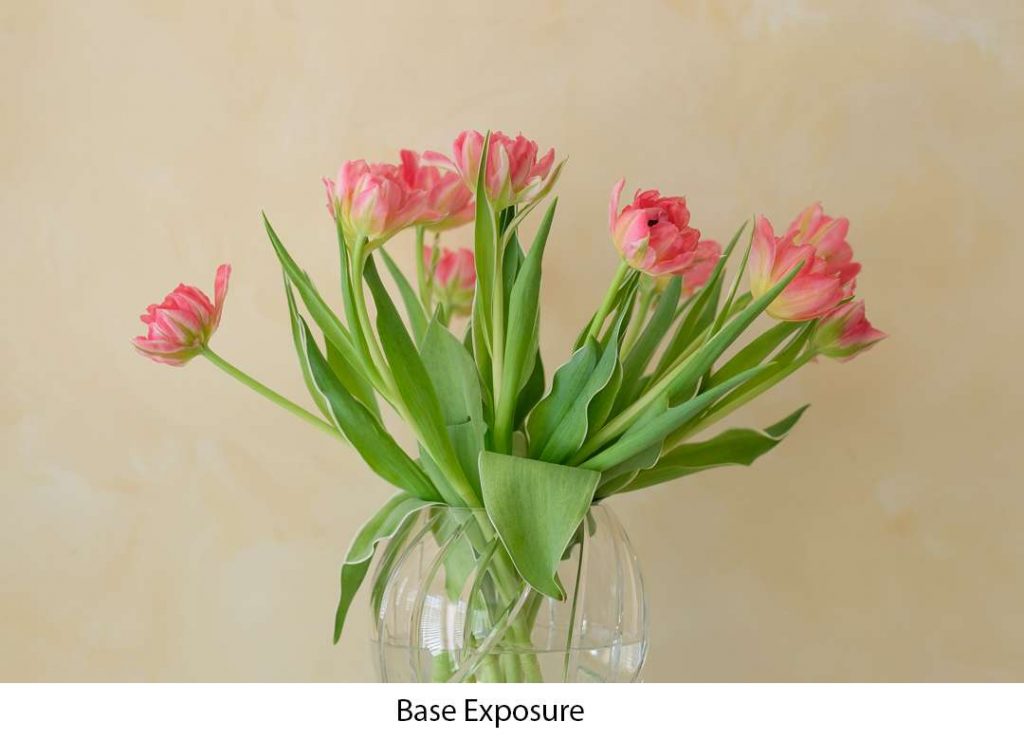
The image below is correctly exposed, the one immediately after it is deliberately over exposed by 2 stops.
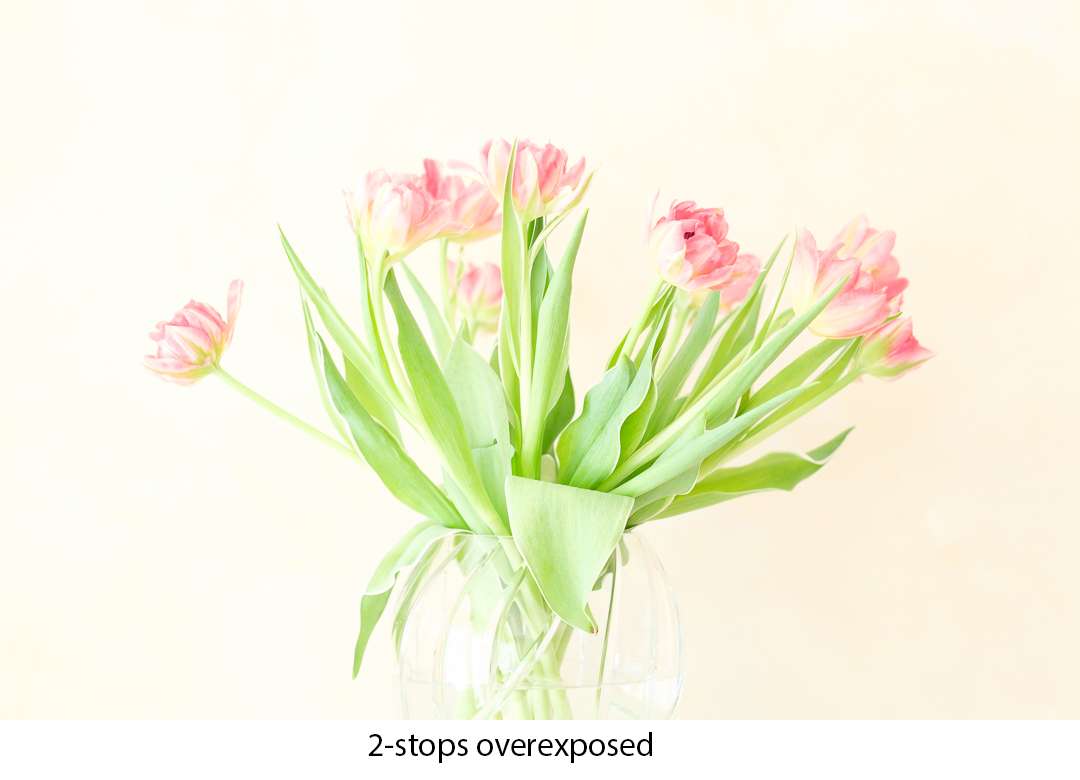
While it looks like there may be no hope for the over exposed image, a look at the Lightroom Clipping Display (ALT-click the Highlights slider (OPT-click on a Mac)) shows that we have clipping mostly in the red channel, with a little in the green channel as well. However, the reflection on the glass vase is almost completely blown.
One of the first effects of over-exposure is to squeeze the lightest tones together at the top of the tonal scale. This loss of separation creates clumps of similar tones with sudden transitions between them, rather than nice subtle gradations. You can easily see this in the lightest areas of the tulips in the overexposed image above. Part of Lightroom’s ability to recover highlight detail, includes the ability to reconstruct the original tones and the separation between them. There are limits of course, but let’s see what we can do with this overexposed image.
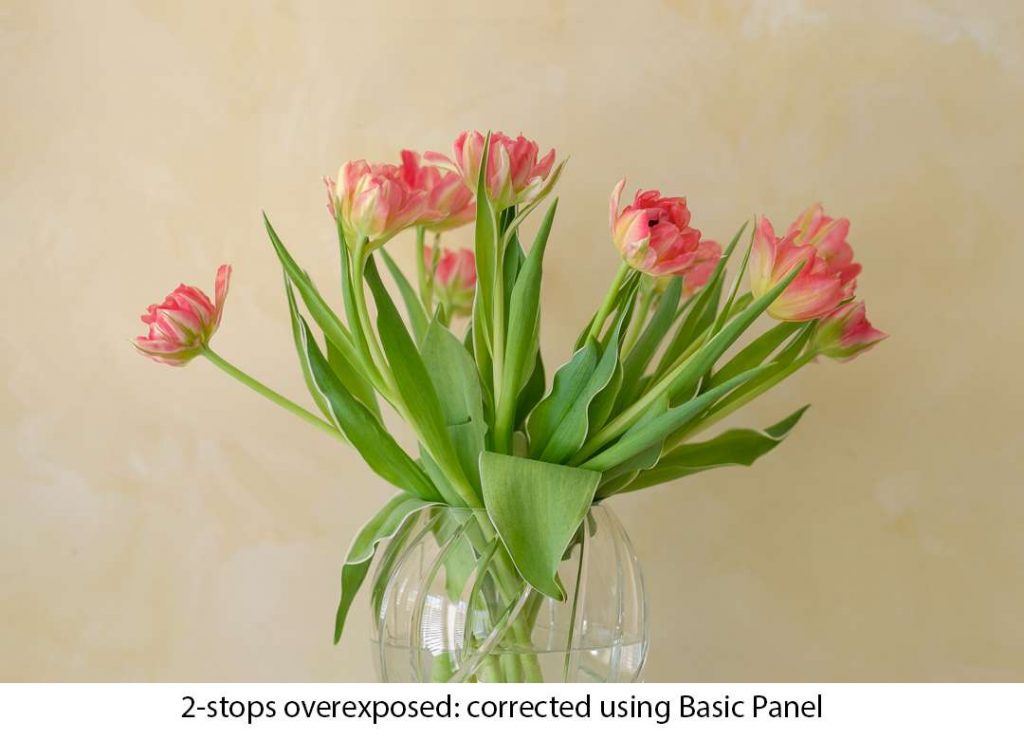
Using just the Basic panel Exposure and Highlights sliders produced this result.
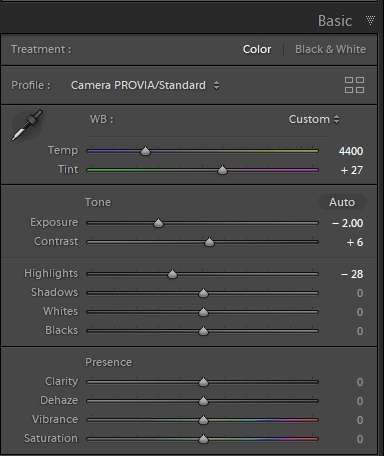
Here are the Basic panel adjustments used.
Not too bad, if I do say so! The subtle separation in the lightest areas of the tulips are a pretty close match to the original, correctly exposed image. The lightest tones in the background (on the left) have also been recovered with good colour and separation. Notice also that we even managed to pull back a respectable level of detail and separation in and around the reflections on the glass vase.
In contrast to the controls in the Basic Panel, the Tone Curve possesses neither of these abilities. It works much as its counterpart in Photoshop, shifting tones within your image file to new values depending only on where, and how much you adjust the curve. There is no image adaptive resetting of the curve, and certainly no ability to recover partially blown highlights.
Here is my “best efforts” result using only the Tone Curve on the same image.

Despite my efforts, it’s virtually impossible to recover the subtle highlight separation in the lightest areas of the tulips using just the Tone Curve. The lightest part of the background also lacks separation, resulting in a grayed-out tone with poor saturation. The reflections in the glass vase are lost cause.
Which version do you prefer?
Ever since the introduction of these Basic Panel features, I find that I rarely use the Tone Curve.
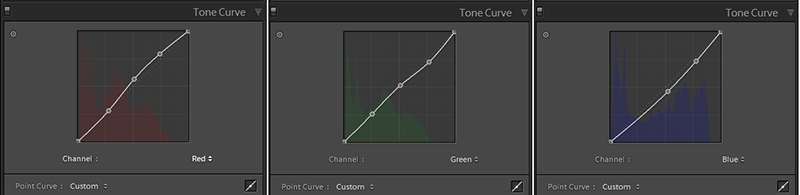
There is however, one situation where the Tone Curve is the right tool for the job: introducing new, or removing unwanted colour casts in an image.
Here’s an example.
Walking through the harbor near my home one evening, I spotted the warm sunset glow on an old ship from a good distance away. Unfortunately, by the time I reached it, the sun had somewhat uncooperatively, slipped behind some clouds near the horizon. Thinking I might be able to “un-set” the sunset in post, I went ahead and shot the image anyway (first image below). Editing it later in Lightroom, I used the Basic panel for all the essential contrast and other tone-mapping adjustments. What was still missing though was the warmth of the sunset light on the side of the ship and in the sky. Adjusting each colour channel in the Tone Curve using point mode allowed me to recreate the warm glow in the just highlight areas as it had been when I first saw the scene (final image below).


In my course, “After the Click, Refining Your Vision in Lightroom and Adobe Camera Raw”, we cover these and many other features of the Lightroom Develop module. More than just a technical discussion, the goal of the course is learning to use these tools (because that’s all they are) to create stronger more compelling images.
I hope you will join me.
-BPSOP Instructor – Mark English
Mark Teaches:
After the Click: Refining Your Vision in Lightroom & Camera Raw
The Art of Printing & Selling Your Art


