Understanding all that there is to know about composition is a topic you could easily write a whole book about. The basics of composition are the same for everyone, and are something that should be given some thought when lining up your photo through the viewfinder. Now that we have identified our subject and moved to a position that made the best use of the light, and are mentally prepared with all the basics we have learned, we can look through the viewfinder and compose our shot. But a bigger question is how do we make our viewer linger for a while in our image?
In its simplest terms, composition is simply composing the picture so that the subject is highlighted as the main focus of the image. You’ll usually want your subject to be the center of attention in the frame, making a stronger statement. You’ll often hear photographers saying to “fill the frame with the subject”. It is a good guideline to keep in mind.
Beautiful scenery doesn’t always mean beautiful photos. The beauty of nature inspires us to record moment and images but we must learn to focus on making powerful and meaningful photographs. We have to go beyond just recording the beauty of the natural world and become part of the creative process. We have to learn how to take a mixture of elements of design and create an image that will inspire and move people and make them want to spend time appreciating our unique view.

Look Down
Start with what’s at your feet. Look at the foreground. Foreground can be great in leading the viewer’s eye through the scene and giving them a sense of being there or perspective. We want to transport viewers to our magical find. Not just anything will do. It needs to be interesting and lead the viewer on a journey through our image. Leading lines, curves, shapes will lead the eye on that journey. So take a walk around and scout out those interesting foreground elements.
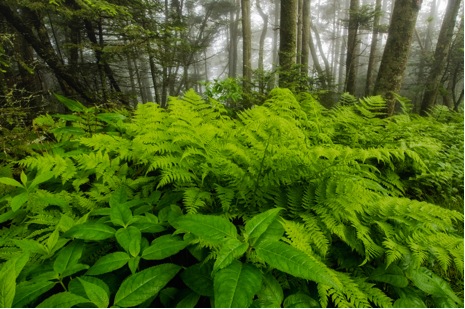
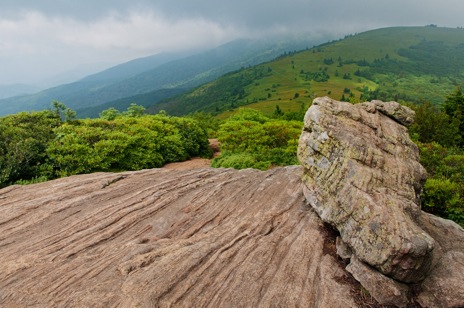
Notice in this image how I found a leading line with the rock? It invites the viewer and points the way for them to take a walk along the path into the beautiful, lush, & foggy forest in the mountains of North Carolina.
Leading elements can be powerful so be careful and don’t choose leading elements that lead the viewer out of the image or cause confusion. Make sure the foreground lead to something important in the background. Leading elements work best when they “flow” through the foreground, starting outside of the bottom of the frame or corners, flowing through the foreground into the middle and back ground.
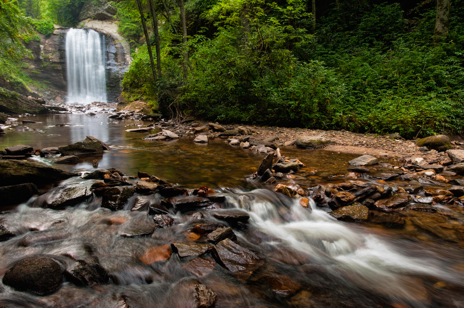
For this shot of Looking Glass Falls in North Carolina, I got low in the creek to capture the small cascade of water as it travels down the river from the waterfall and placed it in the bottom right hand corner so that it would “flow” from the image.
Get Up Close and Personal
Sometimes interesting foregrounds mean getting close. Let the elements dominate the area closest to the viewer. Wide angle lenses are great for this. Don’t be afraid to get right up on the foreground with the wide angle. It will allow you to get close to an interesting foreground and incorporate the rest of the scene as well. It will also give a sense of depth to the image. I would recommend f/16 or f/22 for sharpness throughout the scene. HOWEVER, you can get creative here with a limited depth of field. Remember there are no rules!
The lush ferns along a trail on Roan Mountain, TN dominate the foreground in this image. I got on my knees inside the ferns with a wide angel lens for this shot.
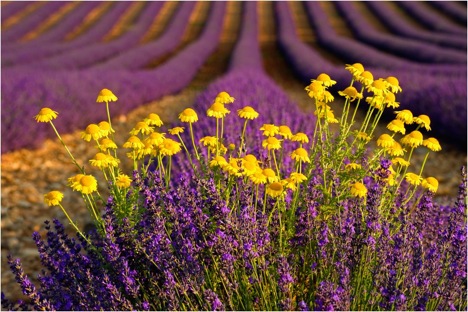
In Provence, France these yellow flowers dominate the foreground and the lines of lavender in the background add depth to the image.
Look for a Fresh Perspective
Look for opportunities that haven’t been done before. In landscapes, look for less popular spots. Stray from the masses and look for something unique. To make a unique image think to yourself: How can I make this image better? Can I reveal something unique or exciting about the subject? How can I find a unique angle and do something different?
Work each image and opportunity. One click of the shutter leads to another so try different approaches, angles, viewpoints etc. Start with the obvious, then concentrate on a different way to photograph it. Push beyond mental barriers as much as you can. Work the subject, take a break and then try again.
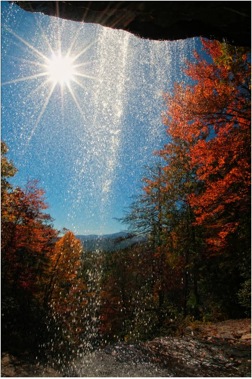
In this image I photographed Glen Falls in North Carolina from behind the fall, a unique viewpoint.
Create Visual Flow
The camera “freezes” a moment but don’t let your image appear lifeless. Learn to impart a sense of motion, energy and life into your images. Visual Flow is a way of creating the illusion of a 3D perspective and motion into our images. It can create energy and a sense of visual excitement to your photos. It captures dynamic energy, creating an illusion of movement and energy.
There are many ways to create visual flow. Most common are using composition, color, shape & long exposures. It does require the ability to see abstractly and to pre-visualize the scene. It can be difficult and takes practice. To move the viewer’s eye through your image is the goal. It will make the viewer want to stay there a while and come back for many more visits!
Certain shapes help with visual flow. Curves can give scene elegance. Zig-zags create energy by forcing the viewer’s eye back and forth. Circles can trap the viewer’s eye holding interest for a longer period of time. Lines and triangles point the eye. Long exposures captures create a sense of movement and give a sense of movement over time. Flowing water is a good example but there are moving clouds or moving flowers etc. that imply motion also.
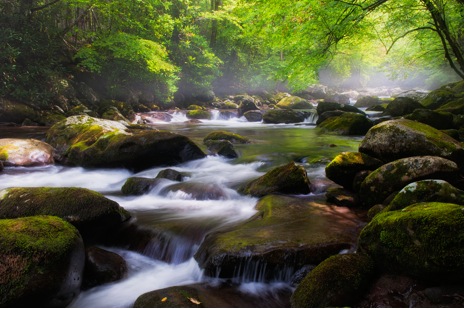
Curved lines of the slow flowing water and shapes of the rocks in the Great Smoky Mountains create energy and motion.
The lines and shape of the rocks at Roan Mountain, TN give the image a sense of motion and leads the viewer’s eyes into the image.
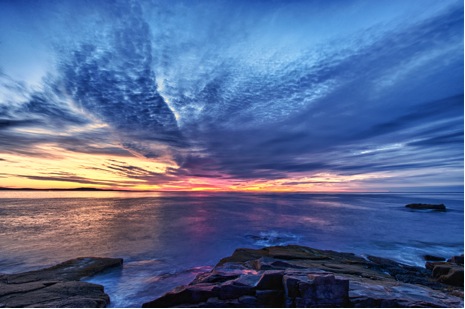
The flowing motion of the clouds is what captured my interest in this scene in Acadia National Park along with the shape of the rocks matching the shape of the clouds!
Color can create visual flow too. Transitions such as warm to cool or light to shadow can sometimes really add interest. Color and contrasts and transitions of color can be effective in creating energy in a photo.
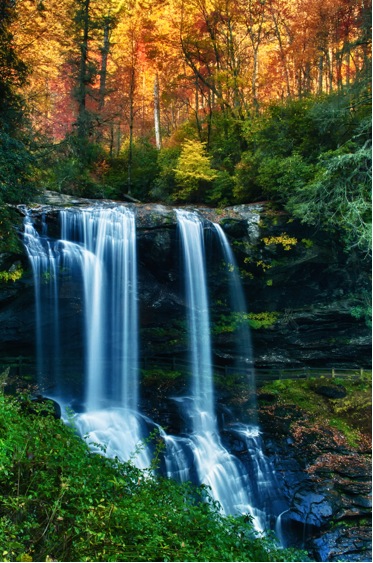
In this image of Dry Falls in North Carolina on a Fall day, the transition of warm to cool creates visual flow along with the slow motion of the waterfall.
These are just a few concepts to improve composition and to attract and engage your viewers. It may take just a few moments to understand these concepts but a much longer time to master them. The more you practice, the more you will develop a deep understanding and then the more successful your compositions will become!
All My Best,
Donna Eaton
Instructor/ BPSOP.com
Donna is teaching Photography After Dark


