You have undoubtedly heard both familiar phrases before. “Get it right in camera” is the purist’s view, believing that the only purpose of post-processing is to restore a faithful version of the subject. “Fix-it-post” on the other hand, holds that the shutter click is only the start of the creative process; post-processing is a valid way to create and extend the message of the original image. Adherents to the first position hold that any editing beyond the bare minimum renders an image outside the realm of photography; not worthy of a ‘serious’ photographer’s attention. The ‘Fix-in-post’ crowd looks at the “get-it-right-in-camera” crowd as creatively stunted; out-of-step with the times and the technology.
I’d like to suggest a different approach: sticking exclusively to either view suggests arrogance or laziness, possibly both, and does a disservice to both.
To be sure, there are certain things that must be taken care of in-camera. Sloppy exposure settings may be correctable in post, but then again, they may not. Failing to see, and compose to eliminate, distracting elements might be fixable in post, but then again, they may not. In any case it’s far more efficient to take care of these distractions in camera, than waste significant time in front of a computer screen trying to fix them later.
To put both approaches in context let’s take a look back at the history of photographic processes.
Back when photography meant creating images with black & white film and processing it in a chemical darkroom, many technical and artistic decisions were made well after the film was exposed. Choices of film developer, processing time and temperature among others affected image contrast and acutance (perceived sharpness). Choices of printing paper also affected image contrast and tone. Cropping an image to strengthen the visual relationships or to offer alternative interpretations was considered normal and often necessary.
No less than Ansel Adams used the chemical darkroom to extensively edit his images to achieve his artistic goals. Consider a contact print, basically an unedited version of the image as captured in camera, (on the right) with a final print of “Moonrise” (on the right), one of his most recognizable images.
Which do you prefer? Which do you think adheres most closely to the photographer’s vision?

When colour photography arrived, the chemical processes used then (and now) allowed far less opportunity to edit the visual and tonal relationships than was possible in the black & white world. Photographers had to now concentrate to a far greater extent on controlling these elements as part of the initial production; carefully controlling lighting contrast and colour temperature within the comparatively more limited capabilities of colour film.
And, once colour transparency films become popular, particularly as the newer film stocks filtered down to the increasingly popular 35mm format, the game changed again. Owing to the small size of the film frame, cropping become largely frowned upon; the loss in quality was just too great for many applications. On top of that there was now a greater disconnect between the creation of an image in camera and its conversion to published image. In the past, B&W images were developed and printed either by the photographer or a trusted assistant who worked closely with the photographer to realize his or her vision for an image. The rise of 35mm transparency film changed this. In the extreme case a photographer would send the film from an entire shoot off to the client, who would take care of the processing and editing of the images. National Geographic photographers worked under this model for years, never seeing the processed images until their return to the Nat Geo offices, often months later. Even absent this approach, photographers came under increasing pressure to “get it right in camera”. The locked in nature of the film and processing left limited ability to alter colour and contrast. Since the end-product delivered to the client was the actual piece of film exposed in camera, the photographer simply had to manage contrast and colour in the field. The small size of the 35mm frame also drove a need to maximize the use of the entire frame, so cropping in camera was essential to creating maximum image quality.
Digital changes all of this. Control of contrast and colour is now to a greater extent back in hands of the photographer. As digital photographers we have a range of control over almost every aspect of these qualities with our images that simply was not possible with colour film. This control is not infinite though; failing to deal with excessive contrast or allowing unwanted distractions against a complex background will mean too much time spent trying to correct these problems in post, often with less than desirable results. Getting an image as close to perfect in camera will always provide you with a better starting point than failing to deal with technical and aesthetic deficiencies in camera and later trying to correct them in post. “Getting it right in camera” is still important. It’s just that thinking of the creative process as done at the moment of exposure is just so darned limiting!
So, how should post-processing fit on to the creative process? On this Ansel can provide some guidance as well.
Adams was a proponent of previsualizing the final image – seeing it in your mind’s eye, ideally before exposure. To be sure, this takes lots of experience and a well-developed visual sensibility. The technical process of capturing an image, shutter speed, aperture choice for example, must be second nature – requiring little conscious thought. After the moment of exposure, post processing can play a large role in moving from the merely objective to a more subjective level of image making. Ansel referred to the objective form of image making as an “External Event”, describing an approach to image making reflected in saying,
“I came, I saw, I snapped”.
This is mostly about “memory preservation”, birthdays and annual vacations for example. Beyond this, Adams elevated image making to an “Internal Event”:
“I came, I saw, I interpreted and visualized”.
Previsualizing what you want the viewer to see in your image — what you are trying to communicate about your subject, allows you to look past what a subject merely looks like… to what it feels like; to the emotional response you want to elicit in a viewer. Image making then becomes more a process of communicating thoughts and feelings about a subject than merely recording a likeness. An approach to image making that is wholly based in the “Get it right in camera” sensibility eliminates the possibility of creatively using the tools available in post to this end.
In no way am I suggesting that creative, interpretive photography in the digital age requires the use of the tools in post-processing — far from it. Ansel Adams didn’t create iconic images of the American West simply because he was exceptionally proficient in the darkroom, he produced iconic images because he used the tools of the darkroom to realize in print, that which he had previsualized in his mind, either at the moment of exposure, or later as he worked with the image in “post”. In the same way, digital post-processing simply provides an additional set of tools to realize a photographer’s intention, her pre-visualized intent for an image.
A different kind of Lightroom Course…
Lightroom is merely a tool. No different than a new lens, a filter, or a studio light. Using any tool begins with understanding what you are trying to accomplish; understanding the problems that need to be fixed, choosing the appropriate tool and lastly, knowing how to use it.
In my course, “After the Click” I encourage participants to stop thinking of the tools in the Lightroom Develop module as a technical exercise carried out in rote fashion. There is a reason why you stopped to raise your camera to your eye to capture an image; something about the subject, the arrangement of visual elements or perhaps the light that stopped you in her tracks. The first step in realizing the potential in an image, is understanding what you are trying to communicate to a viewer. It’s often not so easy to define clearly for yourself what it is you are trying to say. Sometimes an image may not be about a pleasing arrangement of shape line and colour; sometimes a mood is the thing you are trying to communicate.
A few years ago, I spent several days in Pienza, a magical town at the northern edge of the Val d’Orcia region of Tuscany. Via Santa Caterina to the west of the old town forms the local evening “passeggiata” and affords spectacular views of the valley to south. The Villa and roadway in the image on the left was photographed from up here using a 300mm lens (FF equivalent). Shooting through almost a mile of late afternoon haze tends to kill off a lot of contrast, leaving the image a quite flat with excessively cool shadows.
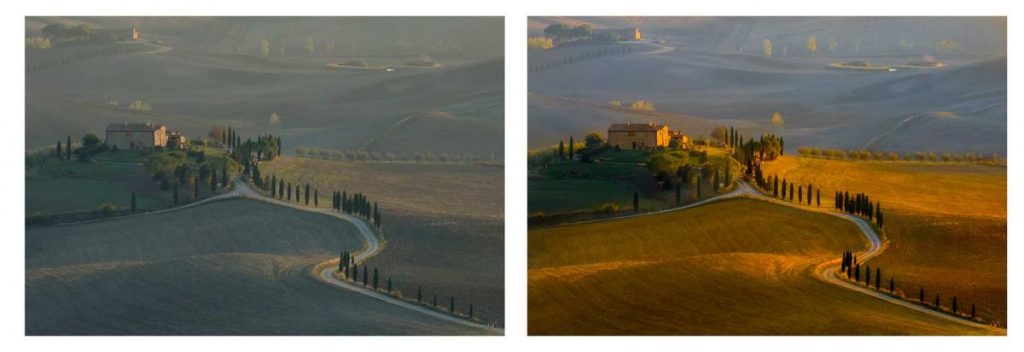
From my vantage point above the valley, I was struck by an overwhelming sense of warmth and tranquility created by light of the approaching sunset as it swept across the land. Using the tools in Lightroom (on the right) allowed me to recreate more closely the feeling of being there than was the case with the straight out of camera image.
In the end, I’d like to suggest a different approach. Neither the “Get it Right” crowd, or the “Fix-it in Post” crowd are wrong; but neither is right either. “Get it right as possible in-camera” will always be the best starting point for creative refinement. However, being too dogmatic about it gives up the creative possibilities offered by thoughtful post processing. In the past there was no good choice other than getting it right in camera. This is no longer the case. However, relying on post to correct basic composition or exposure is at best, laziness and lack of attention to craft. At worst, it suggests the image maker hasn’t thought about what they are trying to say… or perhaps that they have nothing to say at all.
My point in all this is simply to say that dismissing extensive but thoughtful post processing out of hand is to place limits on photographic expression that is artificial. To justify these limits by drawing a box around photography and dismissing anything outside that box prevents photography from evolving, and just as importantly ignores the history of photographic processes.
I’m absolutely certain that were Ansel Adams alive today, he would be all over the possibilities of digital post processing.
-BPSOP Instructor – Mark English
Mark Teaches:
After the Click: Refining Your Vision in Lightroom & Camera Raw


