 One of my favorite topics to discuss with students taking my online BPSOP classes, and in my “Stretching Your Frame of Mind” workshops I conduct around the planet is the Light. Unless you’re street shooting where timing and and capturing a moment are important, Light is everything.
I’ve been a student of light for as long as I can remember, including those B/W years spent shooting with AP and UPI. I studied art and design, with a couple of semesters plodding through Art History, where we studied each of the Masters and later impressionists approach. This is where I learned notable techniques like Renaissance portrait lighting.
When I first started studying the Light, I broke it down in what I termed Four Part Harmony: Hue, Intensity, Direction, and Quality.
Hue: Refers to the color of the light. The color is dependent on the time of day you’re shooting. When the sun is low on the horizon, it appears warmer since it’s going through more atmosphere. As the sun rises in the sky, the color of the light becomes bluer. The reason being that it’s going through the shorter blue and violet wavelengths.
Intensity: The intensity of the light is associated with how hard or soft the light source is. When you consider the intensity, don’t think of it as being either bright or dim. It means a whole lot more than that. One needs to think about it in terms of how it will render the final outcome to your photos. When you consider the Hue, consider the intensity as well. The lower the light is to the horizon, the more atmosphere it’s going through making the light much softer than it is when the sun is higher and going through less atmosphere.
Cloud cover can have a huge effect on your images, mostly when the sun is high and it’s a day that’s considered partly sunny. It’s a good time to shoot as it’s referred to as open shade. The only drawback is that with open shade, it’s hard to create the third dimension (depth) since you need side light to accomplish that.
Using artificial light can greatly impact the intensity of the light. Aiming your flash directly at your subject will render it harsh and contrasty. Shooting through diffusion, or bounced off a white umbrella, or bounced off the ceiling will provide a softer light; it’s the only way I light when I’m indoors.
Direction: There are three basic ways to light a subject. Side, front, and back. The first thing I ever do, before raising the camera to my eye, is to determine where the source of the light is. I avoid front light like the plague…why? because Form is a basic element of visual design, and it refers to the three-dimensional quality of a subject. When you front light, you eliminate the third dimension (depth) and as a result you’re left with the other two…height and width. Front light provides the least amount of information.
When you sidelight your subject you create the third dimension…depth. A simpler concept is when you side light, you provide shading to your subject. Side light is also used to emphasize the texture of an object; or any patterns in your composition. It’s also a good way to separate the subject from the background.
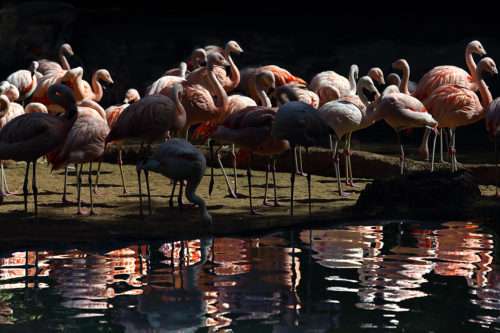
Back light is when the source of the light is behind your subject. It’s my favorite way to light since it adds a rim of light around the subject. When I’m shooting something transparent, such as water, grass, flowers, leaves, etc., the back light makes those subjects glow. It also can add strong shadows, and as I always say, shadows are your best friend.
Quality: The quality of the light affects mood and drama. It also refers to the softness or hardness of the light source. What kind of look or mood you’re trying to create is determined by how the light is used. Harsh direct light gives you sharp and defined shadows, where a softer diffused or bounced light might not offer near as defined shadows, and sometimes none at all.
My favorite light is available light. As far as the quality of the light goes, most of the studio shooters I know, including myself try to emulate available light and will go to great lengths and expense to do so. I can’t tell you how many “North Light Studios” there are to rent in NY. I say North light because it’s the softest. Since it faces north, you’ll never get any direct sunlight coming in to affect your photos.
-BPSOP Instructor: Joe Baraban
Joe Teaches:


