I’m sure you’ve heard this over and over. Landscape photography is about light. Your best option to capture great landscapes is at best 1/2 hour before and after sunrise, and 1/2 before and after sunset. (These times may vary depending on where you are, but this is my rule of thumb.)
If you are on an epic photography journey, this can mean a lot of early mornings, and late evenings. That first moment when you wake up at 4:30 am can be hard, but once you are out and experience the beauty of the sunrise, it will all be worth it. And besides, if you have traveled a long distance to get to an amazing place, why be having breakfast or sleeping when the light is perfect? That perfect light may only last a couple of minutes, but you might capture something to last forever in your photography portfolio and your mind’s eye.
You can’t duplicate this light in Photoshop.
I suppose you could if you tried, but I would rather have the real pallet to paint with light. You never know what nature may throw at you during these magic moments of light, and there are a couple of examples below.
On our recent photography workshop to the Grand Tetons and Yellowstone, we were there for 10 days. We got up very early every morning to experience what nature had in store for us. We experienced several epic sunrises during this trip. All of them were completely different, and not something that was easily imagined or created in Photoshop.
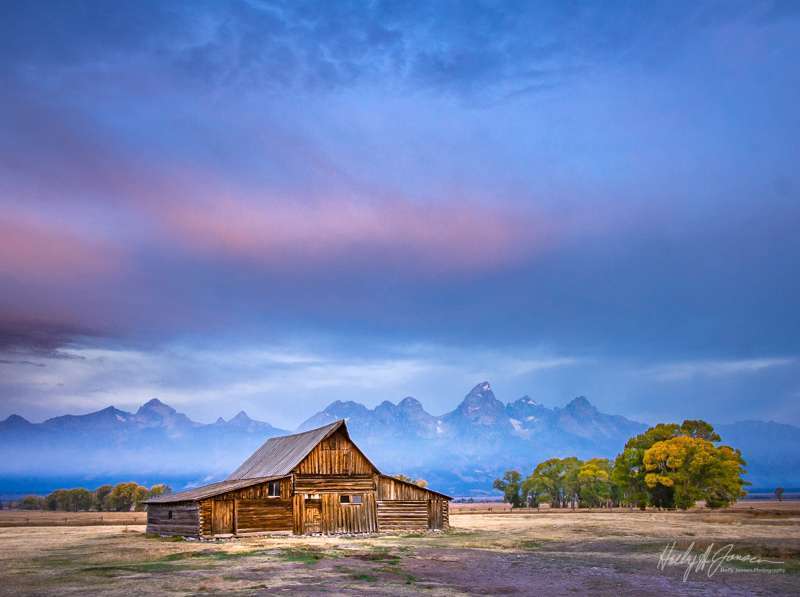
On our second morning, we headed out to the Mormon Row Barns to experience the sunrise. We were not alone, as there were probably 10 other photographers out there. It’s not our practice to hang out with a large crowd of photographers, but this is an iconic location and we were rewarded with beautiful light.
When I am shooting in this type of environment, I always study the light with the thought of how I will post process it later. The camera sensor cannot pick up the wide range of light that our eye can see, so I frequently take notes on how it looked, and what I will do in post-processing.
There was a moment when the sky lit up a beautiful pink color, but only for a second. There was a little haze and smoke in the sky from a fire in the Southern part of the state, but it only added to the experience and color to our light pallet.
How did I feel so confident that I could reproduce what I saw in Lightroom and Photoshop? My secret weapon is always the histogram. That is the best gauge of the quality of the exposure you are capturing, and whether you will be able to bring down the light and bring up the shadows to the scene that you actually saw.
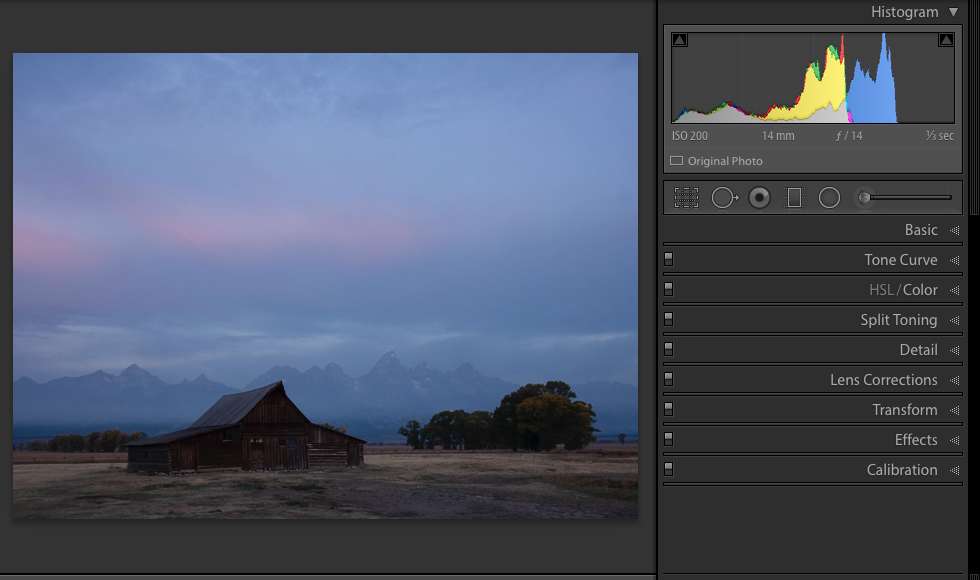
See my before and after images of the Mormon Row Barns in Grand Teton National Park with the original histogram.
On first look, this image looks underexposed and flat. But take a look at the histogram. Do you see the area in the left side of the graph? There is a little space to the left in the shadows which means there is information there, and that the shadows can be opened up. Notice the area on the right side of the histogram. That is the highlights. So there is plenty of room to adjust there as well without overexposing the image.
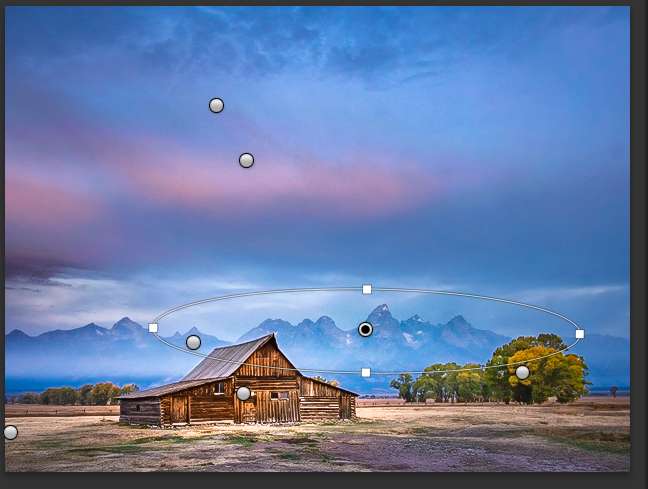
And Here is the finished processed image showing the areas where I added individual adjustments. I used the radial filter to brighten up the very darkest areas and the graduated filter to give the sky its dimension. It wasn’t a complicated adjustment process, you just need to look at your images like a painting. Where do you need to add exposure or color to make your creation pop?
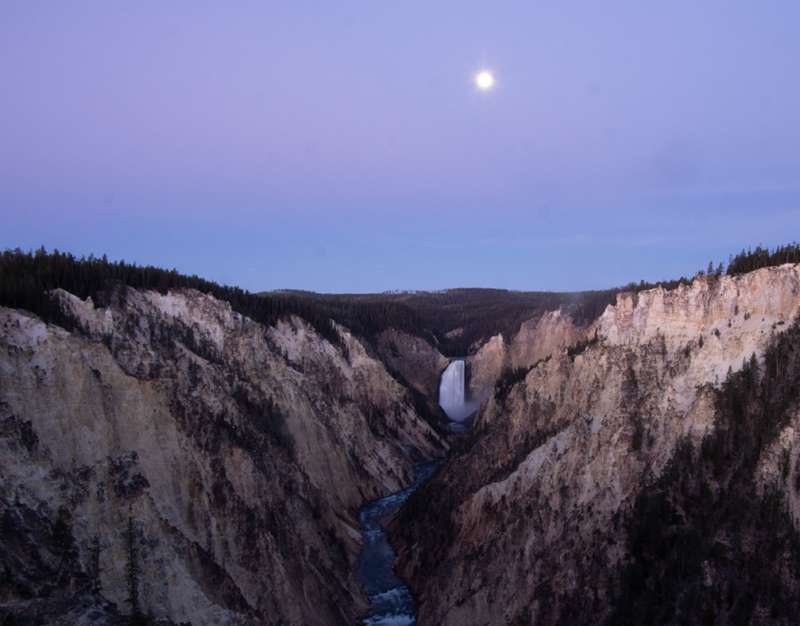
On the last day of our trip, we were headed into Yellowstone and rose early once again to catch the sunrise in Yellowstone Canyon. My thoughts were to catch the sunrise and then wait and see if we could catch the full morning light on the waterfall. Once we arrived, we were greeted by a warm glowing light. It was 6:30 am in September, so this was not the sun. It was the moon, lighting up Yellowstone Canyon! It was such an unexpected beautiful surprise.
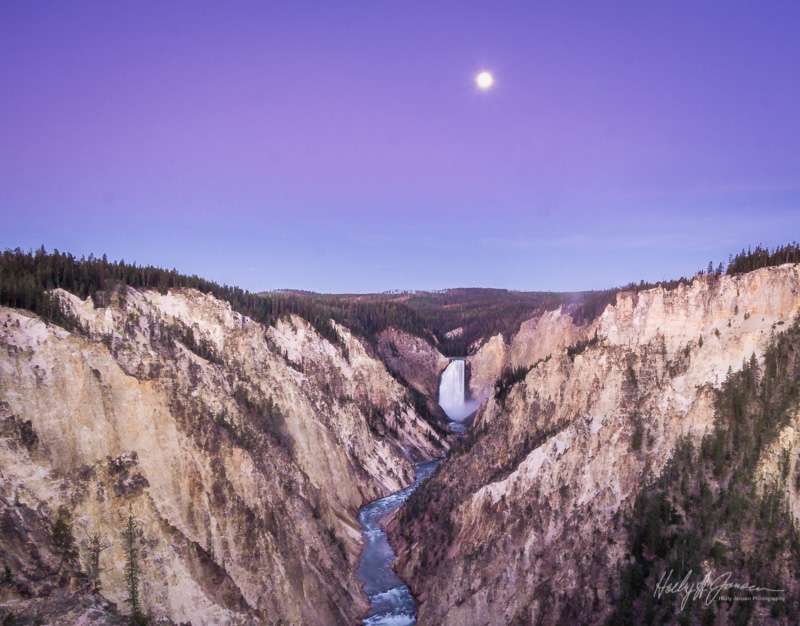
I shot this image keeping a close eye on my histogram so that I would be able to open up the shadows and enhance the sky in Lightroom. Here’s my before picture with a screenshot of the histogram. You can see with this image it did not require a lot of editing, but once again, I made sure that my histogram was balanced so I would have flexibility when I brought it into Lightroom.
You never know what you will find when shooting landscape photography. Early mornings can be rough, but you never know what you find. It will always be a better image than shooting midday as the light will be soft and the shadows long. Don’t miss those amazing moments. Keep in mind how it really looked, so you can “paint with light” when you bring it home and open it in Lightroom.
If you would like more information on how to create amazing images in Lightroom, take my next Lightroom Quick Start class here at BPSOP.
In this class, I cover the basic tools, so you can use Lightroom as your go-to editing and organizational tool. This 4-week class covers the basics that will get you up and running quickly in an efficient way. Try our next Lightroom class and learn to use the essential program for editing and organization.
BPSOP Instructor – Holly Higbee-Jansen
 Holly Higbee-Jansen is photographer, trainer, blogger, and workshop leader who enjoys teaching and the creative process. Her passions include teaching photography workshops in beautiful locations in California, Iceland, Costa Rica and the American West with her husband Mark. Holly also teaches online classes on Lightroom, Photoshop and photographic technique. Get Holly’s Free E-Book on “Landscape Photography and the Light“ and find out about her newest workshops at Jansen Photo Expeditions.com.
Reach Holly by email at [email protected] and read her blog at: JansenPhotoExpeditions.com/Blog
Holly Teaches:
Do you want to learn to create images that show the beauty of the scene you saw when you took the photograph? Do you want to learn the other essential side of digital photography, photo editing and get up to speed quickly?
This course is designed to get you up and running FAST in this incredibly powerful program. In this two week information packed class, you will learn how to import, organize and perform simple and effective editing processes that will let you produce beautiful adjustments to your pictures.
iPhone Photography
In this class, we will introduce you to the magic of iPhone photography using several shooting and editing apps that will give you the ability to make your pictures sing in a fun and easy way. You will learn how to crop, change saturation, brightness and affect the overall look of your pictures with HDR, drama and grunge filters and other techniques. You will be amazed at the simple and effective methods.


