Quick Photo Tip: Wait For It

Of all the genres in photography, I personally think that street shooting offers the hardest challenge…why? Because “like a box of chocolates you never know what you’re going to get”….while walking down the street.

Landscape, portraiture, food, are three areas that immediately come to mind that gives you time to think ahead of time about your photo. You have the luxury of finding the location, looking for the best light, and as far as food photography you have total control in the studio.

When I’m walking the streets with any of my fellow photographers that are taking my “Stretching Your Frame of Mind” workshops, I’m basically looking for light. If I can find the light, chances are pretty good that I will find a shot somewhere in it.

I have had other photographers that take my online class with the BPSOP submit photos that lack visual interest and can’t stand the test of time. For example, a photo that’s showing someone talking on a phone leaning against a corner with a cigarette hanging out one side of the mouth is not going to stand the test of time; unless something extraordinary is happening. How about all those photos that show homeless people eating, begging, or sleeping on the sidewalk?

Having said that, when you do find some light…light that’s worthy of spending some time with, it’s important to find a comfortable spot and wait for some action; just the way Henri Cartier-Bresson did.

When you do see something or someone approaching the light you have settled in on, don’t be in a hurry to bring the camera up to your eye. Too many times I have seen a photographer do just that only to have the subject veer off. Sometimes it’s either because they’re polite and  don’t want to “photobomb” your shot, or they just don’t want to be photographed.

It’s important (and hard to do) to wait for it...wait until the very last minute to bring up your camera.

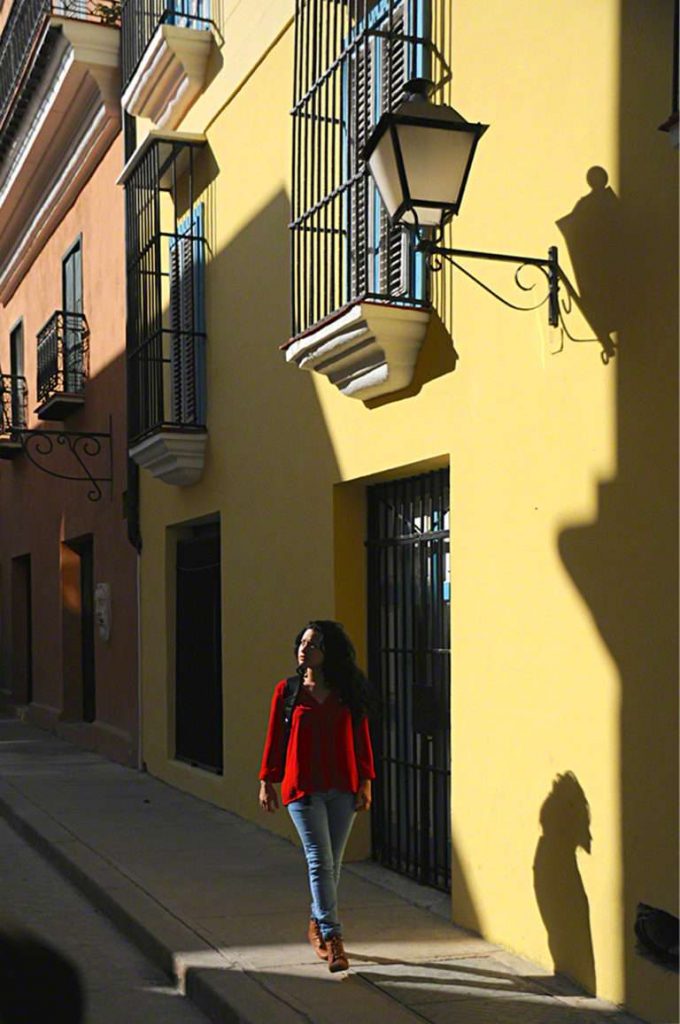
In the above image, I came around a corner and saw the light hitting just this one part of the building. I thought I would give it a few minutes to see if someone would walk through it. I pre-visualized where I wanted them to be in the light, and I also thought about making sure their entire shadow was against the wall.

I fired off several exposures of the spot I wanted to get the exposure down, knowing I would probably get off one shot.

Well, the waiting paid off. Not only did I get her in the light, but I was lucky enough to have her wearing great colors; of course her looking down the intersection didn’t hurt!!!

Visit my website at: www.joebaraban.com, and check out my workshop schedule at the top of this blog. Come shoot with me sometime.

-BPSOP Instructor: Joe Baraban

Joe Teaches:

Stretching Your Frame of Mind I 

Stretching Your Frame of Mind II

“I just wanted to thank you for another wonderful class. I have to confess that each week when I read the new assignment, my first reaction was mild panic and a deep certainty that I would not be able to produce anything worthwhile that fit within the parameters you had set. But before I knew it, the ideas started to flow, and I quickly became obsessed (no, that isn’t too strong a word!) with exploring the possibilities. I can honestly say that the photos I produced in response to your assignments are among my favorites. Thanks for bringing out a creative side I didn’t know I had!”

Barbara Geiger
Understanding Color

“Thank you so very much for this course! It’s allowed me to take the blinders off and present my images for what I want them to be without being a slave to the “reality” of the camera. I would also add that in conjunction with your printing course, this has been the most useful course I’ve ever taken. Your notes are more than comprehensive and your comments and critiques are direct, clear, and always directed to the improvement of the art.”

Bill
After the click

” I want to thank you for this class and for your patience and availability to answer all of my questions. I have learned very much through this class. I have used LR in the past, but mostly for editing images. I now have a better grasp in the organization of my images, an even better understanding of editing images, and an understanding of the value of presets. I still have a lot to learn, but this has put me on the road to be able to improve my photography. Again, thank you! ”

Dale Yates
Lightroom Quickstart

Classes Starting Soon!

Understanding Exposure and Your DSLR

Instructor: Bryan Peterson Duration: 6 Weeks Cost: US$169 Without que…

Wireless Flash Techniques for Outdoor & Nature Photographers

Instructor: Rick Burress Duration: 4 Weeks Cost: US$129 Learn Photoshop…

The Real Photoshop Course

Instructor: Charlie Borland Duration: 4 Weeks Cost: US$129 Are you a …

The Ultimate Guide to Adobe Bridge CC

Instructor: Rick Burress Duration: 4 Weeks Cost: US$129 The Anti-Catalo…

After the Click – Refining Your Vision in Lightroom & Camera Raw

Instructor: Mark English Duration: 4 Weeks Cost: US$129 Why do some ima…

Editing in Adobe Camera Raw

Instructor: Rick Burress Duration: 4 Weeks Cost: US$129 If you love pho…

Exploring Adobe Photoshop Lightroom & Lightroom for Mobile

Instructor: Holly Higbee-Jansen Duration: 4 Weeks Cost: US$129 In this …

Lightroom Quick Start

Instructor: Holly Higbee-Jansen Duration: 4 Weeks Cost: US$129 Do you w…

Mastering Apple Photos

Instructor: Jon Canfield Duration: 4 Weeks Cost: US$129 Mastering Apple…

Luminar Essentials

Instructor: Jon Canfield Duration: 4 Weeks Cost: US$129 Luminar is an …

The Art of Printing and Selling Your Art

Instructor: Mark English Duration: 2 Weeks Cost: US$76 The print is the…

The 50 Most Useful Tips in Photoshop CC and Photoshop Elements

Instructor: Roger Morin Duration: 2 Weeks Cost: US$76 This two-week cla…

50 MORE Photoshop Tips & Tricks

Instructor: Roger Morin Duration: 2 Weeks Cost: US$76 This two-week cla…
Translate »