Sometimes the simplest things, the most obvious things, are the things of which we need to remind ourselves most often.
A few weeks ago we had a brief break in our usually grey winter days here in Vancouver. By late afternoon I noticed broken clouds filling in on the horizon to the west; the kind of clouds that often produce some interesting sunset possibilities. So I headed down to a point of land a short walk from my home. I arrived there to find a group of photographers all setting up for the approaching sunset; big tripods and long lenses everywhere.
For me, there was also an obvious wide-angle composition; nice, but nothing to out of the ordinary.

After working that for a bit, I moved on, eventually heading back to find the same group; still busy shooting the setting sun with long lenses. So intent on this one possibility, it was apparent than none of them had thought to look behind them at the incredible light developing on the harbour and distant mountains.
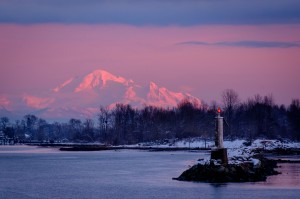
We all love to shoot sunsets, after all who can resist a spectacular sunset? The problem though, is that absent a defining landmark most look like they might have been shot anywhere in the world. The first image above could have just as easily been shot on the coast of France, or a few hundred meters from by back door. Turning your gaze instead 180 degrees often produces more interesting results that say more about the place where you find yourself.
The Light on the Land is often more interesting than the Light itself. It’s always worth a look behind you before moving on to your next location.
The Forgotten ALT Key
Lightroom has become (as for many others), my primary image adjustment tool. I can’t imagine life without it. But when I get together with other photographers, I’m surprised to hear how few of them know of the hidden power contained within the -ALT key (“Option” on a Mac). Here are a few of my favourite -ALT key shortcuts.
Highlight and Shadow Clipping
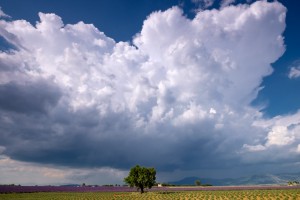
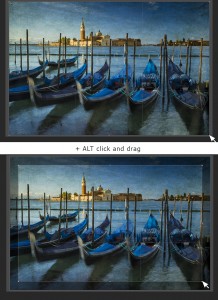
This is one that every Lightroom user should understand and use. Holding the ALT key while clicking any of the Tone sliders in the Basic Panel of the Develop module allows you to see precisely where Clipping is occurring in your image. Clipping represents areas where the tones have been pushed together at either end of the tonal scale. Clipped highlights will reproduce as pure white in a print, and clipped shadows as featureless black areas. Let’s use this image as an example; preserving the brilliant white highlights in the clouds, along with the deep shadows under the lone tree will be a challenge for any medium, particularly for most printer/paper combinations
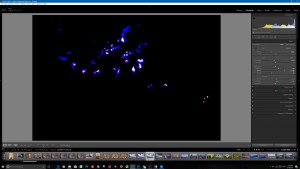
Holding down the -ALT key while adjusting the Exposure, Highlights or Whites slider causes the image area to turn black. Any clipped highlights will immediately show up as white or coloured areas in the image area. Adjust the highlights or whites sliders to eliminate as much as much of the clipped areas as possible. Keep in mind however that specular reflections from light sources off water, glass or metallic surfaces will always be clipped, and this is acceptable.
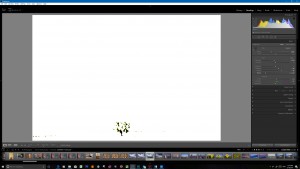
Holding down the ALT key while adjusting the Shadows or Blacks sliders will cause the image area to turn white. Crushed (clipped) shadows will appear in the image areas as black or coloured areas. Most images, particularly in print are more tolerant of some clipping in the shadows than they are in the highlights, but large featureless black areas in your prints are not generally aesthetically pleasing. There exceptions to this of course, so let your artistic vision guide you.
Importing and Exporting Lightroom Catalogs
When I travel, I always create a new empty catalog for the trip on the laptop I take with me, giving it a suitable name like “Italy_2017”, for example. During the trip I ingest images from my cards to this catalog at the end of each day, and back them up to an external drive. I do a first pass edit, picking the keepers and rejects (although I never delete any images at this point), keyword at a high level, and I might even try some initial editing in the Develop module. When I return home, I simply export this new Lightroom catalog with all original image files, and import it back into my main Catalog on my office workstation.
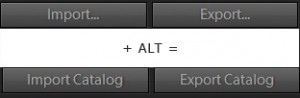
Holding down the ALT key In the Library module, causes the “Import” and “Export” (lower left) buttons to change to “Import Catalog” and “Export Catalog”
Print Copy
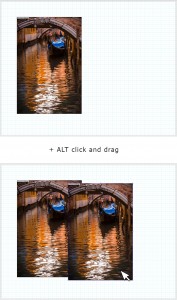
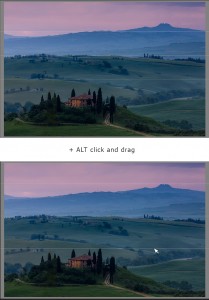
When creating a custom print layout, either as a new template, or with images, holding down the ALT while clicking and dragging an image will create a copy that you can re-position anywhere in your layout. This also works when creating a custom print layout, allowing you quickly duplicate and reposition new image cells. The newly created cells can then be resized and rotated if needed.
Reset Develop Settings
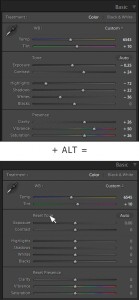
Sometimes you just want to reset all your tone edits back to neutral and start again. While in the Basic panel of the Develop module, hold done the ALT key to change “Tone” and “Presence” to “Reset Tone” and “Reset Presence”. Click either or both of these to reset all the sliders under them in one click.
Resizing a Cropped Area
Resizing and repositioning a cropped area usually involves grabbing multiple corners or moving the entire cropped area around. If you are close and just want to adjust the size of the cropped area without affecting its relative position, hold down the ALT key and grab any corner of the cropped area, and drag it to expand or contract the cropped area evenly.
Resizing the Grad Filter
When creating a Grad Filter, to knock down an overly right sky for example, the initial position you click becomes the first edge of the filter, as you drag away from this point the grad filter expands. The center point of the grad obviously moves along as you drag. If you want to change of the coverage of the grad filter without changing the center point, just hold down the ALT key as you drag either edge of the grad. The center stays put.
There are many more shortcuts using the ALT key, these are just a few. In my Printing Class, along with helping you establish a proper colour managed workflow to optimize your prints, we also discuss approaches to editing your images in post for maximum impact, using the ALT key and many other tools available to you in Lightroom and Photoshop.
– BPSOP Instructor: Mark English
Mark Teaches:


