With the high quality of Digital SLR and mirror-less cameras these days, you have all the tools at your fingertips to create beautiful balanced exposures. The secret to creating well exposed images is knowing how much light you have captured in your image, and that you can discern from watching your histogram carefully when you are shooting.
From the example below, you can see that the image itself appears to be very dark with no information in the shadows. However, it you look at the histogram, you will see that there is information in the darks (on the left side of the histogram there is space between the”spike” and the left “wall”). That means there is an opportunity to bring up the darks and create a compelling image.
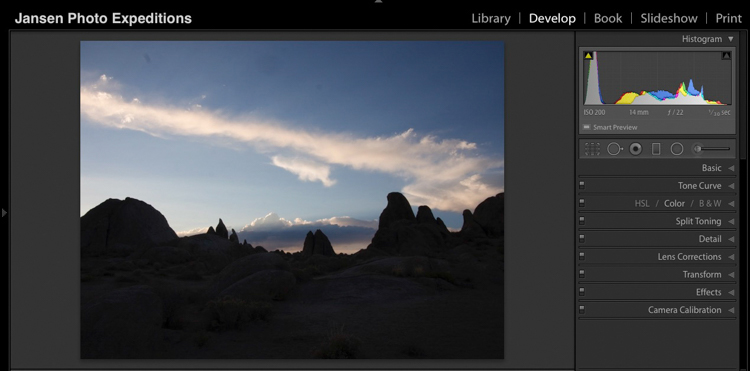
This is an example of a balanced histogram. Notice there are no spikes on either the left wall or the right wall of the graph. If there was a spike flat on the left wall, it would mean that there was no information in the dark areas or shadows in the image. If there is no information, you are not able to bring up the darkest areas in post processing. It looks like this image is too dark, but the histogram is telling us something different.
If your histogram is balanced, you will have much more opportunity to create beautiful imagery rather than fight with an over exposed or under exposed area in post processing.
The secret to creating great images in Lightroom is, number one, getting it right in camera. (or as close as possible). I prefer to see a solid histogram that shows that there is information in both the highlights and the shadows of the image. That will make your post processing job a whole lot easier.
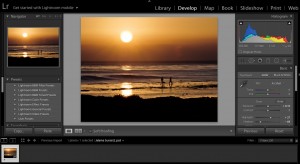
Here’s another example of the first image we looked at after image editing was applied in Lightroom. Quite a difference!

Balanced histogram allows you to bring up the shadows in an image.
The image above is the edited version of the first image in this article. Notice how the histogram has shifted over from the darkest areas of the graph and there are no “blown out” or underexposed areas. With some minor adjustments of bringing up the shadows, and bringing down the highlights, this image changed considerably and went from a “throw out” to a an interesting piece.
Here’s another histogram example:
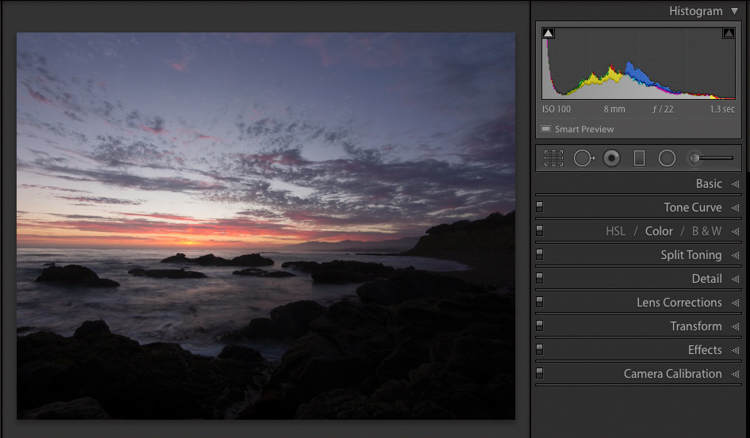
Here’s an example of an underexposed histogram
The example of above is an underexposed histogram. Notice the “spike” on the left wall showing there is no information in the darkest areas of the image. It’s easy to see what the graph is telling you if you look at the dark rocks in the image. There is little or no chance of bringing up the shadows in this image, as it shows no information in the shadows.
This shows you the benefit of watching your histogram when you are shooting. If the image seems to dark or too light, and you watch your histogram, you will have a good idea of the potential of the picture when it comes to post processing down the line. It’s always important when you are composing a picture to think about what you might do with it in post processing. Then you are intentionally creating an image, not just a snap shot.
Digital photography is fully 50% image capture and 50% post processing. Learn how to make the best of your camera and the tools you have available to you!
Learn the tools to effective photo editing and work flow with my upcoming Lightroom Quick Start class.
BPSOP Instructor – Holly Higbee-Jansen
 Holly Higbee-Jansen is photographer, trainer, blogger, and workshop leader who enjoys teaching and the creative process. Her passions include teaching photography workshops in beautiful locations in California, Iceland, and the American West with her husband Mark. Holly also teaches online classes on Lightroom, Photoshop and photographic technique. Get Holly’s Free E-Book on “Landscape Photography and the Light“ and find out about her newest workshops at Jansen Photo Expeditions.com.
Reach Holly by email at: [email protected] and learn about Holly’s adventure’s at: HollyJansenPhotography.com
For a complete list of Holly’s current workshops go to:
Jansen Photo Expeditions – JansenPhotoExpeditions.com
Holly’s Portfolio: HollyJansenPhotography.com
Facebook – https://www.facebook.com/Jansenphotoexpeditions
Instagram – http://instagram.com/photographyexplorations
Holly Teaches:
iPhone Photography
In this class, we will introduce you to the magic of iPhone photography using several shooting and editing apps that will give you the ability to make your pictures sing in a fun and easy way.You will learn how to crop, change saturation, brightness and affect the overall look of your pictures with HDR, drama and grunge filters and other techniques. You will be amazed at the simple and effective methods.
 Do you want to learn to create images that show the beauty of the scene you saw when you took the photograph? Do you want to learn the other essential side of digital photography, photo editing and get up to speed quickly?
This course is designed to get you up and running FAST in this incredibly powerful program. In this two week information packed class, you will learn how to import, organize and perform simple and effective editing processes that will let you produce beautiful adjustments to your pictures.


