WHATS THE DIFFERENCE BETWEEN PRESETS AND PROFILES IN LIGHTROOM?
Part of using Lightroom is taking advantage of the auto features. Some of these features come with the program, others you can set up yourself or purchase from a third party.
In my Lightroom class, we cover in detail how to set up your own presets. Presets have been around since Lightroom was invented. You can use presets for any kind of process that you use on a regular basis. Some of my favorite presets I use for the adjustment brushes (graduated, circular and selective brushes). These include an exposure adjustment, a “sunshine” warming filter, and a texture brush. When you are editing a lot of landscape photography images, adding warm light can be an important element in these pictures. Presets will only modify the sliders in the develop module, nothing else. They are good for getting the creative juices flowing. You can hover over a preset, and it will show on your image how it will change the look of it. Don’t forget, these settings can always be adjusted, a preset is just a starting point to inspire creativity.
In April of 2018, Adobe expanded the usefulness of profiles and made them more easy to access. They were originally hidden at the bottom of the Develop module. Now the profiles are located at the top of the Basic panel in the Develop module. Keep in mind that you need to be working with a RAW file for the majority of the profiles to show up in this panel. These are only available if you are using the current versions of Lightroom CC, Lightroom Classic CC or Photoshop CC 2018 or newer.
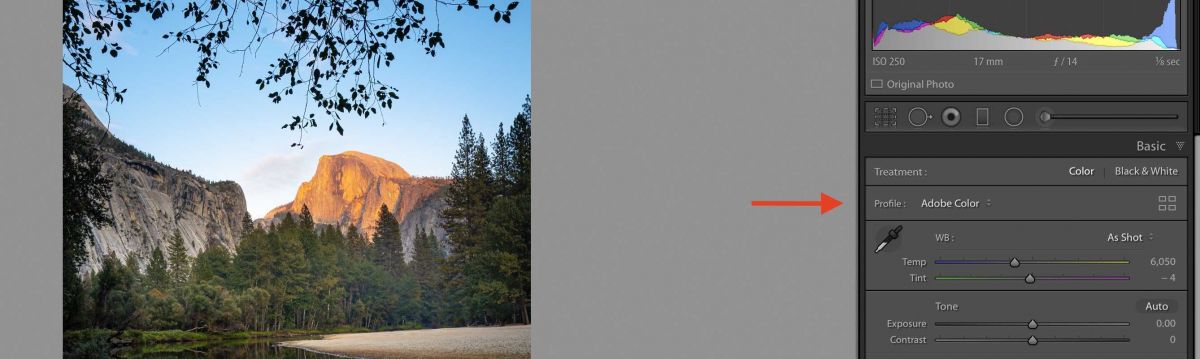
Profiles are like presets but are permanently installed in the Lightroom program. To access profiles, open the basic panel in the Develop module and use the drop-down menu to select your option. You can also click on the icon to open the profile browser. You can select a profile that will be applied to the overall look of a photo. Unlike presets, you can apply these over any develop/edit controls you have already used. Profiles can create looks that are not possible with the Lightroom controls on their own. It would be as if you added a custom film effect to your images.
Try using different profiles on an image that has already been edited in the basic panel and save your favorites in the “snapshot” portion of the left side of the develop module for that particular image. Then you can go through all of the different profiles, and save the ones you like, and cull through the images later.
Lightroom is great for its overall editing and organization features, but when you dive a little deeper, you can find some amazing tools to enhance your images.
BPSOP Instructor – Holly Higbee-Jansen

Holly Higbee-Jansen is photographer, trainer, blogger, and workshop leader who enjoys teaching and the creative process. Her passions include teaching photography workshops in beautiful locations in California, Iceland, Costa Rica and the American West with her husband Mark. Holly also teaches online classes on Lightroom, Photoshop, and photographic technique. Get Holly’s Free E-Book on “Landscape Photography and the Light“ and find out about her newest workshops at Jansen Photo Expeditions.com.
Reach Holly by email at [email protected] and read her blog at JansenPhotoExpeditions.com/Blog
Holly Teaches:
In this class, we will introduce you to the magic of iPhone photography using several shooting and editing apps that will give you the ability to make your pictures sing in a fun and easy way. You will learn how to crop, change saturation, brightness and affect the overall look of your pictures with HDR, drama and grunge filters and other techniques. You will be amazed at the simple and effective methods.
Do you want to learn to create images that show the beauty of the scene you saw when you took the photograph? Do you want to learn the other essential side of digital photography, photo editing and get up to speed quickly?
This course is designed to get you up and running FAST in this incredibly powerful program. In this two week information packed class, you will learn how to import, organize and perform simple and effective editing processes that will let you produce beautiful adjustments to your pictures.
For a complete list of Holly’s current workshops go to:
Jansen Photo Expeditions – JansenPhotoExpeditions.com
Holly’s Portfolio: www.HollyJansenPhotography.com
Facebook – https://www.facebook.com/Jansenphotoexpeditions
Instagram – http://instagram.com/photographyexplorations


