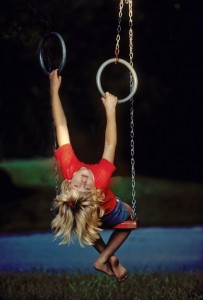
Front light right on the edge of darkness
Light is one of my favorite subjects to talk about…why? Because light is everything to me, and that’s why over the past five years of writing these posts I have written several on the subject; my mantra is you find the light, you’ll find the shot.
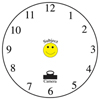
In one of my online lessons with the BPSOP, I talk about my clock, and always knowing where the sun is on it. In other words, Printif you look at my clock you’ll see where the camera is in relation to the subject. From there you can determine if your subject is going to be side lit, back lit, or front lit.

For example, if the source of the light is coming from behind the 8,9 or 3, or 4 then you’re subject will be side lit. If the light is coming in from the 10 or 2, I call that the “law of the light where the angle of incidence equals the angle of reflection; my favorite way to light people.
If the light is coming from behind the 11,12,or 1, then it will backlight the subject. Last, if the light is coming from behind the 5,6,or 7, then your subject will be front lit.

Light right on the edge at 10 o’clock
By the way, I avoid front light like the plague, and when I’m shooting with my fellow photographers that sign up for my “Stretching Your Frame of Mind” workshops I conduct around our planet, it’s easier to physically show them the difference between all the different ways just my merely turning the subject or have them move around the same subject.
The reason I avoid front light is because you won’t be able to achieve depth, you’ll only be able to show height and width. You can show the third dimension by having the sun behind the 9 or 3…which is true sidelight.
Now, I’ve talked about the clock before but what I want to add to the mix is placing your subject just at the edge of darkness. what I mean is placing your subject right where the light ends and the dark background begins. I like to do this for a couple of reasons:
The first reason is that it will create visual tension. Two of the ways to create visual tension is through contrast and the use of light. The second reason I like to do this is because of the Figure-Ground concept in the psychology of Gestalt; putting a light object or subject against a dark background.
I said that I don’t like to front light, but the one exception is when I have my subject in the light but right on the edge of darkness so that I’m taking advantage of Figure-Ground; as I’ve done in the photo above.
On July 30th I begin my 29th year at the Maine Media Workshops. I’ve had the same week since the beginning. It’s the week of the Lobster Festival down the road in Rockland. It offers a completely different set of photo ops than one would expect when coming to photograph the coastline, lighthouses, and fishing villages of Maine. Come join me and spend a week completely immersed in your love for photography.
After trying to work out the schedules for the past couple of years, next January I’ll be doing a workshop with William Yu in China:
Although the workshop/photo tour has filled, we’re putting people on a wait list, so be sure to check out the description.
-BPSOP Instructor: Joe Baraban
Joe Teaches:


