What is meant by the term ‘backlight?’
Backlight can be confusing. Some beginning photographers assume that backlighting means that the light source (usually the sun if you’re outdoors) is behind the photographer, hitting them on the back of the head.
However, the opposite is true: the light is very much in front of them and it is not uncommon for the photographer to find him or herself squinting when shooting in a backlit situation. Of the three primary lighting conditions—frontlighting, sidelighting, and backlighting—backlight continues to be the biggest source of both surprise and disappointment, and other then shooting into the backlight of an actual sunrise or sunset, other backlighting opportunities are often missed.
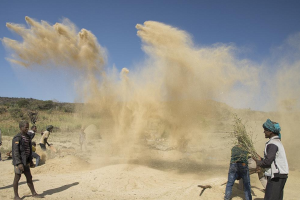
One of the most striking effects achieved with backlight is silhouetting and believe it or not, this effect can be achieved just about anytime you are in a backlit situation. When my students and myself came upon a group of young men during the mid-afternoon, “separating the wheat from the chaff” near a small village in southeast Ethiopia, I noticed each student was choosing to shoot the scene from a front-lit position and here is that front-lit scene.

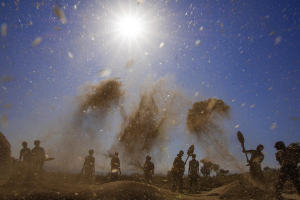
Fortunately, these guys would be performing this activity for some time so I was able to remind the students to consider the backlighting potential in this scene. After they walked to the opposite side of the activity, and getting down low to the ground with their wide angles, I suggested they shoot somewhat up into the sky, including the sun and as the activity began again, it was time to fire the shutter in rapid succession…this backlighting effect is seen here in the image above and its clear, that the young men are now all silhouetted against the ‘star-bursting’ sun that was achievable as well by the use of the aperture of f/22. So let’s review…
Once we were in position, laying low to the ground, we set our apertures to F/22 and with the camera in MANUAL exposure mode, I instructed the students to now adjust the shutter speed until a correct exposure was indicated which for all of us was at a 1/320 second with the ISO set to 200…(It’s important to note that when using a wide-angle lens, such as the 18mm lens on my Nikon D810, the angle of view is quite extreme and as seen here, the intensity of the sun, overall, is somewhat diminished because it does not take up that much of an area in the overall composition and as a result, a ‘correct’ exposure can often be achieved by a simple “aim, expose and shoot”. To be clear a ‘correct’ exposure in this case is going to result in the desired silhouette effect you see here.)
As far as the “where did we focus”, all of us had turned autofocus off and manually set the focus distance to one meter, thus setting an ‘automatic’ depth of field of roughly 20 inches to infinity. The image you see below is just one of the many examples we shot during the course of this frantic activity.

Again the lesson here is that backlight will often result in a silhouette, but backlight is by no means limited to sunsets or sunrises!
You Keep Shooting!
BPSOP Founder: Bryan F Peterson
Bryan teaches:
Understanding Exposure & Your DSLR
Mastering Nikon Flash Photography
Understanding Close-Up Photography


