How To Create Remarkable Nightscapes by Blending Two Images of Different Exposures from the Same Tripod Position

Here’s how to easily combine two nightscapes into a single, stunning composite image!


The next time there is a new moon and you can get totally away from city lights, do the following. Make two separate images: one with a 20 or 30 second exposure and the second with 2 to 3 minute exposure. The first one will have the sky well-exposed with minimal star streaking, but the foreground will likely be pretty dark (below, left/top). The second one should have the foreground nicely exposed by the sky will be badly over-exposed with egregious star streaking (below, right/bottom).

stars

Next, open both images in Photoshop, and copy and paste the shorter exposure time image on top of the longer exposure time image, as shown below (1). Then after clicking on the top layer, create a layer mask (2). Using the brush tool (3), with a black foreground color selected (4) adjust the settings as shown in (5) below.
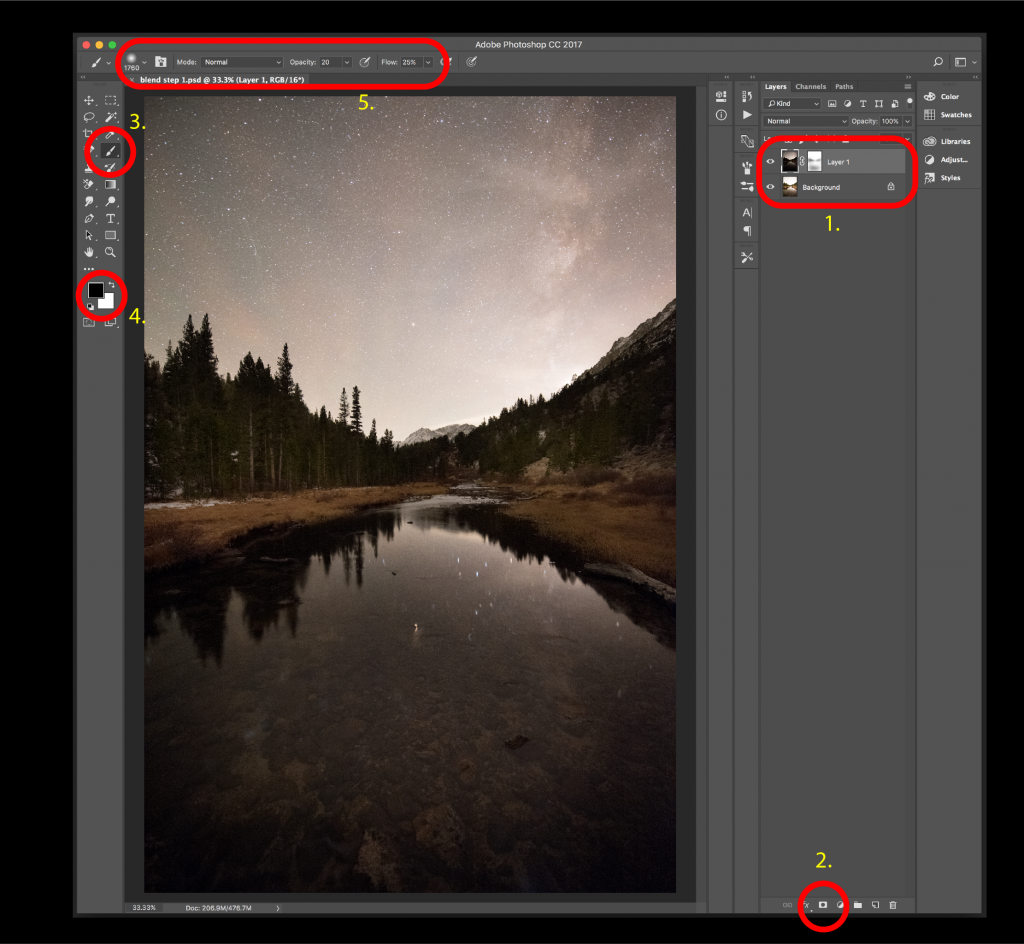
 

b


Next, use the brush tool to paint over the areas of the top image you wish to remove. You can see how I did this below, where I have also switched off the bottom layer’s visibility so you can see which parts of the top layer I have removed and to what extent:
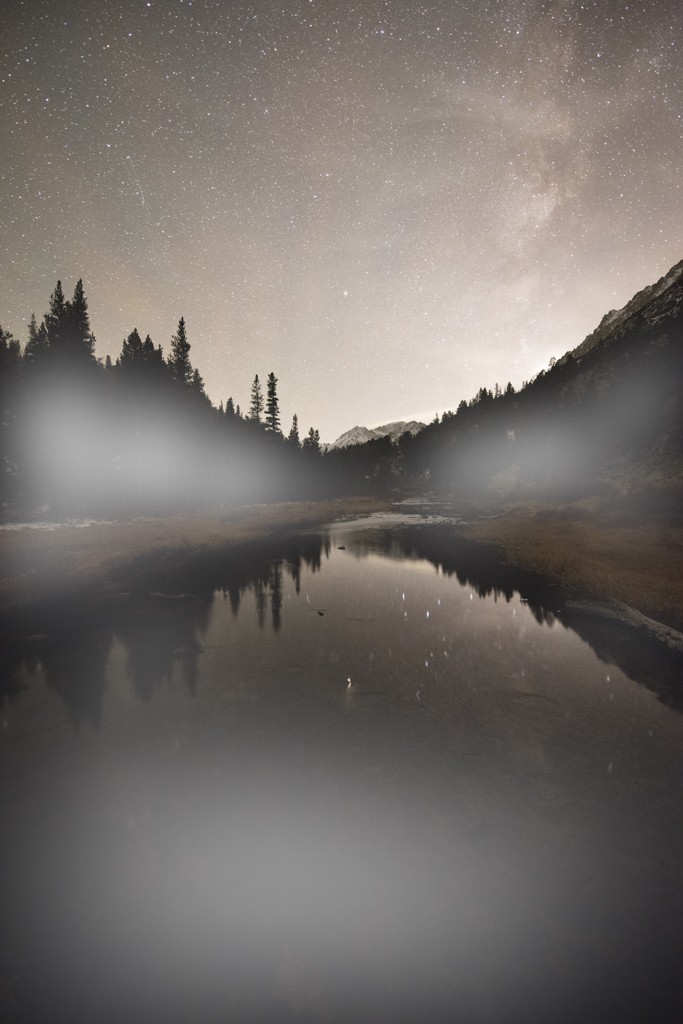
c


After a little final editing, here is the final result! Easy, right? Give it a try and let us know how it goes!!
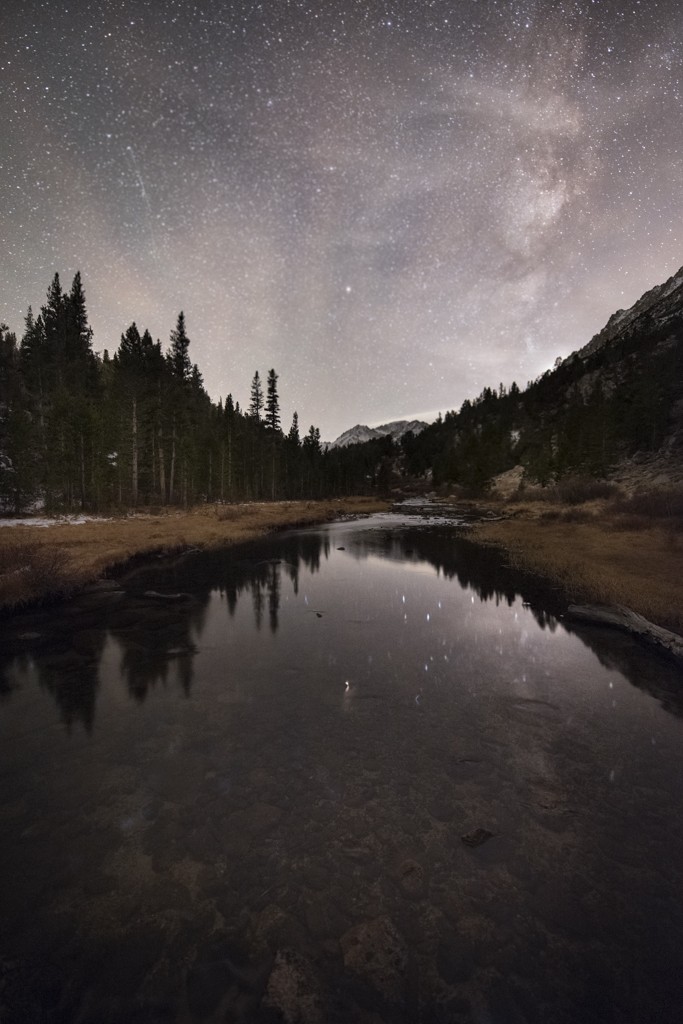
d

-BPSOP Instructor: Mike Shaw

Mike Teaches:

Star Trails & Night Photography


“I just wanted to thank you for another wonderful class. I have to confess that each week when I read the new assignment, my first reaction was mild panic and a deep certainty that I would not be able to produce anything worthwhile that fit within the parameters you had set. But before I knew it, the ideas started to flow, and I quickly became obsessed (no, that isn’t too strong a word!) with exploring the possibilities. I can honestly say that the photos I produced in response to your assignments are among my favorites. Thanks for bringing out a creative side I didn’t know I had!”

Barbara Geiger
Understanding Color

“Thank you so very much for this course! It’s allowed me to take the blinders off and present my images for what I want them to be without being a slave to the “reality” of the camera. I would also add that in conjunction with your printing course, this has been the most useful course I’ve ever taken. Your notes are more than comprehensive and your comments and critiques are direct, clear, and always directed to the improvement of the art.”

Bill
After the click

” I want to thank you for this class and for your patience and availability to answer all of my questions. I have learned very much through this class. I have used LR in the past, but mostly for editing images. I now have a better grasp in the organization of my images, an even better understanding of editing images, and an understanding of the value of presets. I still have a lot to learn, but this has put me on the road to be able to improve my photography. Again, thank you! ”

Dale Yates
Lightroom Quickstart

Classes Starting Soon!

Understanding Exposure and Your DSLR

Instructor: Bryan Peterson Duration: 6 Weeks Cost: US$169 Without que…

After the Click – Refining Your Vision in Lightroom & Camera Raw

Instructor: Mark English Duration: 4 Weeks Cost: US$129 Why do some ima…

Exploring Adobe Photoshop Lightroom & Lightroom for Mobile

Instructor: Holly Higbee-Jansen Duration: 4 Weeks Cost: US$129 In this …

Lightroom Quick Start

Instructor: Holly Higbee-Jansen Duration: 4 Weeks Cost: US$129 Do you w…

Mastering Apple Photos

Instructor: Jon Canfield Duration: 4 Weeks Cost: US$129 Mastering Apple…

Luminar Essentials

Instructor: Jon Canfield Duration: 4 Weeks Cost: US$129 Luminar is an …

The Art of Printing and Selling Your Art

Instructor: Mark English Duration: 2 Weeks Cost: US$76 The print is the…
Translate »