There are many hidden features in Lightroom that will help simplify your work flow and some of them are not easy to find. Here is a tip that can help you with your Lightroom editing.
The Spot Removal Tool
Are you interested in how to easily get rid of dust and scratches in Lightroom? Many digital cameras these days are magnets for dust on the lens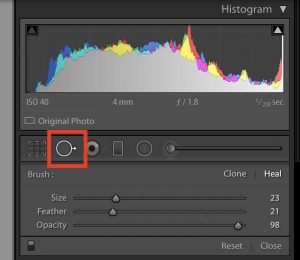 or on the sensor. This is just something we have to deal with these days especially if you are shooting in any sort of inclement weather conditions. On our recent photo workshop to Iceland, I encountered a fair amount of dust and water spots on several images. Here is an easy way to identify and remove those marks in post processing.
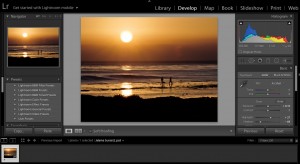
On the selective editing bar in the develop module, there is the spot removal tool. You can either click on it, or use the letter Q to activate it from the Develop module. This is truly a spot removal tool, anything more, you would need to go to Photoshop and use the content aware feature to make any dramatic changes to your images. But to remove dust, hair or sensor dust, this tool does the trick.

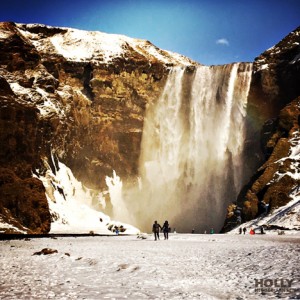
Before Applying the Spot Removal Tool
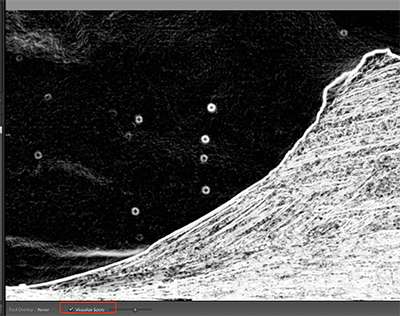
There are some obvious spots on the image above, but if you want to get a closer view, you can active the visualize spots tool. To view any dust, dirt or hair on your image, first activate the spot removal tool and click on “Visualize spots” that shows below the center image in the Develop module. There, the image will now turn black and white. You can adjust the strength of this feature by pushing the slider back and forth. If you push the slider to the left, it will reduce the number of visible imperfections you are able to see, and if you push the slider to the right, it will increase that number of visible imperfections.
For this type of editing with the spot removal tool, I will normally set the feathering to 0 and the opacity to 100%. Adjust the spot removal brush to the size of the spot and click on it. If the spot removal doesn’t disappear or has an obvious outline, then increase the feathering until the adjustment has a softer edge and it not noticeable. Undo your last adjustment, and do it again with the new settings.
As mentioned above, this tool is really only effective for small spots and scratches. Any larger area would need to go into Photoshop for further work with content aware.
This tool can take a little bit of practice to get it right, but used correctly, it can be a time saver for these types of digital imperfections.
If you want to learn more about this amazing program for editing and organization, try my Lightroom Quickstart class. Please head on over to the class page here.
Hope to see you in the next class!
BPSOP Instructor – Holly Higbee-Jansen

Holly Higbee-Jansen is photographer, trainer, blogger, and workshop leader who enjoys teaching and the creative process. Her passions include teaching photography workshops in beautiful locations in California, Iceland, Costa Rica and the American West with her husband Mark. Holly also teaches online classes on Lightroom, Photoshop, and photographic technique. Get Holly’s Free E-Book on “Landscape Photography and the Light“ and find out about her newest workshops at Jansen Photo Expeditions.com.
Reach Holly by email at [email protected] and read her blog at JansenPhotoExpeditions.com/Blog
Holly Teaches:
In this class, we will introduce you to the magic of iPhone photography using several shooting and editing apps that will give you the ability to make your pictures sing in a fun and easy way.You will learn how to crop, change saturation, brightness and affect the overall look of your pictures with HDR, drama and grunge filters and other techniques. You will be amazed at the simple and effective methods.
Do you want to learn to create images that show the beauty of the scene you saw when you took the photograph? Do you want to learn the other essential side of digital photography, photo editing and get up to speed quickly?
This course is designed to get you up and running FAST in this incredibly powerful program. In this two week information packed class, you will learn how to import, organize and perform simple and effective editing processes that will let you produce beautiful adjustments to your pictures.
For a complete list of Holly’s current workshops go to:
Jansen Photo Expeditions – JansenPhotoExpeditions.com
Holly’s Blog: http://jansenphotoexpeditions.com/blog
Facebook – https://www.facebook.com/Jansenphotoexpeditions
Instagram – http://instagram.com/photographyexplorations


