Vincent Van Gogh is one of my favorite painters and I’ve studied and seen his work throughout my career, including during a workshop I conducted in Provence a few years ago; we actually shot at the asylum where he committed himself in Saint-R’emy de Provence.
Van Gogh one said, “I dream my painting then I paint my dream”.
For me this is all about pre-visualization. Having said this, I realize that a painter can paint anywhere so this (dreaming) comes naturally to the medium. The photographer must be in the presence of his subject, but pre-visualization is still possible and actually very important as far as making pictures is concerned.
I teach two classes with the BPSOP, and I conduct my “Stretching Your Frame of Mind” workshops all around our planet. In my online class I send to my students what I call my Did It Do It list for making strong photos; if you have the time to check out that category on my blog you’ll be that much ahead of the game.
One of them and perhaps the most important is “did you pre-visualize”. This is about seeing the image framed in your mind before bringing the camera up to your eye. Clicking the shutter is the easiest part of photography when you know ahead of time what it’s going to look like. For me this will often include moving things around, add or take away objects that either fit or don’t fit, or ask people to be in my shot. Bottom line is that I’m an artist whose medium is a camera instead of a paintbrush…I paint pictures with my camera.
As an advertising and corporate photographer for forty year the term pre-visualize referred to commercial photography. I would be given a rough layout by an art director or graphic designer and my assignment was to create the layout in either a natural outdoor environment or in my studio. After a brief discussion I would begin to visually assimilate some ideas in my mind and I always knew that if I could picture it in my mind I could replicate it on a piece of film.
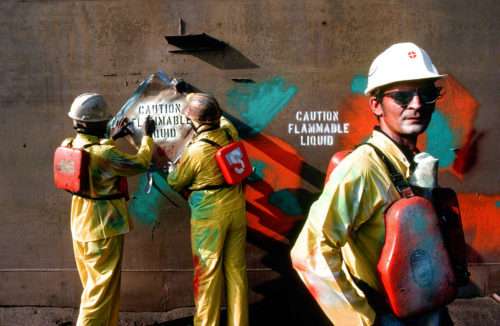
In the above photo, I was shooting a brochure for a barge company on the Mississippi River. While sitting in this large office I saw the yellow slickers, the template, and several cans of spray paint. I immediately began conjuring up images in my mind and had this photo laid out in my imagination within a minute. After asking the powers that be if my idea was something that could happen, and getting a ‘yes’, I proceeded to transfer my idea to reality.
I found three men to wear the slickers, and spray painted them and the wall while having my camera on a tripod; it was just like painting my dream.
The term pre-visualization dates back to the photographer Edward Weston who first coined the phrase in 1921. He thought why limit yourself to what your eyes see when you have such an opportunity to extend your vision?” Weston spent a great deal of time in Mexico along with his son Brett who he took along to keep him out of trouble.
In Mexico he strengthen his practices and in so doing helped Brett become a great photographer in his own right. Weston believed very strongly in the process of pre-visualization and by the way thought that cropping an image was tantamount to failure.
Another photographer in that era who became quite popular was Ansel Adams who had his own take, “The visualization of a photograph involves the intuitive search for meaning, shape, form, texture, and the projection of the image-format on the subject.”
This notion is exactly what I teach in my classes and workshops, that is, using the elements of visual design; Shape Form, and Texture mentioned by Adams are three of them along with Line, Balance, Pattern and Color.
Alfred Steiglitz, the most important photographer of his time also believed in the concept of pre-visualization. “ I see the photograph in my mind’s eye and I compose and expose the negative. I give you the print as the equivalent of what I saw and felt.”
So, my fellow photographers, pre-visualization has long been the cornerstone of creative thinking and there’s no question that it will absolutely enhance your images. The next time you go out shooting take some time to see the image in your mind before bringing the camera up to your eye.
Decide on what’s your message, and what reaction you want the viewer to feel. Then get the lighting and exposure correct and do as much as possible before the easy part comes…clicking the shutter.
-BPSOP Instructor: Joe Baraban
Joe Teaches:


