One of the biggest secrets to the success of your organization in Lightroom is to learn how to use keywords. This doesn’t mean you have to keyword every image that you import into Lightroom, but you can keyword batches of images or select images that you want to remember. I have over 30,000 images in my catalog and I can literally find a single image in a matter of seconds because of the way I have set up my folders and keywords.
When I started using Lightroom, I first created a consistent naming system for all of my folders of images before even importing into Lightroom. It took me some time to go back and rename all of the folders from all my travels and events. I renamed the folders so they were all consistent. For Example:
Yosemite_2015_07
For me, to name the folders by location and then date works out well. Some people prefer to name their folders by events, or even by date. Whatever works for you is great, just be sure that your naming is consistent and it’s something you can remember. You don’t want to have a series of folders that are named differently.
All of these folder titles could fall into the Yosemite_2015_07 category. Don’t make this mistake of creating random titles: Summer 2017, Yosemite 2017, Yosemite July 2017, Half Dome 07_2017.
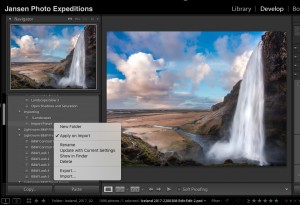
When you import your images into Lightroom, you can either rename them to correspond with the folder, or rename your favorites so you can find them easily. I find this method of renaming them one by one very time consuming and tedious. So batch renaming works upon import, or just adding a keyword to your favorites.
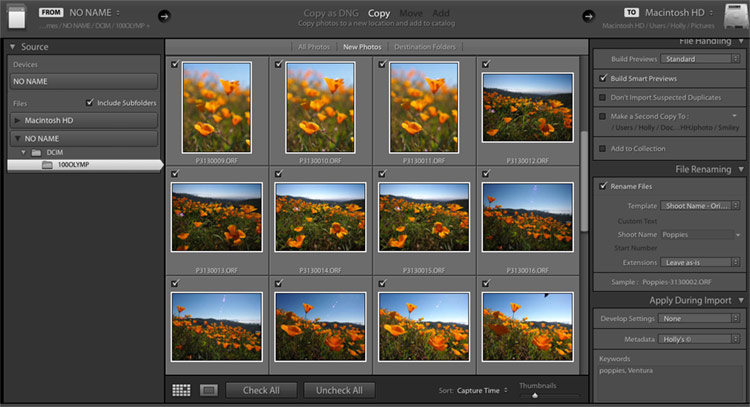
You can batch rename and keyword a series of images like the ones above in the import module.
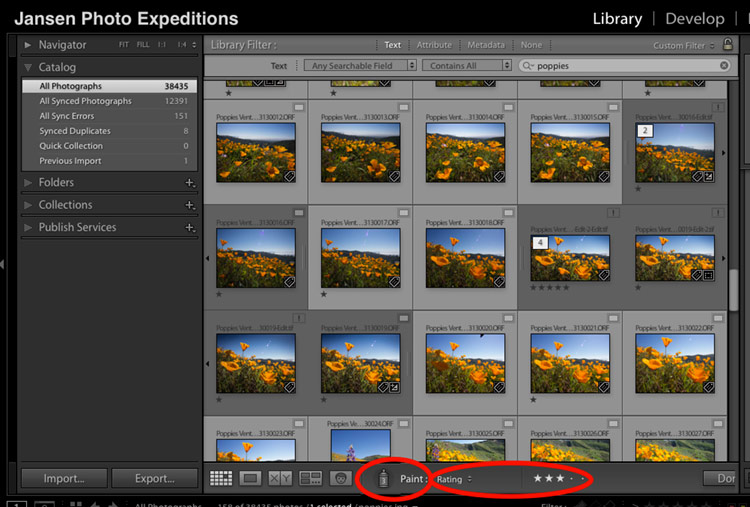
Use of the Paint Can Tool in Lightroom Develop Module
Once I activate the “painter tool”, I will select a 1 star rating. Then I can quickly go through my images in the grid view and “spray” a one star rating on all of the images that I like. At this point, I don’t apply any more than a 1 star rating. If something really merits a greater rating, I go back and review the images again. Once I do my second pass of images, I will set the spray can to the 2 star rating. Then repeat the same method for those images that I might like to go in and apply Lightroom adjustments. The 3 star ratings are reserved for those images that I might use for an article or blog post and the 4 star ratings are reserved for the best of the best which I would put in my portfolio. Keep your star ratings consistent, so you know that if it has a 4 star rating, that it reflects your best work.
Now that you have set up the keywords to your images, you now have the ability to search or filter images in your catalog. In the Filter Bar in the Grid View, choose the Text option and the drop down box to select keywords, and start entering specific keywords.
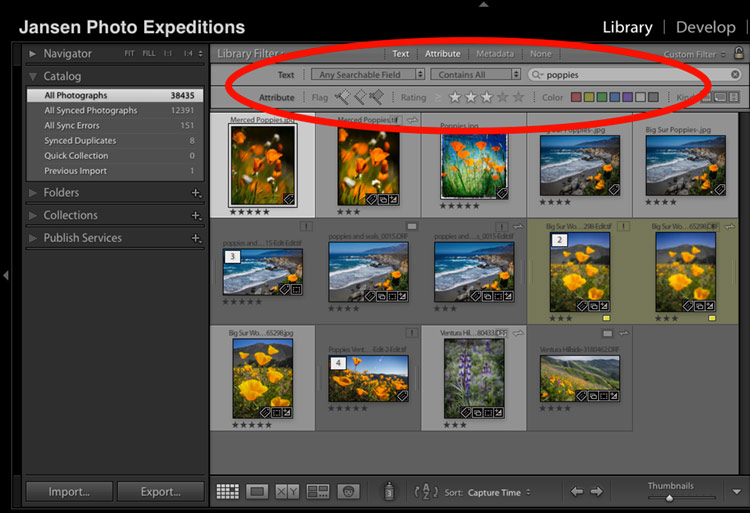
Filter bar in Lightroom showing keywords and star ratings
Then you will see Lightroom begin to sort images based on the keyword. You can then add another dimension to the search, and add a star rating. It’s when you go back into your Lightroom catalog of 30,000 pictures to find the 4 star rated picture in “Yosemite” that was keyworded: “Half Dome Sunset”, and you find it in a second. Then you’ll see how great this system works. You can also limit your search to specific folders or collections when selected in the left hand column of the Library Module.
Have you tried to organize your images in Lightroom? What kind of challenges are you experiencing? Feel free to share your comments below.
If you would like to learn more about this technique, please take either of my Lightroom Classes, Lightroom Quickstart, or Lightroom Presets to get a more in depth discussion.
BPSOP Instructor – Holly Higbee-Jansen
 Holly Higbee-Jansen is photographer, trainer, blogger, and workshop leader who enjoys teaching and the creative process. Her passions include teaching photography workshops in beautiful locations in California, Iceland, Costa Rica and the American West with her husband Mark. Holly also teaches online classes on Lightroom, Photoshop and photographic technique. Get Holly’s Free E-Book on “Landscape Photography and the Light“ and find out about her newest workshops at Jansen Photo Expeditions.com.
Reach Holly by email at: [email protected] and read her blog at: JansenPhotoExpeditions.com/Blog
Holly Teaches:
iPhone Photography
In this class, we will introduce you to the magic of iPhone photography using several shooting and editing apps that will give you the ability to make your pictures sing in a fun and easy way.You will learn how to crop, change saturation, brightness and affect the overall look of your pictures with HDR, drama and grunge filters and other techniques. You will be amazed at the simple and effective methods.

Do you want to learn to create images that show the beauty of the scene you saw when you took the photograph? Do you want to learn the other essential side of digital photography, photo editing and get up to speed quickly?
This course is designed to get you up and running FAST in this incredibly powerful program. In this two week information packed class, you will learn how to import, organize and perform simple and effective editing processes that will let you produce beautiful adjustments to your pictures.
Lightroom Presets: Taking Your Photos from Good to Great
 In this two week class, we will show you how to create your own presets to use over and over and create your own signature style. You will also learn to use third party presets to help with your creativity and enhance your editing power. You will receive detailed information on the website page each week, as well as tutorial videos to help you understand the course material.
For a complete list of Holly’s current workshops go to:
Jansen Photo Expeditions – JansenPhotoExpeditions.com
Holly’s Blog: http://jansenphotoexpeditions.com/blog
Facebook – https://www.facebook.com/Jansenphotoexpeditions
Instagram – http://instagram.com/photographyexplorations
YouTube – youtube.com/c/Jansenphotoexpeditions
Google+ – https://plus.google.com/+jansenphotoexpeditions
500px – https://500px.com/hhjphoto


