Backlight

What is meant by the term ‘backlight?’

Backlight can be confusing. Some beginning photographers assume that backlighting means that the light source (usually the sun if you’re outdoors) is behind the photographer, hitting them on the back of the head.
However, the opposite is true: the light is very much in front of them and it is not uncommon for the photographer to find him or herself squinting when shooting in a backlit situation. Of the three primary lighting conditions—frontlighting, sidelighting, and backlighting—backlight continues to be the biggest source of both surprise and disappointment, and other then shooting into the backlight of an actual sunrise or sunset, other backlighting opportunities are often missed.

One of the most striking effects achieved with backlight is silhouetting and believe it or not, this effect can be achieved just about anytime you are in a backlit situation. When my students and myself came upon a group of young men during the mid-afternoon, “separating the wheat from the chaff” near a small village in southeast Ethiopia, I noticed each student was choosing to shoot the scene from a front-lit position and here is that front-lit scene.

screen-shot-2016-12-08-at-10-24-31-am

Fortunately, these guys would be performing this activity for some time so I was able to remind the students to consider the backlighting potential in this scene. After they walked to the opposite side of the activity, and getting down low to the ground with their wide angles, I suggested they shoot somewhat up into the sky, including the sun and as the activity began again, it was time to fire the shutter in rapid succession…this backlighting effect is seen here in the image above and its clear, that the young men are now all silhouetted against the ‘star-bursting’ sun that was achievable as well by the use of the aperture of f/22. So let’s review…

Once we were in position, laying low to the ground, we set our apertures to F/22 and with the camera in MANUAL exposure mode, I instructed the students to now adjust the shutter speed until a correct exposure was indicated which for all of us was at a 1/320 second with the ISO set to 200…(It’s important to note that when using a wide-angle lens, such as the 18mm lens on my Nikon D810, the angle of view is quite extreme and as seen here, the intensity of the sun, overall, is somewhat diminished because it does not take up that much of an area in the overall composition and as a result, a ‘correct’ exposure can often be achieved by a simple “aim, expose and shoot”. To be clear a ‘correct’ exposure in this case is going to result in the desired silhouette effect you see here.)

As far as the “where did we focus”, all of us had turned autofocus off and manually set the focus distance to one meter, thus setting an ‘automatic’ depth of field of roughly 20 inches to infinity. The image you see below is just one of the many examples we shot during the course of this frantic activity.

screen-shot-2016-12-08-at-10-25-34-am

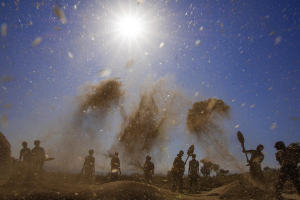
Again the lesson here is that backlight will often result in a silhouette, but backlight is by no means limited to sunsets or sunrises!

You Keep Shooting!

BPSOP Founder: Bryan F Peterson

Bryan teaches:

Understanding Exposure & Your DSLR

The Art of Seeing

Mastering Nikon Flash Photography

Understanding Color 

Understanding Close-Up Photography


“I just wanted to thank you for another wonderful class. I have to confess that each week when I read the new assignment, my first reaction was mild panic and a deep certainty that I would not be able to produce anything worthwhile that fit within the parameters you had set. But before I knew it, the ideas started to flow, and I quickly became obsessed (no, that isn’t too strong a word!) with exploring the possibilities. I can honestly say that the photos I produced in response to your assignments are among my favorites. Thanks for bringing out a creative side I didn’t know I had!”

Barbara Geiger
Understanding Color

“Thank you so very much for this course! It’s allowed me to take the blinders off and present my images for what I want them to be without being a slave to the “reality” of the camera. I would also add that in conjunction with your printing course, this has been the most useful course I’ve ever taken. Your notes are more than comprehensive and your comments and critiques are direct, clear, and always directed to the improvement of the art.”

Bill
After the click

” I want to thank you for this class and for your patience and availability to answer all of my questions. I have learned very much through this class. I have used LR in the past, but mostly for editing images. I now have a better grasp in the organization of my images, an even better understanding of editing images, and an understanding of the value of presets. I still have a lot to learn, but this has put me on the road to be able to improve my photography. Again, thank you! ”

Dale Yates
Lightroom Quickstart

Classes Starting Soon!

Understanding Exposure and Your DSLR

Instructor: Bryan Peterson Duration: 6 Weeks Cost: US$169 Without que…

Wireless Flash Techniques for Outdoor & Nature Photographers

Instructor: Rick Burress Duration: 4 Weeks Cost: US$129 Learn Photoshop…

The Real Photoshop Course

Instructor: Charlie Borland Duration: 4 Weeks Cost: US$129 Are you a …

The Ultimate Guide to Adobe Bridge CC

Instructor: Rick Burress Duration: 4 Weeks Cost: US$129 The Anti-Catalo…

After the Click – Refining Your Vision in Lightroom & Camera Raw

Instructor: Mark English Duration: 4 Weeks Cost: US$129 Why do some ima…

Editing in Adobe Camera Raw

Instructor: Rick Burress Duration: 4 Weeks Cost: US$129 If you love pho…

Exploring Adobe Photoshop Lightroom & Lightroom for Mobile

Instructor: Holly Higbee-Jansen Duration: 4 Weeks Cost: US$129 In this …

Lightroom Quick Start

Instructor: Holly Higbee-Jansen Duration: 4 Weeks Cost: US$129 Do you w…

Mastering Apple Photos

Instructor: Jon Canfield Duration: 4 Weeks Cost: US$129 Mastering Apple…

Luminar Essentials

Instructor: Jon Canfield Duration: 4 Weeks Cost: US$129 Luminar is an …

The Art of Printing and Selling Your Art

Instructor: Mark English Duration: 2 Weeks Cost: US$76 The print is the…

The 50 Most Useful Tips in Photoshop CC and Photoshop Elements

Instructor: Roger Morin Duration: 2 Weeks Cost: US$76 This two-week cla…

50 MORE Photoshop Tips & Tricks

Instructor: Roger Morin Duration: 2 Weeks Cost: US$76 This two-week cla…
Translate »