A question I often hear in my course “The Art of Printing Your Art” goes sort of like this: “How large does my file have to be (or how many megapixels do I need) to make a print of this or that size”. The answer often surprises some students.
Recall that digital images are made of thousands of discrete dots called pixels. In a well-crafted print, they are displayed so close together that we perceive a continuous tone image, rather than an assemblage of dots.
Initially, the maximum number of pixels that you have to work with is determined by the resolution of your camera sensor. A dSLR of around 20 Megapixels will produce an image composed of roughly 5,600 X 3700 pixels. When we go to print these pixels on paper, we can choose to spread them out over a smaller or larger area to produce a smaller or larger print. The larger we try to print, the farther we will have to spread those available pixels apart, and the fewer there will be per inch on paper. Spread them out too far, and the print will start to fall apart. On the other hand, as we pack those pixels closer together in a print we will be able to reproduce more fine detail… up to a point.
So what is an appropriate degree to which we should spread out our available pixels? Expressed in a different way, what is an appropriate image resolution at which to print?
The answer to this question is wrapped up in the limits of human visual acuity. We have to ask ourselves, “What is the finest detail we can see at any given distance?” We need to print at a sufficiently high resolution so that the image appears to be continuous tone and so that all the fine detail is preserved. On the other hand, printing at resolution so high that no one with good vision can see the difference just wastes ink and limits the maximum size we can print.
The closer we look at a print, the finer the detail we can see, and conversely, move that print farther away and we will lose the ability to see that same fine detail. That much I’m sure is obvious. We also have a tendency to hold smaller prints closer to look at them and to step back to look at larger prints, So, it seems logical that smaller prints should be printed at higher resolutions than larger prints.
Fortunately for us as print makers, this works in our favour. We can spread those pixels thick and close together for small prints, where the higher print resolution is needed, and spread them out thinner for larger prints where it doesn’t matter so much.
Now let’s look at the impact of these numbers on our print making.
When we talk about “sizing an image for final output”, we are talking about adjusting the size and image resolution together, to produce an image that will print at a particular size at chosen number of pixels per inch. We do this in Photoshop (“PS”) using the Image>Image Size dialog.
You always start with the native pixels from your camera sensor. You can find the native pixel dimensions of your camera sensor by opening an image in Photoshop, and then going to Image>Image Size. The pixel dimensions are displayed at the top of the dialog. For example, a typical dSLR in the 20 megapixel range will produce an image with native dimensions around 5600 pixels on the long side. If we spread these out at 300 to the inch, we can produce a print roughly 19” on the long side (5600 ÷ 300 = 18.7). If we can get away with 200 pixels per inch in our finished print, then we can produce one 28 inches on the long side. Rounding up a bit this means that we can print a 20 X 30 print with just the native pixels of the camera in our example.
Long story short: when sizing for your final print in Photoshop: for starters, deselect the “Resample” box in the Image>Image Size dialog. This will ensure that we are working with only the native pixels of your camera. Set the Width and Height to whatever size you plan on printing. Have a look at the “Resolution” number that results; it will change as you change the width and height of your image as PS recalculates how to spread your pixels at a particular size.
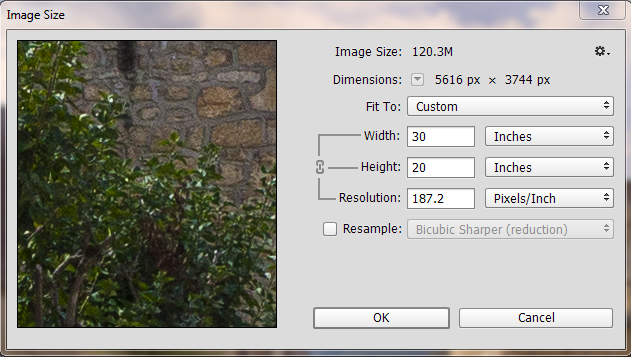
In the example dialog above, our 20 X 30 print can be printed at about 187 pixels per inch. This is a good news, because (without going into details), as long as the Resolution number falls between 180 and 480 pixels per inch, you are good to go. Starting with a file from a typical dSLR in the 18 to 21 megapixel range, the resulting print resolution will be very close to optimal for you chosen print size, keeping in mind that we don’t need the highest resolutions for larger print sizes.
What do when the print resolution falls outside this range? That’s a topic for another day, one that we cover in my course The Art of Printing Your Art”. Classes start soon… hope to see you in class!
– BPSOP Instructor: Mark English
Mark Teaches:
The Art of Printing & Selling Your Art


