The DIY Light Box

FOR YEARS I ENJOYED SHOOTING A TWO-LIGHT SETUP with my two White Lightning Ultra 1200 studio strobes, placing each in a softbox – one on the floor, pointed up, and the other on a light stand, pointed down. Between these two softboxes would be a 4′ x 4′ sheet of 1/8-inch white Plexiglas on which I’d place numerous subjects, including flowers and fruit and vegetable slices. The image below is an example made this way. But as much as I enjoyed this setup, it did take up a large corner of a room, and it was expensive!

 create your own light box

Then one day I stumbled upon the obvious. I lined the inside of a medium-size cardboard box with white poster board, replicating a softbox. I put one of my portable electronic flashes inside the box, pointing it up. On top of the box, I placed a sheet of 1/8-inch white Plexiglas which I found at Home Depot. I mounted another portable flash on a light stand overhead about 2 feet above the box. Due to the obstruction of the one flash in the box, you will need some kind of wireless device to get both of the strobes to fire simultaneously. I’ve found a radio remote, such as a PocketWizard, to be most successful.

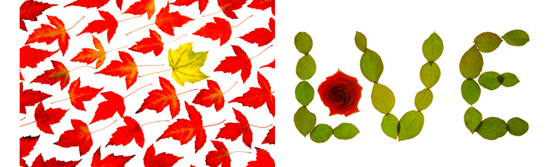
To start, set both flashes to the same output – full power and in MANUAL FLASH MODE. Make sure that both flash distance scales indicate the same f-stop. (F/11 is a good place to begin since this is a set-up where depth of field is not an issue). Keep in mind that the flash in the cardboard box will be illuminating the subject through the 1/8-inch Plexiglas, so don’t place a diffuser or any other light-filtering device on that particular strobe. The Plexiglas becomes the diffuser. However, do place a diffuser on the flash sitting atop the light stand flash. Next, call on a normal sync speed of 1/125 sec., 1/200 sec., or 1/250 sec.; that choice is yours. Then place a flower or other small subject on the 1/8-inch Plexiglas, and shoot down on the setup. Check your exposure. Your goal is a subject floating in white space while being well exposed from both front and back. Many subjects will appear to glow. This is due to the strong backlight of the strobe firing from inside the box. You may end up decreasing the power of one strobe to make it mesh more with the light output of the other. It’s easier to make any changes to the strobe outside the box (the one on the light stand). Here are two examples of how magical this lighting set-up is! Both photos: 105mm lens, ISO 200, f/11 for 1/125 sec.

how to make a light box


Click below to watch a video stream that makes this idea even easier to understand – and keep on shooting!

All my best,

Bryan F. Peterson

“I just wanted to thank you for another wonderful class. I have to confess that each week when I read the new assignment, my first reaction was mild panic and a deep certainty that I would not be able to produce anything worthwhile that fit within the parameters you had set. But before I knew it, the ideas started to flow, and I quickly became obsessed (no, that isn’t too strong a word!) with exploring the possibilities. I can honestly say that the photos I produced in response to your assignments are among my favorites. Thanks for bringing out a creative side I didn’t know I had!”

Barbara Geiger
Understanding Color

“Thank you so very much for this course! It’s allowed me to take the blinders off and present my images for what I want them to be without being a slave to the “reality” of the camera. I would also add that in conjunction with your printing course, this has been the most useful course I’ve ever taken. Your notes are more than comprehensive and your comments and critiques are direct, clear, and always directed to the improvement of the art.”

Bill
After the click

” I want to thank you for this class and for your patience and availability to answer all of my questions. I have learned very much through this class. I have used LR in the past, but mostly for editing images. I now have a better grasp in the organization of my images, an even better understanding of editing images, and an understanding of the value of presets. I still have a lot to learn, but this has put me on the road to be able to improve my photography. Again, thank you! ”

Dale Yates
Lightroom Quickstart

Classes Starting Soon!

Understanding Exposure and Your DSLR

Instructor: Bryan Peterson Duration: 6 Weeks Cost: US$169 Without que…

Wireless Flash Techniques for Outdoor & Nature Photographers

Instructor: Rick Burress Duration: 4 Weeks Cost: US$129 Learn Photoshop…

The Real Photoshop Course

Instructor: Charlie Borland Duration: 4 Weeks Cost: US$129 Are you a …

The Ultimate Guide to Adobe Bridge CC

Instructor: Rick Burress Duration: 4 Weeks Cost: US$129 The Anti-Catalo…

After the Click – Refining Your Vision in Lightroom & Camera Raw

Instructor: Mark English Duration: 4 Weeks Cost: US$129 Why do some ima…

Editing in Adobe Camera Raw

Instructor: Rick Burress Duration: 4 Weeks Cost: US$129 If you love pho…

Exploring Adobe Photoshop Lightroom & Lightroom for Mobile

Instructor: Holly Higbee-Jansen Duration: 4 Weeks Cost: US$129 In this …

Lightroom Quick Start

Instructor: Holly Higbee-Jansen Duration: 4 Weeks Cost: US$129 Do you w…

Mastering Apple Photos

Instructor: Jon Canfield Duration: 4 Weeks Cost: US$129 Mastering Apple…

Luminar Essentials

Instructor: Jon Canfield Duration: 4 Weeks Cost: US$129 Luminar is an …

The Art of Printing and Selling Your Art

Instructor: Mark English Duration: 2 Weeks Cost: US$76 The print is the…

The 50 Most Useful Tips in Photoshop CC and Photoshop Elements

Instructor: Roger Morin Duration: 2 Weeks Cost: US$76 This two-week cla…

50 MORE Photoshop Tips & Tricks

Instructor: Roger Morin Duration: 2 Weeks Cost: US$76 This two-week cla…
Translate »