Ask better questions.
This post is adapted from material in my Free eBook,
“Twelve Ways to Improve Your Photography, without spending a cent”,
available on my website (pacificLIGHT.ca), or by clicking here
“Would you use an 85mm lens or something else, for this?” “Should I shoot this at f/8 or f/4?” These and variations on them, are the most common questions I hear on my location workshops. The only possible answer to questions like these is, “I don’t know, what are you trying to show the viewer?”
Photography is not primarily a technical pursuit. At its heart, photography is an aesthetic, creative art-form — a vehicle for artistic expression. Of the two, technical or aesthetic, the aesthetic is much harder to define and to master than the technical. Putting the cart before the horse; making technical decisions before thinking about aesthetic considerations is the way too many photographers approach image making.
Asking better questions will help you understand what you are trying to show your viewer. “Why this image? “Why right now?” “What is it that made me pick up the camera and point it at this subject?” “What is it about this subject that I am trying to show the viewer?”

Driving slowly along a back-country road in Tuscany, I came across this elderly gentleman making his way up the hill to the village. With the sun streaming through early morning fog, I was struck with the thought of how scenes like this had likely played out here in the same way for centuries. I also felt sympathy, perhaps misplaced, for this person alone in the fog. I wanted the image to convey a sense of this loneliness and of the timeless way of life in this part of the world. With this in mind, choosing a moderate wide-angle lens allowed me to compose the image to place the subject back in the frame and to include the sun through the fog shrouded trees as well. In post I chose a warm colour balance, added a texture overlay, and some grain to express what I felt in that moment.
There are more questions than those that start with, “Why?”. There is also, “What if?”
Asking “What if?” frees your imagination, allowing it to go in new creative directions. Letting go of all the rules instilled into us, rediscovering our inner child, and allowing ourselves to experiment and take creative risks that may lead to new visual discoveries. Asking better questions before we press the shutter button; questions like “Why?” and “What if”? are more important than, “How?”
Let me relate another example.
When a forecast rainstorm arrived early, a planned day of shooting was in danger of being cancelled.
So, what to do? Wandering into the kitchen, I found myself standing near the sink. For whatever reason picked up the sink strainer/drain plug and started asking myself questions. “What could I do with this?” “What if……?

As it turns out I had been shooting some material for the “Understanding Close-Up Photography” course on bpsop.com (next session in April!) involving water drops and flowers. For context, here is one of the images I came up with.
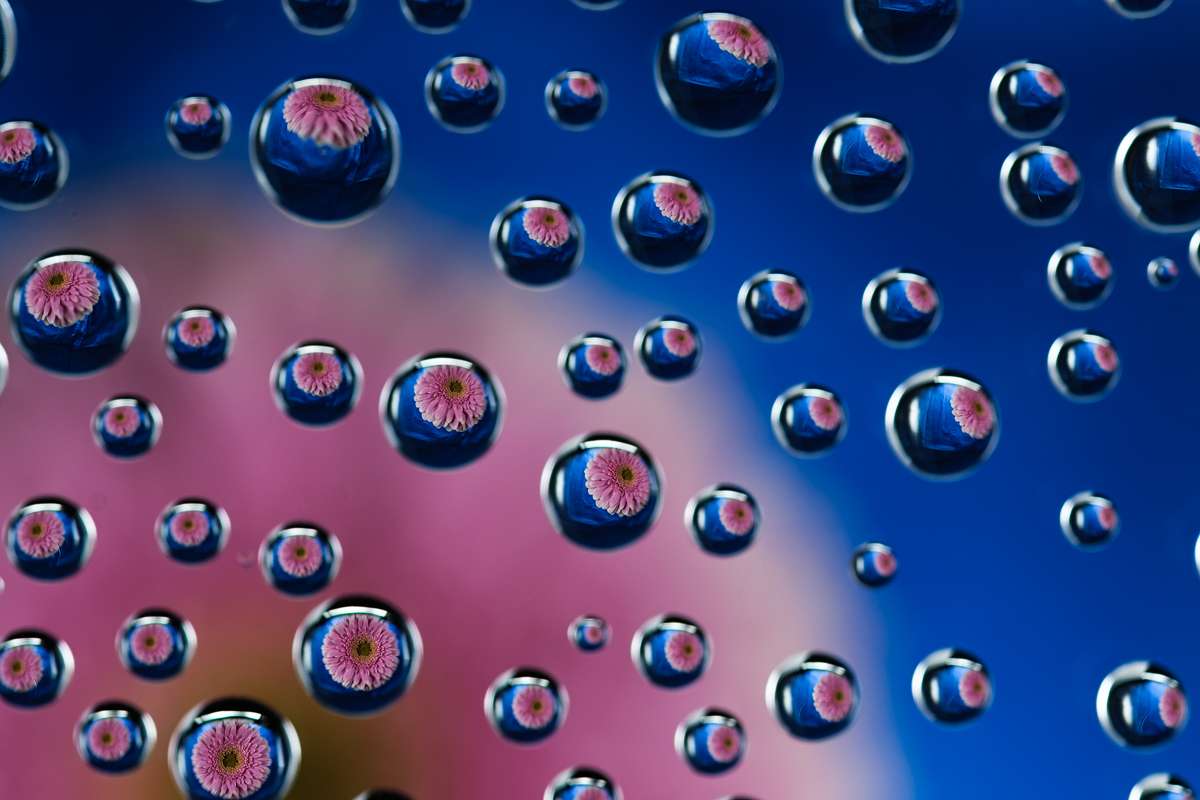
Now, before I go on, it’s important to note that this post isn’t about shooting water drops and flowers, although I will show you how to begin shooting images like this in a minute. This post is really about learning to ask yourself questions that force you to think beyond the obvious and to see the possibilities in the common everyday things around you, whether they are in your garden, a kitchen drawer… or the kitchen sink. So I asked myself, “What if I adapted the water drop and flower approach and lit this drain plug from below? Maybe with a red light and… and maybe a complementary coloured background?
The basic set for the image above (and one I will show you later) is shown in the image below on the left. We have a glass coffee table in our Family room, so it made the perfect “stage” to setup these images. A piece of plate glass is supported above the glass table. This is a tempered plate glass shelf I commandeered for the purpose, and if you decide to try this yourself, make sure the glass is tempered. DO NOT USE PLATE GLASS FROM AN OLD PICTURE FRAME! It is not strong enough, it is not tempered and if it breaks (which is likely) it will produce dangerously sharp edges.
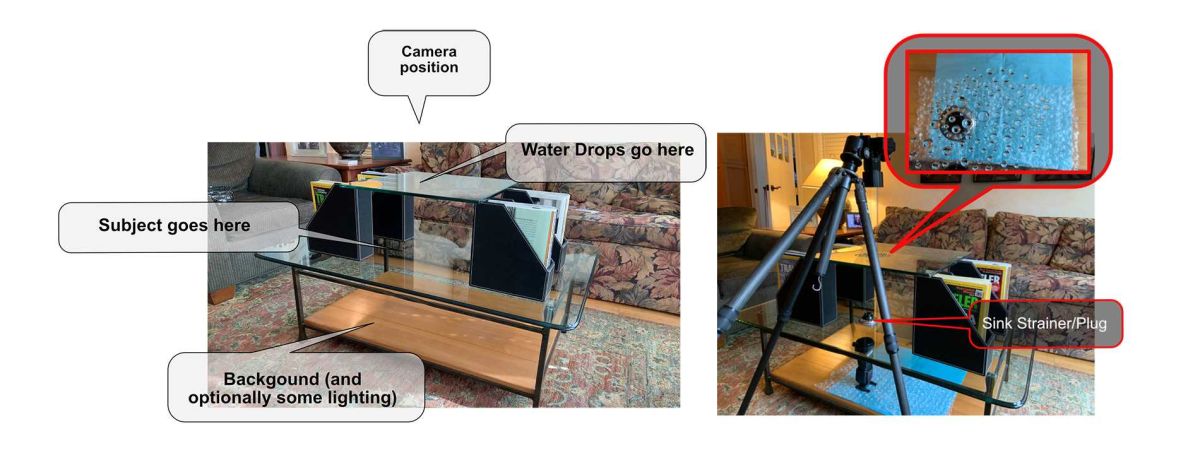
For the Sink Drain Plug setup, all three levels created here (upper glass shelf, middle glass coffee table, and lower shelf) are required since we will want to light the sink drain from below. The Subject is the Sink Strainer, and goes on the second level (the top of the coffee table). Carefully placed water drops are added to the top glass shelf, for reasons that will become clear in a minute. If you want to just shoot flowers or other simple objects, you won’t need to light these from below, so only a single glass stage is required. Simply place the flower or other object below the glass, on some colourful paper or whatever you think appropriate to create a background for the object A glass table like the one here would be ideal. You will need to provide some lighting for the object and its background below the glass. For lighting, you can simply use available window light if you don’t have, or want to use, any additional lighting like the flash units shown here. If you are shooting by window light, use a sheet of black paper or poster board to block the window light from hitting the water drops on the top level, but allowing the light to illuminate the object and background below. I’ll cover these setups in greater detail in the next session of the Close-Up class.
The complete setup for the Sink Drain/Plug image is above on the right.
With the sink drain plug on the coffee table and the water drops carefully placed on the elevated glass shelf (inset above right), a sheet of blue paper and some bubble wrap on the bottom shelf as a background, we’re almost ready to shoot. The camera is positioned to shoot straight down at, and focused on, the water drops on the top layer of glass. The small image inset above on the right shows a “camera eye” view of the water drops on the top level with sink strainer below on the table. If you look closely, you can see that the water drops are imaging the sink strainer below.
To be honest, the lighting was a bit more complicated than shown here but again, the lighting isn’t the point of this post. In the end I came up with the image below, which while not an adjective I like to use in describing my images, I did think was kind of “cool”.

Each water droplet above the subject on the upper glass stage, becomes a little lens — imaging whatever is below. The result is we get sharply defined images of the silhouetted sink strainer in the water drops, but the shape of the sink strainer itself (captured directly through the glass) is just out of focus enough that it leaves you guessing. Which is kind of the point.
But maybe we are not done yet.
Once again the, “What if…?” questions returned. What if I used this as a background for another image?
I loaded the image above onto both mine, and my wife’s iPads. Propping one up vertically, and laying the other on the desk in front of it, I had a small “stage” and a “background” to match.
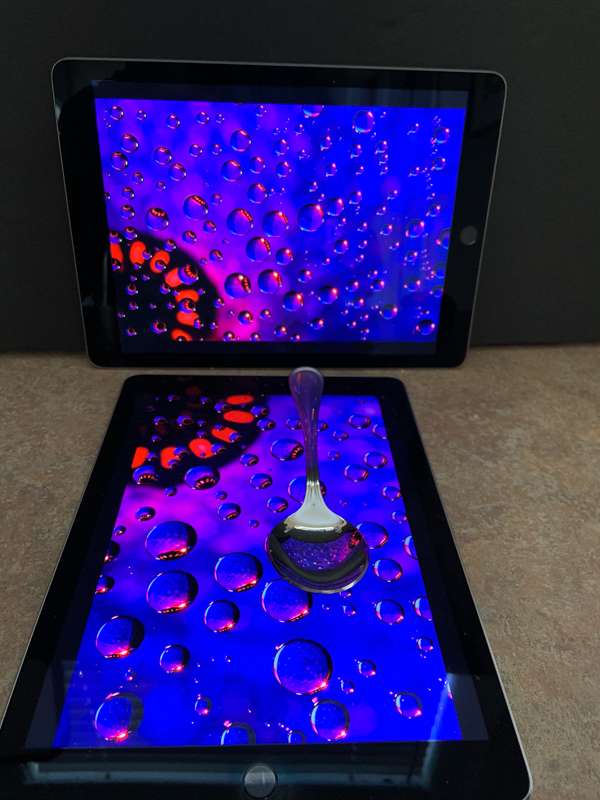
On to the stage, I placed a spoon, and shot just the tip of the spoon, straight on from the level of the iPad “stage” with a macro lens. This was result….
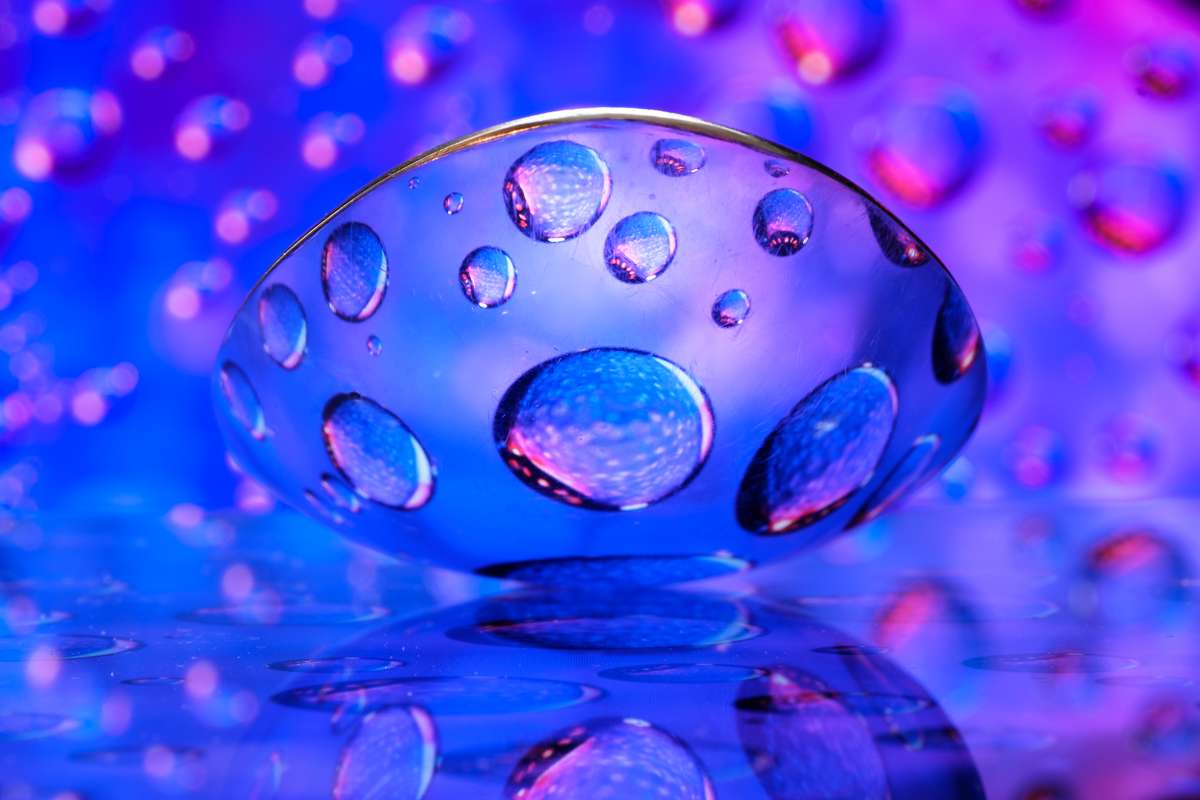
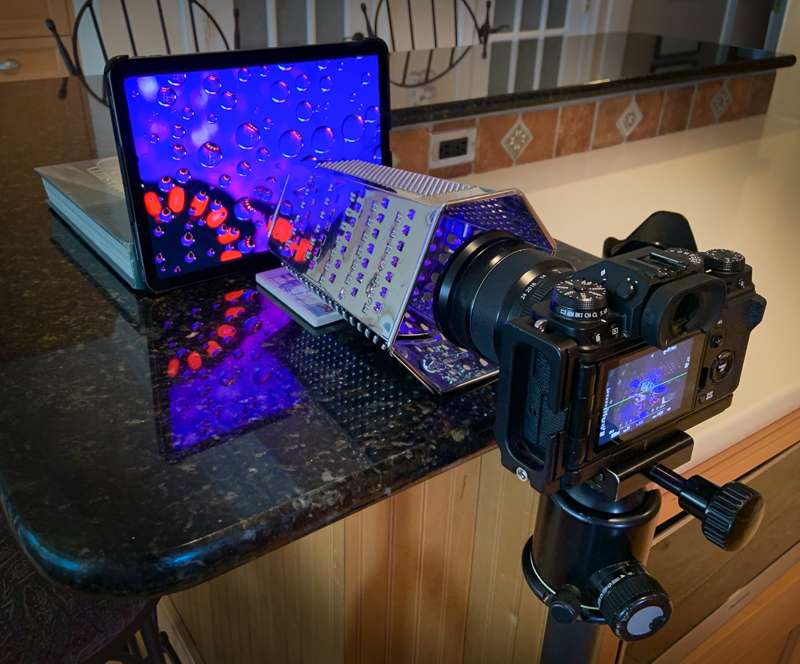
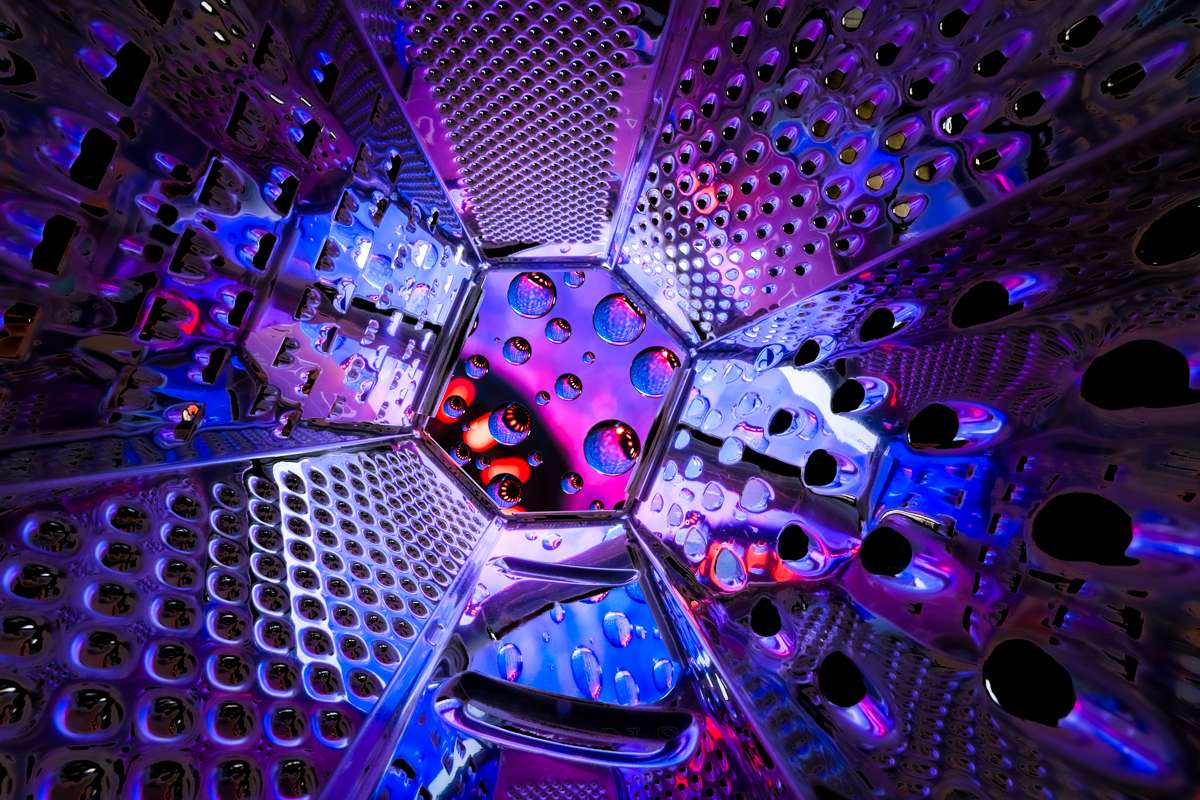
But still I had more questions, “What if I used the original image as a light source to illuminate a shiny reflective object? How about the inside of a cheese grater?
Here is the setup, shot with very wide-angle 10mm lens (15mm full frame equivalent) @f/22 and with the lens set manually to its closest focus point
And here is the result:
Four different images, each one the result of asking better questions. Asking “Why?” or “What if?” will produce more interesting, more creative images — images that show the viewer something more than a simple likeness of your subject.
Start with better questions.
-BPSOP Instructor – Mark English
Mark Teaches:
After the Click: Refining Your Vision in Lightroom & Camera Raw


