Portrait Retouching Fundamentals in Photoshop
Portrait Retouching Fundamentals in Photoshop
01PRFP21 LS1

Take Lesson
01PRFP21 LS2
Take Lesson
01PRFP21 LS3
Take Lesson
01PRFP21 LS4
Take Lesson
Retouching is one of the most common chores for the portrait photographer and mastering the art of retouching can be critical for the success of the portrait photographer. Retouching does not require special artistic talent, if you know how to leverage the power of Photoshop. This course to designed to give you the knowledge of those special techniques and secret tricks that can make professional retouching easy for even the artistically challenged.
Course Outlines:
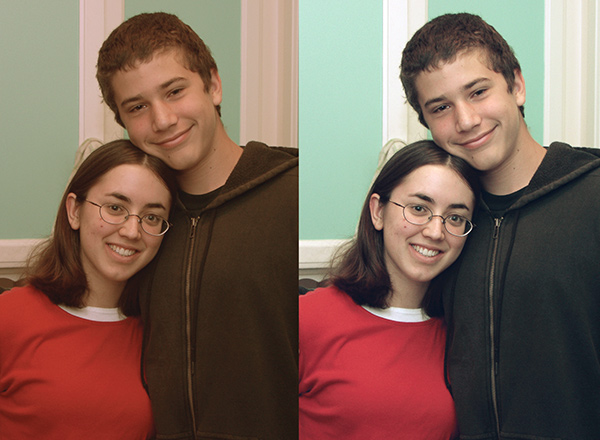
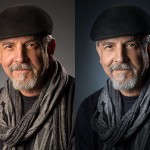
Image from Lesson-1
Lesson 1:
The first lesson involves getting the color of skin correct! This is a critical component of good portrait retouching that is often overlooked. You will learn how to use curves to adjust color and set the white and black points for printing. A special Hue/saturation technique is covered to “get the red out” and enhance skin tone. This assignment will cover the following basic techniques:
- Basic curve shapes
- Curve tool
- Info Panel & correct color numbers for skin tone
- Setting white & black points for printing
- Colorspace considerations
- Hue/Saturation adjustments
- Layer masks for control
- Targeting specific skin tones for adjustment
Your assignment will be to color correct a portrait for good color numbers and set black and white points for printing.
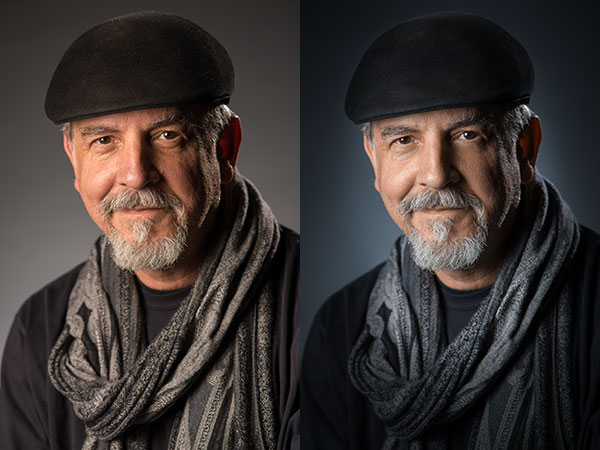
Image from Lesson-2
Lesson 2:
This lesson covers basic retouching techniques in a naturalistic portrait. The goal is to present the subject in a flattering way without over glamorizing. This assignment will cover the following techniques:
- Spot Healing tool
- Clone Stamp tool
- Healing Brush
- Dodge & burn layers
- Softlight blend mode
- Curve adjustment for micro tone adjustment
- Layer masking
- Edge Vignetting
Your assignment will be to retouch a portrait using the techniques in the video lesson.

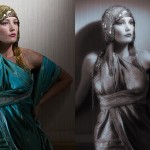
Image from Lesson-3
Lesson 3:
This lesson examines the use of luminosity blending to lighten dark skin and darken light skin. Additionally, a full glamour retouch is detailed for a senior portrait requiring extensive acne remediation and skin smoothing. This assignment will cover the following techniques:
- Luminosity blending using RGB channels
- Advanced blending options to control application of effect
- Spot Healing
- Hue/Saturation color enhancement
- Softlight dodging and burning
- Curve adjustment toning & shaping
- Eye enhancement
- Layer Groups
- Skin smoothing & texture replacement
- Layer masking
- Vignetting
- X-Y slimming transform
Your assignment will be to execute a beauty retouch using the techniques detailed in the video or lighten or darken skin tone in a portrait.
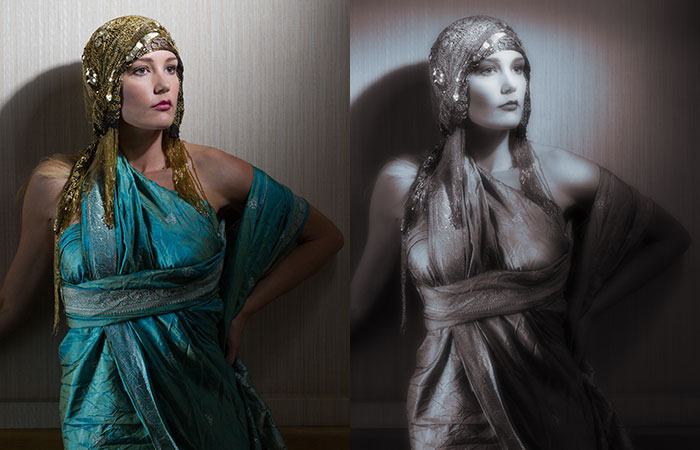
Image from Lesson-4
Lesson 4:
This lesson goes through a very detailed glamour retouch to simulate an old style Hollywood B&W glamour image. Figure shaping and B&W conversions are covered in great detail. A special “Glamour Glow” technique is examined and an Iris blur effect is applied with a vignetter. Finally, the B&W luminosity is applied to the original color image for a cool hand-colored effect. This assignment covers the following techniques:
- Figure shaping with Liquify
- Cloning/repairing
- Multi-channel B&W using the Channel Mixer
- Advanced Blending Options with Knockout to control channel selection
- Layer masking
- Gaussian Blur & Overlay blending for “Glamour Glow” effect
- Layer Groups
- B&W Luminosity blending onto original color
Your assignment will be to do a retouch and turn the portrait into an old style B&W image.
Course Requirements:
Photoshop CS3 or higher – lesson videos use CS6 or CC – the Photoshop interface changed dramatically with CS5 so students with earlier versions will be advised that the video lessons will not “look” the same and this can cause some confusion.
Instructor: Lee Varis
 Lee Varis is a photo-illustrator working in Hollywood. He has been involved in commercial photography for the last 35 years. He started working with computer imaging about 23 years ago and currently works with digital as well as conventional photography in conjunction with computer graphics to create images for use in print advertising.
Lee’s work has been featured on movie posters, video box covers, CD covers, numerous brochures and catalogs. He is responsible for the moth on the “Silence of the Lambs” movie poster! His creative imaging has been featured in National Geographic, Newsweek and Fortune magazines as well as trade journals like PDN, New Media, Micro Publishing News, Rangefinder and Photo Electronic Imaging. Most of Lee’s work starts off as photography that is manipulated in the computer using a wide variety of imaging software. Images are often re-combined with digital painting and effects or with additional photo elements to create digital images that transcend the original source materials. Clients, art directors and fellow artists look for inspiration at Lee’s web site:
There he displays recent imaging work and updates on his numerous classes and workshops, as well as links to his blog and book websites. You can learn more about Lee’s extensive career as an imaging artist from his presentation at Adobe:
Lee has also been involved with consulting and training activities for numerous corporate clients. He did two series of imaging seminars for Apple Computers that took him around the country to most of the major metropolitan areas and is currently active in seminar programs with APA, PPA, ASMP, and Julia Dean Photographic Workshops as well as a touring Creative Production Photoshop roadshow with Mogomedia.
Lee’s first book was “Digital Photography for Creative Professionals” with Rockport Publishers 2003. This is an examination of professional applications of digital photography for commercial graphic artists and art directors concentrating on workflow issues and creative solutions for graphics workgroups. His best know book is the best seller: “Skin: The Complete Guide to Digitally Lighting, Photographing, and Retouching Faces and Bodies” Wiley Publishing 2006 & a 2nd edition in 2010. This book has become a must-have reference for every portrait and fashion photographer. His latest book is “Mastering Exposure and the Zone System for Digital Photographers, Cengage, 2010—an detailed examination of calibrating and shooting for ideal quality in digital captures. He has written numerous articles for Design Graphics, PEI, PC Photo, Rangefinder and Digital Photo Pro. Buy his books on Amazon from the links below:
http://varis.me/SO9dtd
http://varis.me/NvELmN
As a fine artist, Lee has been working on a series of images based on the Tarot. Current progress on this project is on display at:
http://www.newmillenniumtarot.com
Lee 40 years of experience in photography spans the transition from film to digital giving him an invaluable vantage point for teaching and inspiring future generations of artists.