On April 18th, Adobe released a game-changing update to Lightroom and Camera Raw. While there are some improvements in masking that will be of interest to portrait photographers, and we finally have the Tone Curve in local adjustments, the big news is in the Detail Panel. With little fanfare and even less advance notice, Adobe has introduced Artificial Intelligence-based Noise Reduction in the desktop-based and the cloud-based versions of Lightroom Classic and Lightroom.
In a word, it works. In fact, it works extremely well and is very simple to use. There are some limitations, and it does exact a workflow penalty, but these are a small price to pay for the incredible job it does at reducing the appearance of visible noise while preserving fine detail. At the moment, it works only on RAW files from the common Bayer-array sensors (think Nikon, Canon and almost everyone else) or the X-trans sensors of Fujifilm X-series cameras. It does not work with DNG, JPG, PSD or TIF files, at least not currently.
The workflow penalty is two-fold. It creates a new DNG file version of your raw file with noise reduction applied. This new DNG file is automatically added to your Lightroom catalog and stacked with the original raw file. Second, it can take several seconds to several minutes to process a file, depending on the image and the hardware you are running Lightroom on.
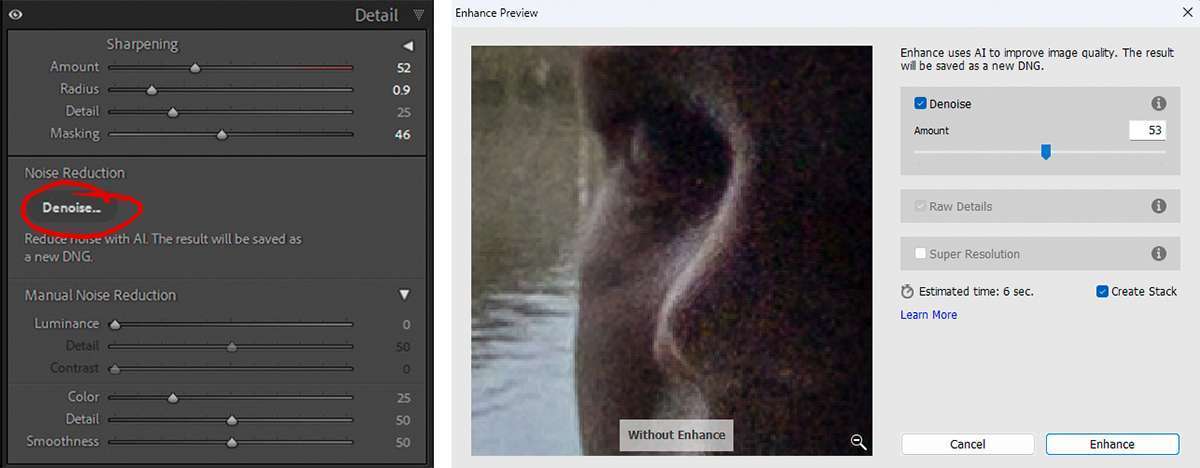
Using this new tool is simplicity itself. To the Detail Panel in The Develop module (image above, left), a new button called, “Denoise…” has been added. Clicking this brings up a dialog with a single slider, “Amount” (above right). This is the same dialog used for the Enhancement and Super Resolution features we have seen before, with the addition of the Amount slider for Denoise. You can set the amount anywhere between 1 (which is essentially no noise reduction) and 100, although I find that settings somewhere in the 50 – 60 range are more than sufficient for most images. If you are dealing with very high ISO settings, or attempting to correct severely under-exposed images you may need to increase the Amount slider beyond this range. A bit of care is warranted — above 70 or so with some images, high settings will begin to create a very un-photographic excessively smoothed-out “plastic” appearance to the image.
So, let’s look at some examples. Here are two images, both shot on APS-C cameras, one at a moderately high ISO of 3200, and another at ISO 25,600. I have examples of each ISO setting processed with,
- the best I can do with the traditional manual noise reduction tools, which are still available.
- a third-party noise reduction plugin: DXO PureRaw, and
- Lightroom’s new A.I. noise reduction tools.
All the image samples to follow have been processed optimally for each option. For image samples processed using DxO PureRaw, sharpening has been applied using the tools in Lightroom rather than DxO. This is my normal workflow with DxO, as I find the sharpening in DxO a bit harsh.
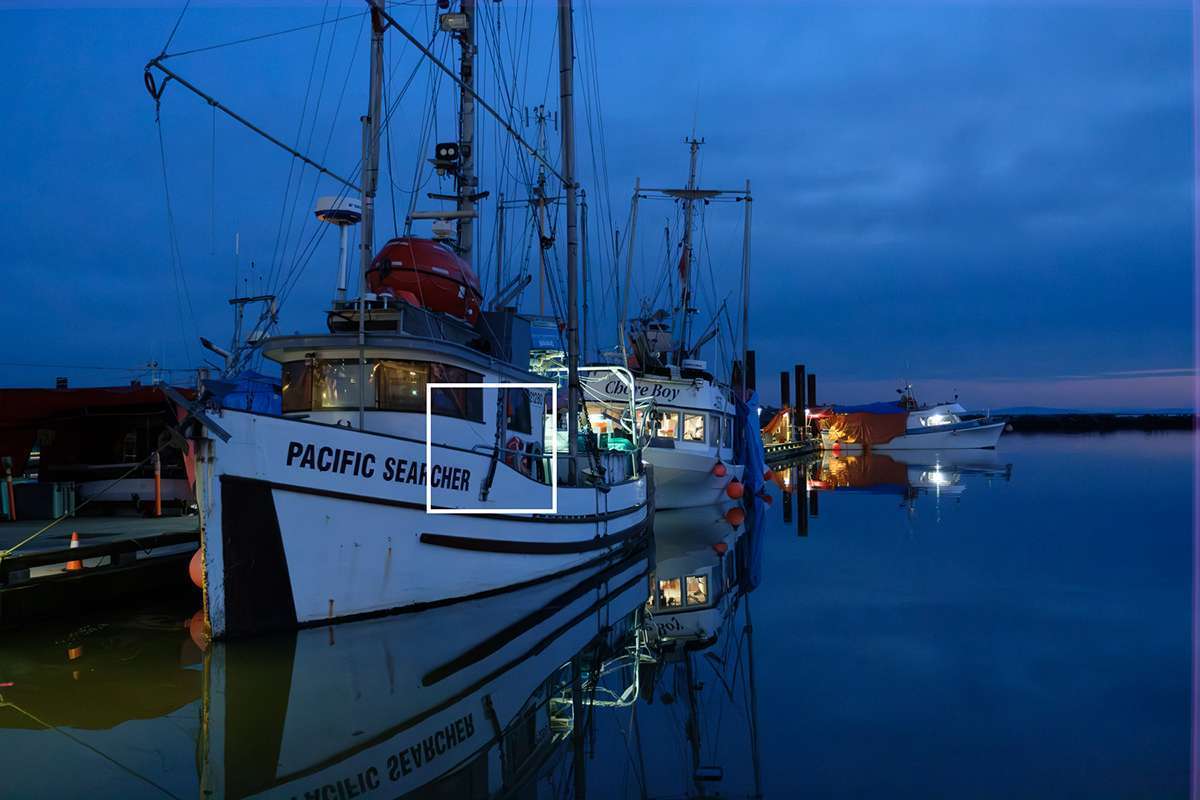
First up, an image shot at ISO 3200. The white square indicates the area enlarged in the comparisons shown below.

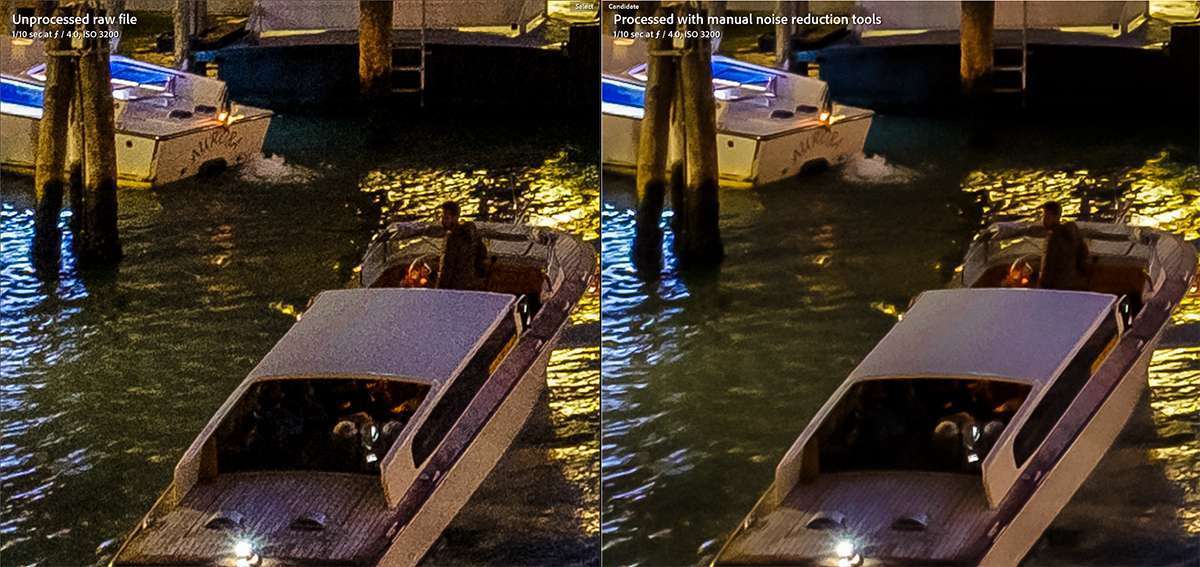
Each of the paired images above is cropped from a 200% enlargement of the original. For context, looking at 200% views on a 27-inch monitor is equivalent to looking at a print 67 inches wide on the long side… from 20 inches away! This is far closer than any reasonable viewing distance for a print of this size.
On the left above all noise reduction is turned off to give you an idea of what the unprocessed image looks like. The image on the right represents the best I can do using the manual noise tools in Lightroom. It’s not bad at all; the worst of the noise is nicely smoothed out, but we have sacrificed some sharpness in the finer details. Note the name “Aurora” on the stern of the water taxi in the upper left of the image, while not as noisy as the original, is also softer.
With these and the following comparisons, you may need to zoom your browser window (usually CTRL-Scroll Wheel, or CTRL-+) to see the differences clearly
Now let’s look at the best manual Lightroom noise reduction effort, compared to the new A.I. noise reduction.
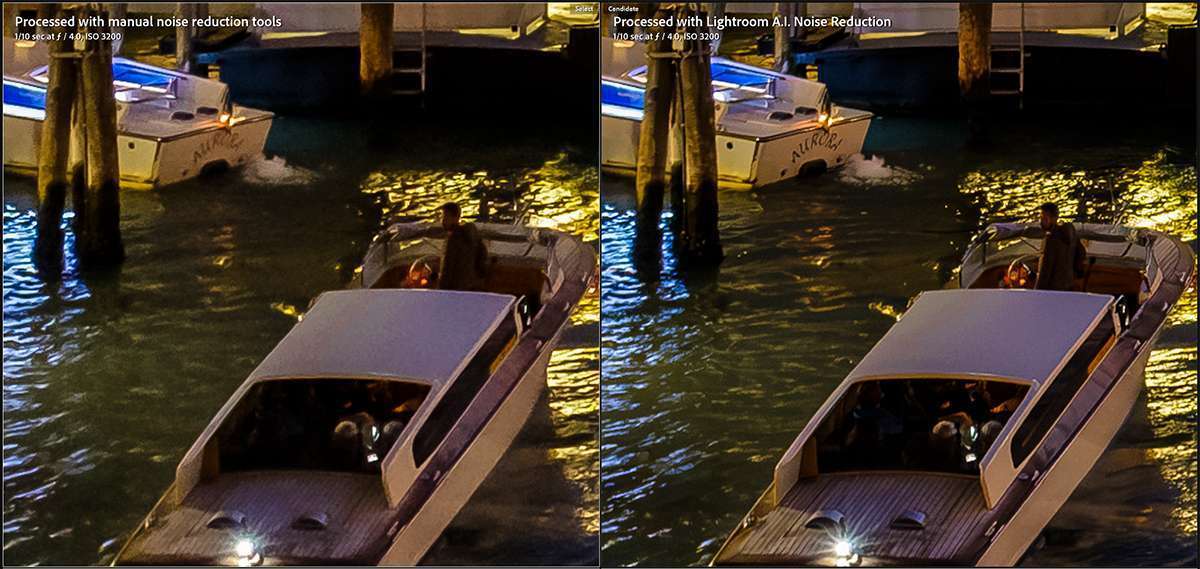
There is simply no comparison between the older manual noise reduction example and the new A.I.-based equivalent. Not only is the noise handled more effectively, but it also does so without losing sharpness in fine details. Note how the white sedan roof of the foreground water taxi is smoother in the AI Enhanced version on the right, but does not have a synthetic “plastic” feel to it. And just look how sharp and noise-free the name “Aurora” appears on the stern of the other water taxi!

DxO ProRaw produces results that are better than those using manual noise reduction in Lightroom, retaining better detail and somewhat better noise reduction. However, it falls short of the results achieved with the new Lightroom A.I. tools in both noise reduction and fine detail reduction.
Now, while the results are impressive, ISO 3200 is not a particularly difficult challenge for a modern digital camera. So let’s increase the ISO all the way to 25,600.
The image above was also shot on an APS-C camera, and the white square represents the area enlarged in the images below.

The image pair above compares the unprocessed image on the left with the best I could do using the traditional noise reduction tools, on the right. As you would expect, the original image is more than a little noisy. While the traditional Lightroom tools do reduce the appearance of noise, they do so at the expense of fine detail. Note the cable hanging below the cabin window (indicated by the arrow)
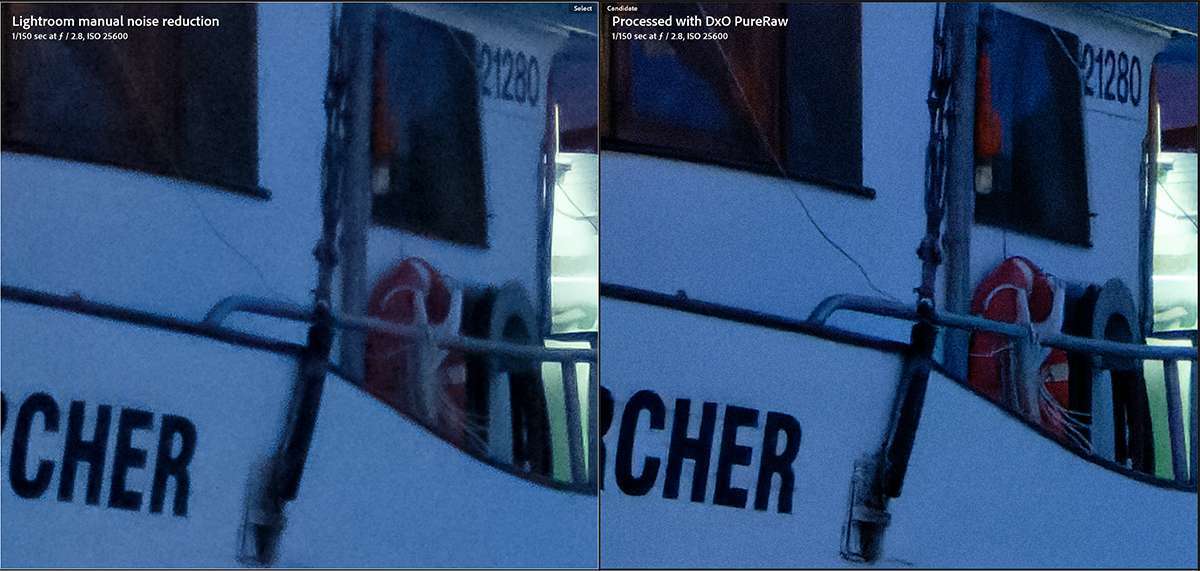
DxO is somewhat better at controlling noise than the Lightroom manual controls and preserves much fine detail more effectively than Lightroom’s manual noise reduction tools.
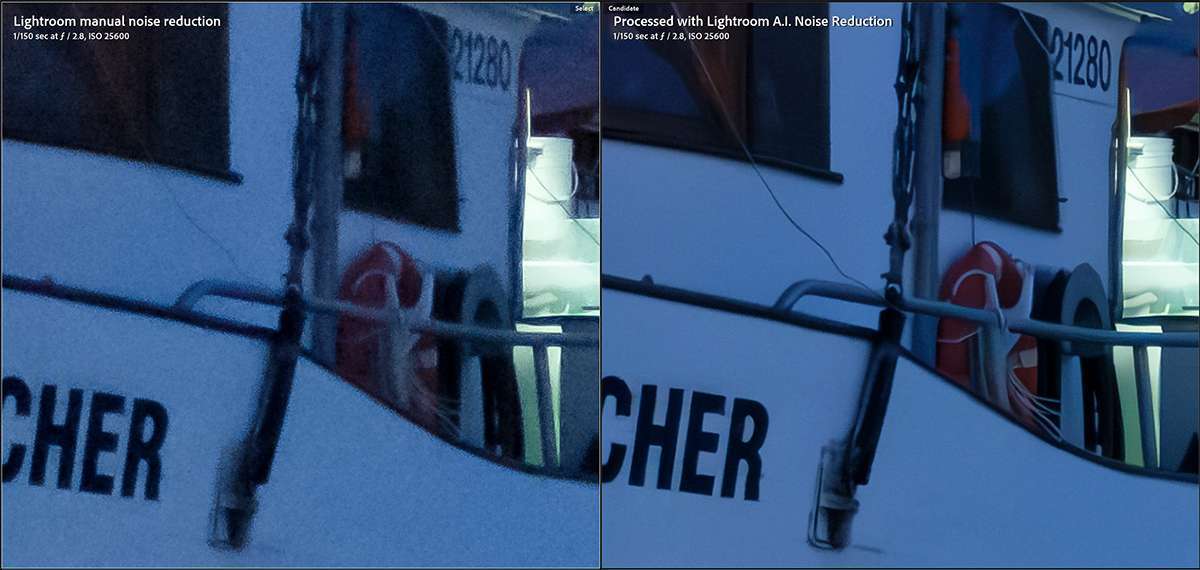
The big story here is the results using the new Lightroom A.I. noise reduction. Aside from effectively eliminating visible noise, fine detail is better retained than either DxO PureRaw or Lightroom’s manual noise reduction tools
Again we need to keep in mind that these are 200% crops of a small portion of each image. Any sharpening effort is best evaluated at 100%; viewing and judging sharpening at 200% will make an optimally sharpened image appear under sharpened. As I said earlier, if these images were printed at the same magnification presented here, they would end up approximately 67 inches wide (170 cm) at optimal print resolution for a print of that size. At the moment, you are viewing these 67-inch prints from something like 20 inches away (51 cm). A comfortable viewing distance for any print is equal to a distance roughly twice the diagonal. For a 67-inch print, this would be about 13 feet (~4 meters). At normal viewing distances, prints from either of these files would appear both sharp and virtually noise free.

Just to drive the point home, the image pair above compares the unprocessed raw file with the A.I. noise reduction.
Parting Thoughts…
Should you immediately incorporate this new tool into your own workflow? The quick answer is a resounding, Yes! However, a more nuanced approach would suggest a few considerations.
Using the new A.I. noise reduction tool creates an entirely new version of your raw file in DNG format. Lightroom is nice enough to add it to your catalog and stack it with your original, so this isn’t a really big deal. Processing the new version can take anywhere from several seconds to several minutes, depending of course on the file and the hardware you are running Lightroom on.
Depending on your intended use, proper application of the manual noise reduction tools may be more than adequate. Since down-resing an image to smaller pixel dimensions is one of the best ways to reduce visible noise, for small image sizes intended for a website or for social media sites like Instagram or Facebook, the manual tools may be all that is necessary. The exception to this might be for images at very high ISO settings, but then again… maybe not. Let your eye be the judge. Certainly, if you plan to print an image, particularly larger sizes for exhibition, the workflow penalty is a small price to pay for the clean image quality achieved.
My own testing so far, suggests that with many current models of digital cameras, the “workflow interruption penalty”, may not be worth the effort for ISO settings at or below ISO 1000. At ISO settings of 3200 and above, the A.I. tools become increasingly valuable, and in my own situation, above ISO 6400 this new tool becomes a complete game changer. I’ll have more to say about these new tools, including where I think it fits into an overall sharpening and noise reduction strategy in the second week of my online course, “After the Click”, beginning May 5th.
What this new tool should do is remove your fear of shooting at very high ISO settings. Certainly, if you can shoot at a low ISO setting and utilize an aperture and shutter speed combination appropriate to the image you are trying to create, then there is no reason to crank up the ISO simply because you can. Higher image quality will always result from shooting at a lower ISO, all other things being equal.
But, it is also far better to get the image, than to come away with nothing.
-BPSOP Instructor – Mark English
Mark Teaches:
After the Click: Refining Your Vision in Lightroom & Camera Raw


