Photoshop Layers Fundamentals: Sections, Masks, and Adjustments
Photoshop Layers Fundamentals: Sections, Masks, and Adjustments
02PLAY18 LS1
Take Lesson
02PLAY18 LS2

Take Lesson
02PLAY18 LS3

Take Lesson
02PLAY18 LS4

Take Lesson
Photoshop is the most powerful image-editing tool available today, and it has become an irreplaceable element of every photographer’s toolkit. Photoshop replaces all the traditional darkroom processes with capabilities that go well beyond what was possible before the advent of the computer. The vast power of this software can be intimidating in its complexity. The key to unlocking Photoshop’s secrets lies in understanding layers, selections, and layer masks. This course is designed to lead you from a basic understanding of layers to more advanced applications of layers in image compositing and special effects! All of the lessons in this course can be followed using any version of Photoshop from CS6 on, but we are using Photoshop CC (2017) for most of the videos – I have included PDFs with step-by-step instructions using much older versions of Photoshop, but these should only be used for conceptual reference
Course Outlines:
Lesson 1:
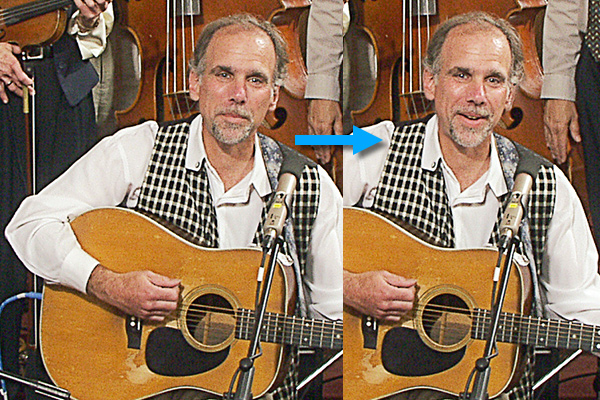
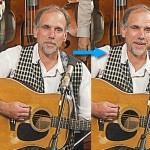
The first assignment involves swapping heads in a group photo. We will replace an unfortunate expression in an otherwise good shot with a better expression from another shot that, overall, is not as good. This is a very common experience with group shots – the larger the group, the more likely it is to happen that somebody will not look so good – learning how to fix this is very valuable! This assignment will cover the following basic techniques:
Selections
- Lasso tool
- Adding to & subtracting from selections
- Saving selections
- Quick mask mode
Layers & Layer Masks
- Making Layers
- Getting Selections into Layer Masks
- Revising Layer Masks
Transforms
- Free Transform
- Rotation of an image layer
- Lining up Layers
Lesson 2:
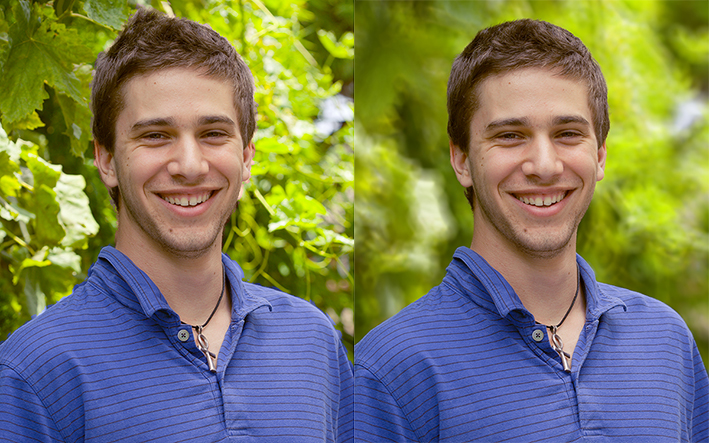
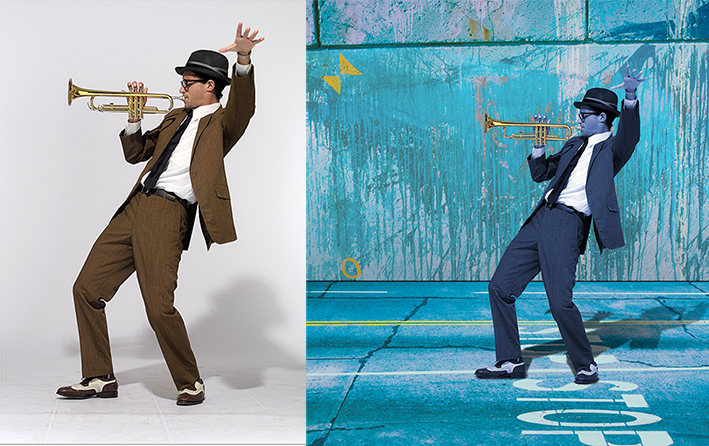
This assignment involves separating a subject from the background and applying a blur filter to the background to simulate a more limited depth of field effect with lens bokeh. Bokeh is a Japanese word used to describe the idiosyncratic optical blur produced by a lens. Digitally produced blur often looks nothing like the kind of blur produced by a lens. Our goal here will be to simulate lens bokeh a little more closely while also learning more about refining selections and Layer masks. This assignment will cover the following techniques.
Selections
- Quick Select Tool
- Edit & Refine the selection edge
- Convert to Layer Mask
Layers
- Duplicating the Background into a Layer
- Content Aware Fill to replace the subject in the Background
Blur Filters
- Iris & Tilt-Shift Blur filters
- Shape Blur to simulate lens bokeh
Lesson 3:
This assignment examines the act of placing one image on another background. You will learn how to make and modify selections & Layer Masks. We examine the basic layer organization features of Photoshop with Clipping Masks and Groups. You will learn how to make drop shadows and see how to adjust layer brightness and color independently while maintaining maximum flexibility. This assignment will cover the following techniques
Selections
- Lasso Tool
- Magic Wand Tool
- Quick Mask
- Editing with the Smudge Tool
- Saving Selections
- Transforming Selections
- Converting to a Layer Mask
Layers
- Moving Layers from one document to another
- Clipping Masks & Groups
- Adjustment Layers
- Drop Shadow and Contact Shadow layers
- Color Adjustments
Lesson 4:

This assignment examines the masking procedures for a difficult hair edge and starts the selection process with Color Range – a useful method for blue or green screen photography. Learn to fine tune selections and masks with paint tools and a blur and burn technique! We also look at an alternate method of generating a mask using Calculations and blend the subject more fully with the background by coloring the hair wisps to suggest the lighting of the background. As a bonus retouching technique, skin smoothing is shown in detail – a very trick application of layers and apply modes. This assignment covers the following techniques
Selections
- Color Range
- Inverting the selection
- Dodging & Burning to refine selections & masks
- Refine Edge dialog
- Calculations for Blue Screen
Layers
- Moving and resizing
- Re-coloring hair edges
- Layer Blend Modes
Bonus Technique
- Retouching & advanced skin smoothing technique
Course Requirements:
Photoshop CS5 or higher – the Refine Edge dialog that is discussed in the lessons was introduced in CS5 – Photoshop CS6 or CC is used in the course videos. Ideally, students should upgrade to the Photoshop CC (latest version) 2017 to take full advantage of the course—Refine Edge has been replaced by Select and Mask in the current version of Photoshop
Instructor: Lee Varis
 Lee Varis is a photo-illustrator now living in the Boston area. He has been involved in commercial photography for the last 40+ years. He started working with computer imaging about 23 years ago and currently works with digital as well as conventional photography in conjunction with computer graphics to create images for use in print advertising.
Lee’s work has been featured on movie posters, video box covers, CD covers, numerous brochures and catalogs. He is responsible for the moth on the “Silence of the Lambs” movie poster! His creative imaging has been featured in National Geographic, Newsweek and Fortune magazines as well as trade journals like PDN, New Media, Micro Publishing News, Rangefinder and Photo Electronic Imaging. Most of Lee’s work starts off as photography that is manipulated in the computer using a wide variety of imaging software. Images are often re-combined with digital painting and effects or with additional photo elements to create digital images that transcend the original source materials. Clients, art directors and fellow artists look for inspiration at Lee’s web site:
There he displays recent imaging work and updates on his numerous classes and workshops, as well as links to his blog and book websites. You can learn more about Lee’s extensive career as an imaging artist from his presentation at Adobe:
Lee has also been involved with consulting and training activities for numerous corporate clients. He did two series of imaging seminars for Apple Computers that took him around the country to most of the major metropolitan areas and is currently active in seminar programs with APA, PPA, ASMP, and Julia Dean Photographic Workshops as well as a touring Creative Production Photoshop roadshow with Mogomedia.
Lee’s first book was “Digital Photography for Creative Professionals” with Rockport Publishers 2003. This is an examination of professional applications of digital photography for commercial graphic artists and art directors concentrating on workflow issues and creative solutions for graphics workgroups. His best know book is the best seller: “Skin: The Complete Guide to Digitally Lighting, Photographing, and Retouching Faces and Bodies” Wiley Publishing 2006 & a 2nd edition in 2010. This book has become a must-have reference for every portrait and fashion photographer. His latest book is “Mastering Exposure and the Zone System for Digital Photographers, Cengage, 2010—an detailed examination of calibrating and shooting for ideal quality in digital captures. He has written numerous articles for Design Graphics, PEI, PC Photo, Rangefinder and Digital Photo Pro. Buy his books on Amazon from the links below:
http://varis.me/SO9dtd
http://varis.me/NvELmN
As a fine artist, Lee has been working on a series of images based on the Tarot. Current progress on this project is on display at:
http://www.newmillenniumtarot.com
Lee 40 years of experience in photography spans the transition from film to digital giving him an invaluable vantage point for teaching and inspiring future generations of artists.