It’s almost time for what can be an epic meteor shower every year – the Perseids Meteor Shower. This year it will peak in the early morning hours of Friday, August 12, but if you’re truly determined to capture the most meteor shots as possible, plan to shoot the night before and the night after as well. To take full advantage, you need to plan to shoot through the night as the hours before twilight in the early morning are often the best. In fact, astronomers are predicting an “outburst” of the Perseids at 200 meteors per hour or more!
Photographing meteors is like shooting lightning – you never know when they will appear, so you need to
have your shutter open as much as possible to capture these fleeting fireballs. While some of you may use a lightning trigger for your lightning shots, I prefer to set my camera on continuous 20-second shots by attaching my remote shutter release and locking it down for lightning, and I do the same for meteors. You can also set the specific number of shots you want using an intervalometer. In this way, your shutter is open for 20 seconds at a time, and during that time, there may be one meteor, no meteors, or two or three meteors in your image. After 20 seconds, the camera closes the shutter and immediately opens it again for another 20 seconds, and so on through the night. This allows you to sit in your reclining chair and enjoy the show! Back home on the computer, you can select the best individual images, or you can create a composite of several to show multiple meteors in one image. Alternatively, you can also create a short time-lapse video.
So, what do you need and how do you get it all set up? I will walk you through the steps below.
First, equipment:
A DSLR or mirrorless camera
A sturdy tripod
Your widest, fastest lens – 14mm-24mm is ideal because it will include the largest possible area of the sky, and more sky means more chances of capturing more meteors. Equally important is the aperture – f/1.4 is ideal, f/2.8 is okay. The wider the aperture (f/1.4), the more light that is reaching the camera sensor, so the more meteors that will be detectable in the images. Remember that f/1.4 is 2 stops faster (wider) than f/2.8, so it will pick up even the dimmest meteors that f/2.8 may not be able to. That’s a big difference.
Remote shutter release or intervalometer
Gaffer tape to secure the lens focus ring after you have focused
Extra charged batteries
Large enough memory card, or extra memory cards
Flashlight
Comfortable chair
Snacks
Okay, now that you have your gear ready to go:
1. LOCATION AND TIME: Head out to the site where you will shoot. You will have already scouted this site during the day for compositions, accessibility, safety, and obstructions. Plan to arrive before it’s fully dark. You can shoot sunset and then the Blue Hour into darkness, when you will switch to meteor photography settings. Sunset on August 12 is at 7:15pm, so depending on your latitude, full darkness (end of astronomical twilight) will be around 10:00pm, plus or minus.
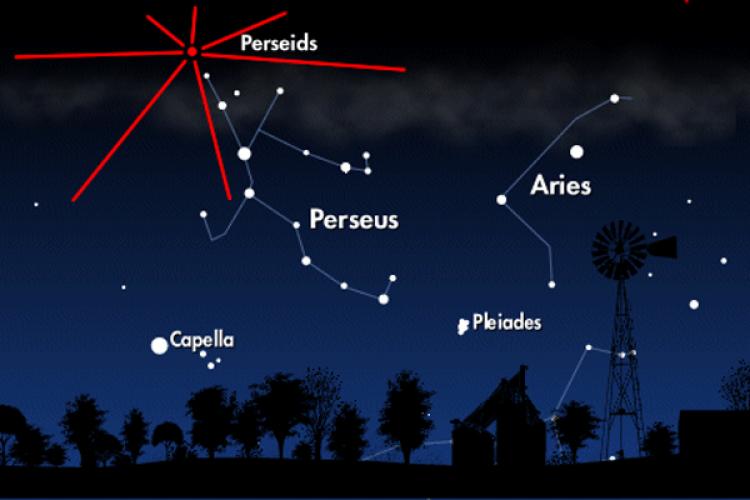
2. COMPOSITION: Decide on your composition. Ideally, you will have an interesting foreground to complement the sky, but the sky needs to be the majority of your image because that’s where the action is. When deciding this, the most important consideration for this is the direction you face. You want to point the lens either side of the meteor shower radiant. The radiant is the emanation point of the meteors. This is the Perseids shower, named after the constellation Perseus in the northeast sky. That means that the meteors will emanate from Perseus. But that doesn’t mean you should point directly at Perseus; rather, plan on pointing about 30-45 degrees to either side of Perseus. Keep this in mind as you plan your composition.
3. SETUP AND FOCUS: Now that you have decided on your composition, set up your tripod and camera. Attach the remote shutter release or intervalometer. Now it’s time to focus. For those of you who have taken my night workshops or have read my book, Fun in the Dark: A Guide to Successful Night Photography, you know just what to do. If not, here is the routine for night photography focusing:
a. The goal is to establish ‘infinity focus’. Infinity means that your subject of focus is beyond the hyperfocal distance, which depends on your focal length and aperture. Don’t worry too much about this if you’re not familiar, just make sure that your composition does not include anything closer than, say, 30 feet. That’s a good ballpark figure. If there is a tree or a bush closer than that, chances are it will be out of focus. Beyond that distance, however, is infinity, and that will all be sharp. Most important is that the stars are sharp!
b. If you have arrived at your site and are setting up in daylight, you can use autofocus to establish infinity focus. Simply autofocus on a distant subject – a mountain, tree, etc. – and then – very important – switch to manual focus. If you don’t, when you half press the shutter release the next time, your lens will attempt to refocus.
c. Take a short piece of gaffer tape (1-2 inches) and gently place it on the lens where the focus ring meets the fixed barrel of the lens. This will secure it from tiny movements due to temperature change, brushing up against the lens accidentally, etc. Remember this – you don’t need to refocus unless you change your focal length (e.g., 20mm to 24mm). Even if you recompose, if you stay at the same focal length, your focus is still good.
d. If you are establishing focus after dark, you are in luck on August 12 because the moon will already be up. You can use autofocus to focus on the moon, then switch to manual focus, tape down, and you’re good to go! It doesn’t matter that the moon may not (preferably not) be in your composition, because infinity is infinity, no matter what direction you are facing.
4. WHITE BALANCE: I recommend a Kelvin setting of about 3500-3800 for this type of night photography. Most DSLRs allow you to set the temperature manually. Check your User Manual if you don’t know how. As a last resort, use the “Daylight” setting. If you are shooting RAW images (and you should be), this is easily adjusted in post-processing.
5. SHOOT: Once full darkness has arrived, it’s time to start shooting. At your widest aperture (e.g., f/1.4, f/2.8), set your shutter speed at 20 seconds and your ISO at 100. Take a test shot. It will probably be way too dark (remember to check the histogram for the most accurate information). This is where the ISO plays its role – increase to 1200 and take another test shot. Too dark? Keep increasing the ISO until you get a good exposure. It may have to go as high as 3200 or 6400.
Now that you have figured out your settings and set them, take a couple of test shots. Make any necessary adjustments, and then lock down the remote shutter release (push the button forward where it will stay).
6. HAVE A SEAT AND ENJOY THE SHOW!
– BPSOP Instructor: Beth Ruggiero York
Beth Teaches:
She is author of Fun in the Dark: A Guide to Successful Night Photography, and a photo workshop instructor for Arizona Highways Photo Workshops. You can purchase her book here. You can see details of her upcoming workshops at http://www.ahpw.org/workshops/.


