What is an appropriate resolution to print your images? How many “pixels-per-inch” do you really need? The answer is really tied to another question, “How good is your eye-sight?”
It stands to reason that the closer you are to something the better you can see any fine detail. And, you likely wouldn’t argue that for large prints, most viewers will tend to step back to view them. So, it stands to reason, since we will tend to hold small prints close to view them and stand back to view large prints, it will be worthwhile to produce small prints at high resolution. But, creating large prints at that same high-resolution with will be somewhat pointless; if you can’t see it, why print it?
Large prints require lower resolution than smaller prints to appear equally sharp at normal viewing distances. A “normal viewing distance” is about twice the length of the print diagonal. When we do the math, we can calculate a set of preferred image resolution settings for prints of different sizes. I cover this in more detail in my course “The Art of Printing and Selling Your Art”, but suffice it to say, if you are shooting with a camera of between, say, 20 – 24 megapixels, and your print resolution falls between 180 and 480 pixels-per-inch at your chosen print size, you’re good to go.
Now, for years, a contrary idea has been floating around: “You should only print at 360 ppi!”, or “You should only print at 300 ppi!” So, who is right? Is it different resolutions for different print sizes, or the same for all sizes? Turns out, they’re both right, and they’re both wrong. Read on.
So how do you find the resolution of your print?
In Photoshop, open the Image Size dialog (Image>Image Size) and uncheck the “Resample” checkbox. Enter the dimensions of your intended print in the width and/or height fields.
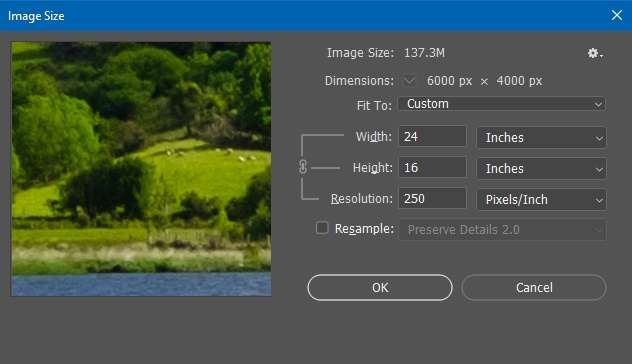
If the resulting number in the “resolution” field is between 180 and 480, you have enough pixels to make a finely detailed image.
If you are printing from Lightroom: in the Print module, first layout the print at your desired size. Then deselect the “Print Resolution” checkbox in the “Print Job” tab and look in the upper left corner of the print layout window. The Dimensions of your print and print resolution are displayed there. If you are between 180 and 480 ppi: you’re good.
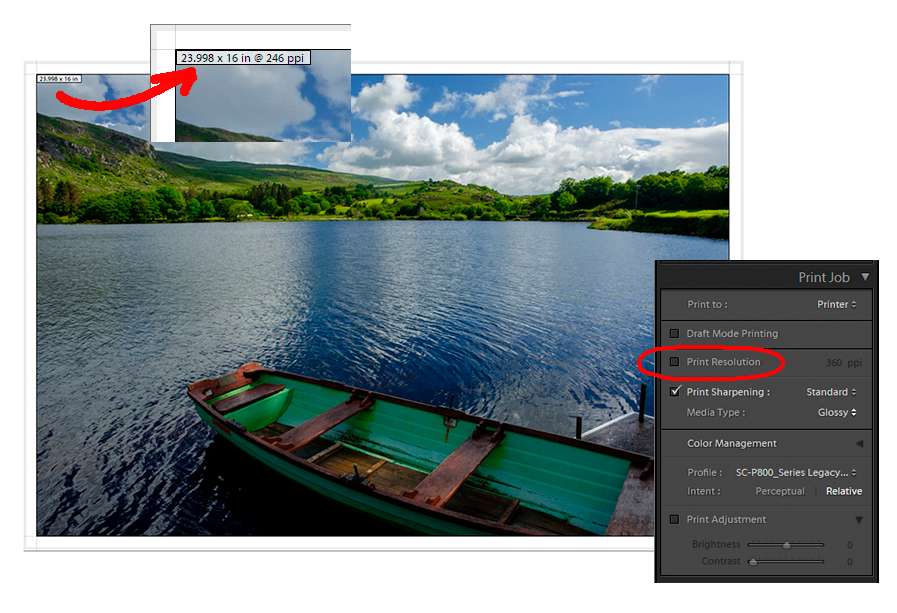
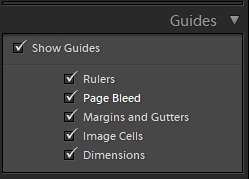
(Note: if you don’t see your print size and resolution in the upper left corner of the screen, open the “Guides” tab in the Print module and check the box marked “Dimensions”)
But wait, there’s more!
To understand the next step, I must digress for a moment and describe what happens when you connect your ink-jet printer to your computer and turn it on.
When you turn on your printer, it goes through a startup and self-test routine. If everything appears OK, it reports to your operating system (MacOS or Windows) saying in effect, “Hi! I am an Epson model xyz (or Canon, or …). I require image data at “X” resolution.”
For Epson printers, X = 360 ppi, for Canon printers, X = 300 ppi.
Now whenever you send an image to your printer, if your print resolution is not exactly 360 ppi (or 300 ppi for Canon), the print pipeline of your operating system will interpolate the image data to 360 ppi (300 ppi for Canon). The problem is that your OS uses a kludgy interpolation method that is not nearly as nice as that which Photoshop or Lightroom can do on their own.

So, for this reason and this reason alone, in Photoshop first determine if you have sufficient “native” pixels in your image file to print at an appropriate resolution for the size of your print — deselect the “Resample” box and ensure you are between 180 and 480 ppi, then re-select the “Resample” box, and set the resolution to 360 for Epson, or 300 for a Canon. If you don’t set it here, your operating system will do it for you anyway, and we don’t want that to happen since your print quality may suffer.
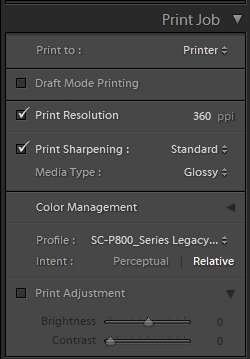
Back in Lightroom: once you determine you have sufficient native pixels for your intended print size, re-check the “Print Resolution” box in the Print Job tab and set the resolution to 360ppi (300 for Canon)
There is a special case when the Image Size dialog ends up with a resolution greater than 360 ppi with some current generation printers; but I will leave that for the course.
– BPSOP Instructor: Mark English
Mark Teaches:
The Art of Printing & Selling Your Art
After the Click: Refining Your Vision in Lightroom & Camera Raw


