Shooting at High Noon

landscape_photo_tipWhen we all start out on our photography adventure one of the first lessons we learn is what time of day to shoot and the advice is always early morning or late afternoon light is always the best times to shoot for it is when the light is at it’s least harshest and will give more vivid colors and you won’t have to deal with harsh contrasts or blown out highlights. I can’t stress this enough that indeed that is always the number one rule I follow but as you know, sometimes rules are made to be broken and here’s why.

BPSOP_wildlife

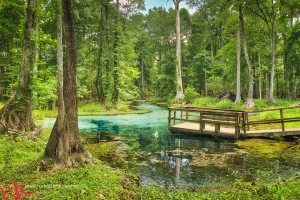
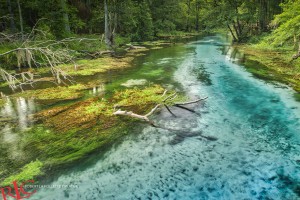
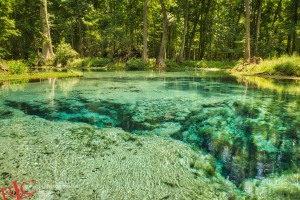
Midday sun is at it’s harshest for it is directly overhead and makes it difficult to control your exposures due to that intense light for it produces some deep contrasts and of course you can and will get blown out highlights. However, there are situations when you want this overhead harsh light and it’s the time when I take advantage of all that intense light when I go out to take landscape photographs of truly magical places when photographing Florida Springs.

High_noon
The direct overhead light is the ideal time to illuminate what lies below the water which are the springs and that light will bring out the vivid hues of blue, greens and aqua colors as well as show the depth and detail of the springs that can be anywhere as a few feet below the surface to sometimes 20-60 feet below.


Learn_photography_online
Since the light is directly overhead it can penetrate the water, reveal those colors and light up the cracks in the earth where the water below makes it way to the surface that is 100% pure and simply breath-taking to not only witness, but to also photograph.


Outdoor_Photography
If I were to follow the rule of early morning or late day, the sun would be at too much of an angle thus not resulting in the amount of color and details as photographing at high
noon when the sun is directly overhead. It’s also during this time the shadows of the trees surrounding the springs don’t cast a a shadow across the water as they would when the sun is lower on the horizon.


BPSOP_wildlife
Also to note you will want to use your tripod of course to help compose your photographs for the rules of composition most certainly applies here as also you will want to use circular polarizer as well. Since I am shooting on a tripod I also set my camera on Aperture Priority mode and shoot at small aperture to capture all the fine detail in the composition and my exposure readings are taken from the green of the surrounding trees to ensure a perfect exposure each and every time.


Landscape_BPSOP
A circular polarizer works just as perhaps you may have a pair of polarized sunglasses where it will help cut through the glare on the water’s surface to reject any possibility of glare so you can capture what lies below the waters surface. It also serves as a nice tool to increase the colors of those blues and greens to help capture some truly amazing landscape opportunities.


online_Photo_School_learn
The end result during this time is truly amazing and taking your time to work your subject from different angles and heights there is almost an endless amount of possibilities and you’ll be glad you broke the rule (and no, you won’t get into trouble!). Enjoy!


Robert La Follette – BPSOP Instructor


Robert Teaches: Wildlife Photography


“I just wanted to thank you for another wonderful class. I have to confess that each week when I read the new assignment, my first reaction was mild panic and a deep certainty that I would not be able to produce anything worthwhile that fit within the parameters you had set. But before I knew it, the ideas started to flow, and I quickly became obsessed (no, that isn’t too strong a word!) with exploring the possibilities. I can honestly say that the photos I produced in response to your assignments are among my favorites. Thanks for bringing out a creative side I didn’t know I had!”

Barbara Geiger
Understanding Color

“Thank you so very much for this course! It’s allowed me to take the blinders off and present my images for what I want them to be without being a slave to the “reality” of the camera. I would also add that in conjunction with your printing course, this has been the most useful course I’ve ever taken. Your notes are more than comprehensive and your comments and critiques are direct, clear, and always directed to the improvement of the art.”

Bill
After the click

” I want to thank you for this class and for your patience and availability to answer all of my questions. I have learned very much through this class. I have used LR in the past, but mostly for editing images. I now have a better grasp in the organization of my images, an even better understanding of editing images, and an understanding of the value of presets. I still have a lot to learn, but this has put me on the road to be able to improve my photography. Again, thank you! ”

Dale Yates
Lightroom Quickstart

Classes Starting Soon!

Understanding Exposure and Your DSLR

Instructor: Bryan Peterson Duration: 6 Weeks Cost: US$169 Without que…

Wireless Flash Techniques for Outdoor & Nature Photographers

Instructor: Rick Burress Duration: 4 Weeks Cost: US$129 Learn Photoshop…

The Real Photoshop Course

Instructor: Charlie Borland Duration: 4 Weeks Cost: US$129 Are you a …

The Ultimate Guide to Adobe Bridge CC

Instructor: Rick Burress Duration: 4 Weeks Cost: US$129 The Anti-Catalo…

After the Click – Refining Your Vision in Lightroom & Camera Raw

Instructor: Mark English Duration: 4 Weeks Cost: US$129 Why do some ima…

Editing in Adobe Camera Raw

Instructor: Rick Burress Duration: 4 Weeks Cost: US$129 If you love pho…

Exploring Adobe Photoshop Lightroom & Lightroom for Mobile

Instructor: Holly Higbee-Jansen Duration: 4 Weeks Cost: US$129 In this …

Lightroom Quick Start

Instructor: Holly Higbee-Jansen Duration: 4 Weeks Cost: US$129 Do you w…

Mastering Apple Photos

Instructor: Jon Canfield Duration: 4 Weeks Cost: US$129 Mastering Apple…

Luminar Essentials

Instructor: Jon Canfield Duration: 4 Weeks Cost: US$129 Luminar is an …

The Art of Printing and Selling Your Art

Instructor: Mark English Duration: 2 Weeks Cost: US$76 The print is the…

The 50 Most Useful Tips in Photoshop CC and Photoshop Elements

Instructor: Roger Morin Duration: 2 Weeks Cost: US$76 This two-week cla…

50 MORE Photoshop Tips & Tricks

Instructor: Roger Morin Duration: 2 Weeks Cost: US$76 This two-week cla…
Translate »