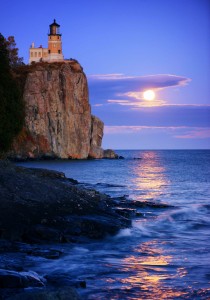
“Split Rock Lighthouse Full Moon” By: Mike Shaw
Heard about the Supermoon this weekend? A Supermoon occurs whenever the moon is BOTH full AND as close to the earth as it ever gets during its monthly orbit; technically known as a perigee full moon. And this weekend’s is the biggest Supermoon in decades; the next time it’ll be this close won’t be until 2034.
Here’s how to observe and photograph it. Your best time to shoot it will be on Sunday night, November 13, 2016, or Monday morning, November 14, 2016. Why? Simply because that’s when the moon sits near the horizon during twilight, and its brightness most closely matches that of its surroundings. These are the best times to get a correct single exposure of the moon, the sky and the foreground.
Here’s what you need:
- Clear skies
- Good view of the northeastern horizon (Sunday evening) or northwestern horizon (Monday morning)
- Camera with manual focus/exposure capability
- Best lens is a mid-long telephoto (70 – 200+ mm) lens to really emphasize the moon
- Tripod
- Remote shutter release/self-timer to avoid camera shake
- Mirror lockup is a good idea, if available (not necessary)
- ISO 400 – 1600
- Aperture – Mid range – f/8, f/11 should suffice
- White balance – 4750K is a good place to start.
- Shutter speed: Determined by your composition/setting; 1/125 – 1/400 sec is a good range to start
- Empty memory card and spare batteries!
- Headlamp preferably with red light, or red plastic taped over a white light
- Comfortable chair!
During the day, select your viewing position. Use of The Photographer’s Ephemeris (http://photoephemeris.com/i-ve-planned-my-supermoon-eclipse-shot-what-could-possibly-go-wrong) and PhotoPills (http://www.photopills.com) are great tools.
About an hour before sunset or sunrise, arrive at the site and set up your tripod. Pre-focus on the horizon; set your camera’s focus on manual and leave it there. Use gaffer’s tape to hold this focus in place for the evening if you desire. Securely lock down your camera, being careful not to disturb the focus.
As sunset and twilight progress, carefully monitor the horizon for the first signs of moonrise. Be prepared to move your tripod as needed; this can get exciting! During sunrise, it’s much easier to estimate where the moon will actually set since you can see it. In the northern hemisphere, as the moon rises, it will move upwards and to your right; as it sets, downwards and to the right. In the southern hemisphere, it will move upwards and to your left; as it sets, downwards and to the left.
Once you begin exposing, be sure to monitor the histograms of your images and adjust the composition and exposure settings as needed. The overall scene brightness will be changing very rapidly during this time of twilight, so you will likely be making significant changes to your shutter speed. You may find exposure bracketing to be a good idea – simply make several exposures in quick succession and at shutter speeds that differ by one exposure stop. For example: five exposures at: 1/500, 1/250, 1/125, 1/60 and 1/30 sec.
After you return home, download your new images, select your favorite and share online! Be sure to tag your images #BPSOPSupermoon…good luck and clear skies!
– BPSOP Instructor: Mike Shaw
Mike Teaches:


