Watching the Moon Through the Window

Few spectacles are as impressive as the rising of the full Harvest moon. It’s just incredible!
moon-arch-1-2

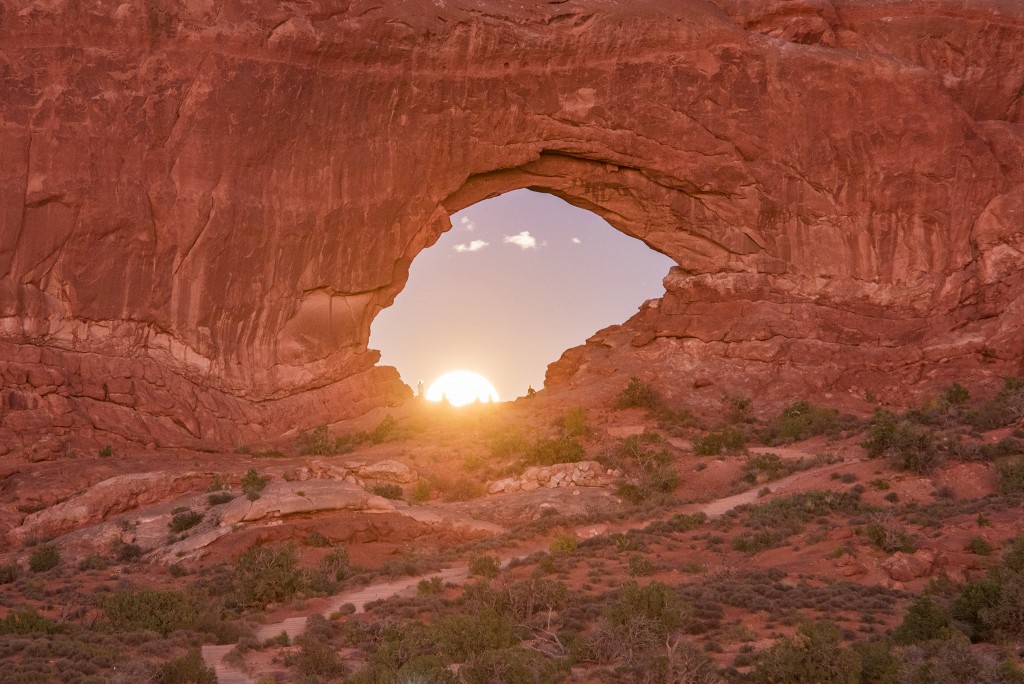
This image shows the September, 2016 Harvest Moon rising through the North
Window in Arches National Park. If you look closely, you can even see other people enjoying the show from inside the window.

Lining up the rising or setting moon with the foreground subject of your choice is straightforward with a little planning. Here’s the basic approach:

1) Find the date of the full moon. The evening of the day before can be even better, as well as the morning of the day after. At these times, the moon is rising/setting during civil twilight, when its brightness more closely matches the foreground. This means it’s easier to capture the full moon in a single exposure. On the day of the full moon, you will often want to bracket your shot, in other words, make several intentionally under and over exposed images to blend subsequently in post-processing.

2) Determine the azimuth (compass direction) of the moon as it is rising or setting on the date you’ll be shooting.

3) Find a cool foreground subject, like the rock window seen here, to line up with the moon.

4) Use a planning app like PhotoPills, The Photographer’s Ephemeris or PlanIt! to decide where you should put yourself to line up the foreground subject with the moon. You will do this by using a compass to find a spot at the right azimuth – in this case, around 94° from true north.

Pro Tip 1: The further you are away from your foreground subject, the smaller it will be and the bigger the moon will appear relative to it.

Pro Tip 2: The moon rises at an angle, so you will want to get the azimuth of the moon when it is around say 5° above the horizon, depending on the height of your foreground subject. The planning apps make this easy.

5) Decide what focal length lens you want to use. Here, I used a 200 mm lens with a 1.7X teleconverter to really isolate the moon and its surroundings. The actual focal length used was 220 mm.

6) Figure out the aperture you need to get the depth of field so everything is in focus.

7) With a shutter speed no longer than say 1 – 2 seconds to keep the (moving) moon sharp, decide what ISO you should use. Here is a summary of the exposure settings for this shot:

1600 ISO | f/8 | 1.6 sec

8) If time permits, try an in-field day scouting recon mission to see how everything looks.

9) Finally, get out there at least an hour ahead of time to allow yourself plenty of time to set up. Use a cable release, mirror lockup, hang a bag from your tripod for stability, and get ready for some excitement once the moon starts to appear! Remember, the moon will totally clear the horizon in under 4 minutes so you’ve got to be prepared!

– BPSOP Instructor Mike Shaw

Mike Teaches:

Star Trails & Night Photography 

“I just wanted to thank you for another wonderful class. I have to confess that each week when I read the new assignment, my first reaction was mild panic and a deep certainty that I would not be able to produce anything worthwhile that fit within the parameters you had set. But before I knew it, the ideas started to flow, and I quickly became obsessed (no, that isn’t too strong a word!) with exploring the possibilities. I can honestly say that the photos I produced in response to your assignments are among my favorites. Thanks for bringing out a creative side I didn’t know I had!”

Barbara Geiger
Understanding Color

“Thank you so very much for this course! It’s allowed me to take the blinders off and present my images for what I want them to be without being a slave to the “reality” of the camera. I would also add that in conjunction with your printing course, this has been the most useful course I’ve ever taken. Your notes are more than comprehensive and your comments and critiques are direct, clear, and always directed to the improvement of the art.”

Bill
After the click

” I want to thank you for this class and for your patience and availability to answer all of my questions. I have learned very much through this class. I have used LR in the past, but mostly for editing images. I now have a better grasp in the organization of my images, an even better understanding of editing images, and an understanding of the value of presets. I still have a lot to learn, but this has put me on the road to be able to improve my photography. Again, thank you! ”

Dale Yates
Lightroom Quickstart

Classes Starting Soon!

Understanding Exposure and Your DSLR

Instructor: Bryan Peterson Duration: 6 Weeks Cost: US$169 Without que…

Wireless Flash Techniques for Outdoor & Nature Photographers

Instructor: Rick Burress Duration: 4 Weeks Cost: US$129 Learn Photoshop…

The Real Photoshop Course

Instructor: Charlie Borland Duration: 4 Weeks Cost: US$129 Are you a …

The Ultimate Guide to Adobe Bridge CC

Instructor: Rick Burress Duration: 4 Weeks Cost: US$129 The Anti-Catalo…

After the Click – Refining Your Vision in Lightroom & Camera Raw

Instructor: Mark English Duration: 4 Weeks Cost: US$129 Why do some ima…

Editing in Adobe Camera Raw

Instructor: Rick Burress Duration: 4 Weeks Cost: US$129 If you love pho…

Exploring Adobe Photoshop Lightroom & Lightroom for Mobile

Instructor: Holly Higbee-Jansen Duration: 4 Weeks Cost: US$129 In this …

Lightroom Quick Start

Instructor: Holly Higbee-Jansen Duration: 4 Weeks Cost: US$129 Do you w…

Mastering Apple Photos

Instructor: Jon Canfield Duration: 4 Weeks Cost: US$129 Mastering Apple…

Luminar Essentials

Instructor: Jon Canfield Duration: 4 Weeks Cost: US$129 Luminar is an …

The Art of Printing and Selling Your Art

Instructor: Mark English Duration: 2 Weeks Cost: US$76 The print is the…

The 50 Most Useful Tips in Photoshop CC and Photoshop Elements

Instructor: Roger Morin Duration: 2 Weeks Cost: US$76 This two-week cla…

50 MORE Photoshop Tips & Tricks

Instructor: Roger Morin Duration: 2 Weeks Cost: US$76 This two-week cla…
Translate »