 You enjoy travel photography, and like photographing people in different culture and places. However, sometimes, you are just lack of courage to approach strangers, or just too shy to raise your camera towards your intended subject, fearing the rejection. Believe me, as travel photographers, we all have the same fear sometime during our journey.
Here comes the good news: with proper techniques and practice, it is much easier to overcome such fear, and get the shot you like.
Tip 1: Praise the subject.
If you feel that something special about subject and you really like it, just tell your subject straight, e.g. He/She has a very attractive facial feature or “It looks likes a nice classic painting with you against this beautiful backdrop, can you take your picture?” Most people feel good and will agree to be photographed when others praise them.
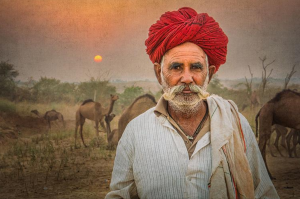
During a photo tour at Pushkar Camel Fair, India, I approached this camel trader, telling him that he looks very good with his camels and sunset in background, and love to take a picture of him. He gladly accepted and let me squeeze a couple of shots.
Tip 2: Always smile to your subject.
“Smile, say cheese”, you must hear this sentence thousand times in picture-taken occasions. There is scientific reason for that: people naturally have positive and friendly response while smiled at. It’s deeply encoded in human psyche across cultures. This will certainly apply to street photography. Smiling to your subjects will definitely lower his/her psychological barrier. However, some people may say, “I was born with a poker face or people tell me that my smile looks like smirk”, then, you need practice more. A cold face will only ensure rejection.
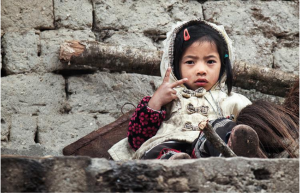
During Yunnan, China photo tour, we walked through a village, I found this lovely girl sitting at second floor around a corner, I immediately smiled at her with eye contact, and raise the camera to ask her for photo with a hand gesture, she responded with the peace sign finger pose, click, what a perfect moment.
Tip 3: Find the right subject.
A travel/street photographer must learn to read/assess people, and find the right subject. The following subjects are easier to approach and take picture of:
- People with smile, or looks kind and happy.
- People with relaxed body gesture, slowly walking, or casually looking around.
- A couple displaying love, affection of each other.
With practice, your success rate will greatly improve. You will be more confident to approach people, and get the shot.
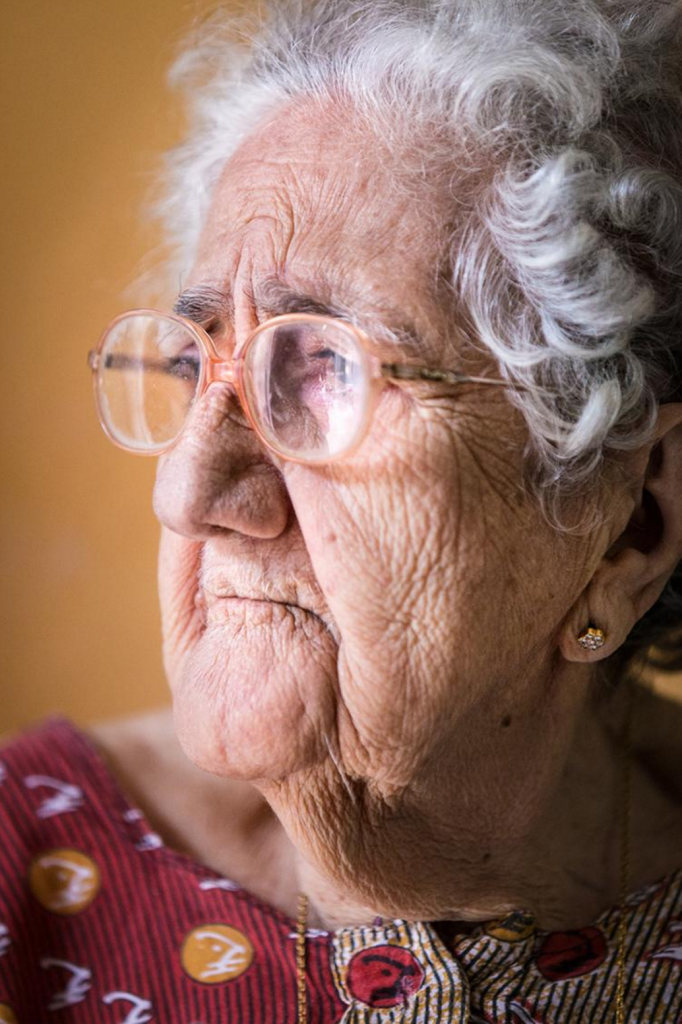
During Kerala, India photo tour, we visited Jew town in Cochin, after the tour of the historic synagogue, I found this Jewish lady sitting casually at a storefront nearby, with her relaxed gesture, I feel she is quite approachable. I kindly ask her to be photographed, she immediately accepted and followed my direction to face the light from the doorway. This is the portrait taken with 70-200 lens at 200mm F2.8.
Tip 4: Find a good buddy, if you’re new to street photography.
For street photo beginners, it’s a good idea to find an experienced buddy, shooting together as a team. It will reduce your nervousness. Sometimes, you can even use your buddy as an excuse to approach intended subject. If you’re male, it helps to get a female buddy. Usually, people are less defensive when approached by a female photographer. However, try to avoid shooting with more than one buddy, the subject will naturally feel pressured when facing 3 or more people.
Tip 5: Relax, don’t fear the rejection.
Let me say this straight at your face: Rejection is the integral part of street photography, and it is impossible to be rejection free. With all proper care and techniques, you will still be rejected for sure in some occasions. Just relax and accept it, and keep remind of yourself: This is not my fault or mistake. It’s ok to be rejected and move on, it’s just part of the life to be a street photographer.
Happy Shooting!
– BPSOP Instructor – William Yu
William Teaches:


